Git Tutorial 5 - Branch and Merge
内容导读
互联网集市收集整理的这篇技术教程文章主要介绍了Git Tutorial 5 - Branch and Merge,小编现在分享给大家,供广大互联网技能从业者学习和参考。文章包含5436字,纯文字阅读大概需要8分钟。
内容图文

Branch is a very important concept in Git and doing branch is one of the greatest features. It plays like the concept of context when you‘re working on it. You can have multiple branches in your repo, and in a time you‘re working in only one of them. It‘s easy to forth or switch back between your branches. When you switch into a branch, Git will replace your working directory with the snapshot of the last commit on that branch for you.
As we‘ve seen in Git Tutorial 1, Git created a branch called ‘master‘ for me by default when I used command git init to create a repo. Since your teammates or others who‘re working with you or interested at your project will always create branch from master. You‘d better make master stable and clean. So please don‘t try to do lots of commits directly to branch master to mess it. Instead, to merge it.
Let‘s create my second branch(you know master is the first).
git branch dev
git branch
git branch -v
The first line command creates a new branch called "dev". Since I am currently working in branch master (this is the only one branch I have before I create branch dev.) the new branch dev was created at the last commit of branch master.
The second line command will list out the local branches you have now.
The third line command is similar to the second one but with one more option "-v" which will show you not only the local branches you have but also the last commits on each of them.
See the screen as the results shown in my terminal
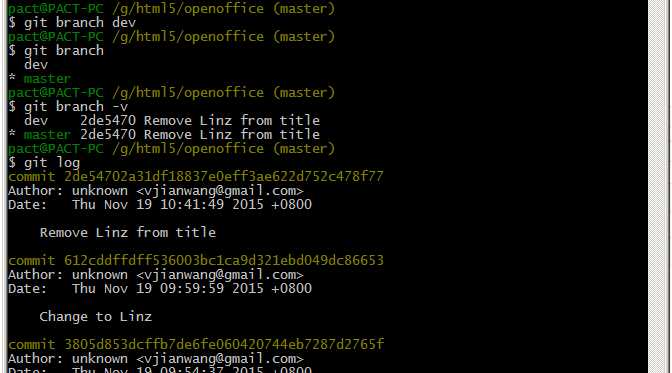
figure 5.1
It displays there are 2 branches in my local repo. The branch in green preceded by a star(*) is the current branch I am working in. Since I just create new branch dev from master, they have the same last commit ID (2de5470 in this example, and the command git log proves that).
Let‘s switch to new branch and do some changes. That‘s typical thing a developer always does after creating a new branch.
Before switch to new branch I‘m working in branch master (easy to know that by seeing the path of working directory which is followed by branch name in the screen.).
Run the command git checkout <branchname>
git checkout dev

figure 5.2
Look at the prompt message in the screen above. The path of working directory is followed by string "(dev)" which indicates you‘re currently working in branch dev rather than master.
Don‘t forget that I said the new branch dev was forked on master, which means they keep the same content of each file completely. Now I‘m going to modify the content of a file in branch dev, and see if there‘s any change to the file in another branch.
Please mind your attention on the line No.5 in openofficetemplates_net.html which I‘m going to modify with a letter.
Before I modify openofficetemplates_net.html... see the picture below
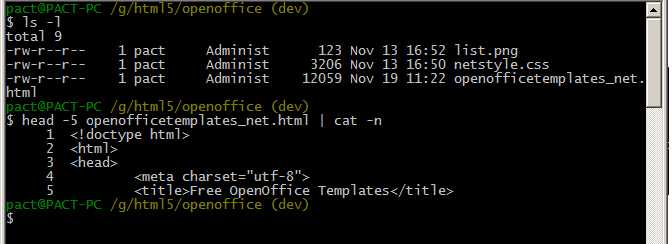
figure 5.3
After I modified openofficetemplates_net.html... see the picture below.
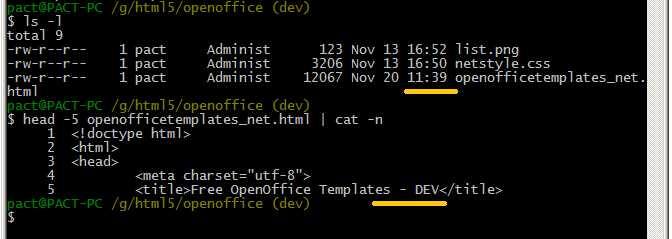
figure 5.4
The change I made in openofficetemplates_net.html is on the yellow. The modified time of it has also been updated to a later timestamp.
Next I‘m going to commit the change to branch dev in local repo.
git add --all
git commit -m "Change element title"
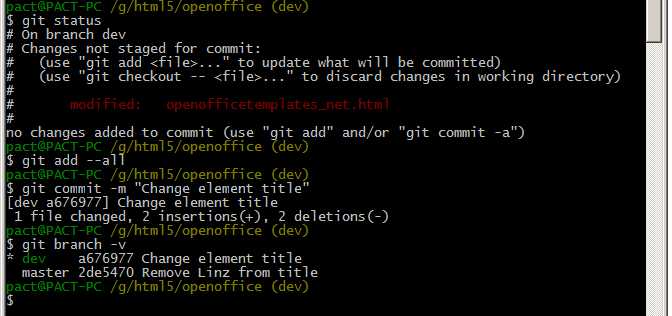
figure 5.5
The screen shows me the commit ID for "Change element title" is a676977. That‘s a new commit to dev. Comparing this with the one in figure 5.1, it‘s easy to realize that the last commit ID of dev at this moment has updated to a676977. The return value of the following command "git branch -v" in the screen has proved that.
Take a look at openofficetemplates_net.html, the change‘s still here. Branch dev is clean now as nothing in staging area.
What do you think I should get if I switch currently working branch from dev to master? Just do it.
git checkout master
ls -l
head -5 openofficetemplates_net.html | cat -n
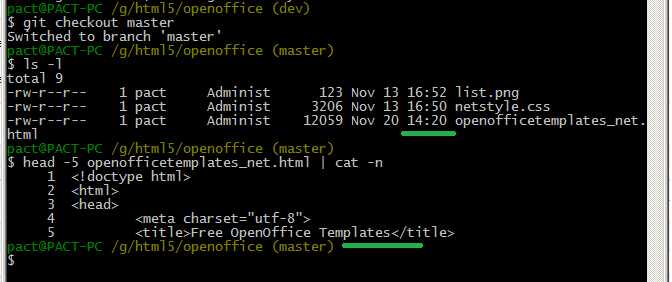
figure 5.6
Please mind your attention at the place on the green. The change to openofficetemplates_net.html has been rolled back and the modified time of it has been updated to a later timestamp, which means Git automatically modified openofficetemplates_net.html back to the snapshot of its last commit when I switched to branch ‘master‘. That‘s exactly what happen to the switch between branches.
Thinking further, we can conclude that each time you switch to branch X Git will automatically update files that‘re different from the snapshot of X‘s last commit back to the snapshot of X‘s last commit. That‘s why we should care about the last commit ID of each branch, that‘s also why Git provides us the command ‘git branch -v‘ to list out all of branches you have and their corresponding last commit ID.
Evently I think branch dev is stable and clean, I want to apply the change to branch master. Don‘t try to add and commit to master directly because that will mess it. We should merge it if we want to apply new changes to master. Before running merge command you must make sure you are working in master otherwise you have to switch to it.
git checkout master
git merge dev
See what we got in my terminal
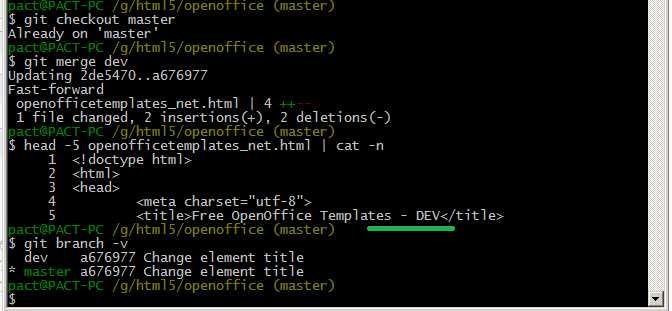
figure 5.7
The change in dev has been merged to master and both of branches now have the same last commit ID (a676977 here).
Finally if you don‘t need branch dev anymore since it‘s been merged to master, you can use command to delete it.
git branch -D dev
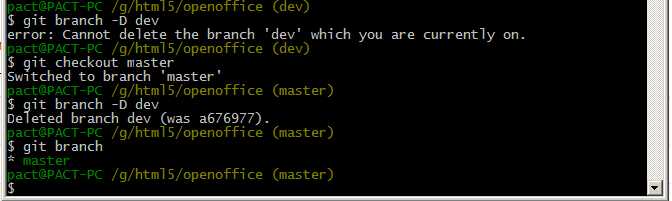
figure 5.8
Please make sure you‘re not currently on the branch dev that you‘re going to delete, otherwise you‘ll got error as picture shown above.
原文:http://www.cnblogs.com/vjianwang/p/gittutorial5.html
内容总结
以上是互联网集市为您收集整理的Git Tutorial 5 - Branch and Merge全部内容,希望文章能够帮你解决Git Tutorial 5 - Branch and Merge所遇到的程序开发问题。 如果觉得互联网集市技术教程内容还不错,欢迎将互联网集市网站推荐给程序员好友。
内容备注
版权声明:本文内容由互联网用户自发贡献,该文观点与技术仅代表作者本人。本站仅提供信息存储空间服务,不拥有所有权,不承担相关法律责任。如发现本站有涉嫌侵权/违法违规的内容, 请发送邮件至 gblab@vip.qq.com 举报,一经查实,本站将立刻删除。
内容手机端
扫描二维码推送至手机访问。