Android自定义组合控件--底部多按钮切换
内容导读
互联网集市收集整理的这篇技术教程文章主要介绍了Android自定义组合控件--底部多按钮切换,小编现在分享给大家,供广大互联网技能从业者学习和参考。文章包含11036字,纯文字阅读大概需要16分钟。
内容图文

效果图: 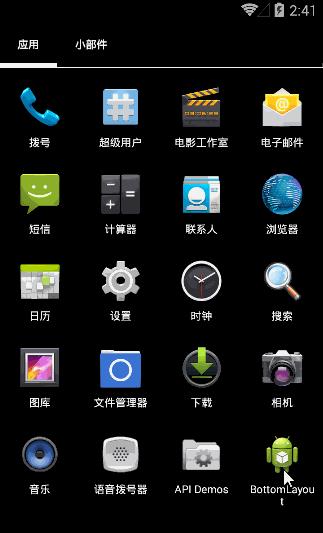
现在市场上大多数软件都是类似于上面的结构,底部有几个按钮用于切换到不同的界面。基于OOP思想,我想把下面的一整块布局封装成一个类,也就是我们的自定义组合控件—底部多按钮切换布局,我把它叫做BottomLayout
看上面的布局,几个按钮横向排列,我们先看一下布局 
最外面LinearLayout 方向 horizontal,然后5个weight相同的RelativeLayout,每个RelativeLayout里面有一个Button(用了显示选中状态)个ImageView(用来显示红点)
                <?xml version="1.0" encoding="utf-8"?>
                <LinearLayoutxmlns:android="http://schemas.android.com/apk/res/android"android:layout_width="match_parent"android:layout_height="50dp"android:orientation="horizontal" >
                <RelativeLayout
android:id="@+id/rl_home"android:layout_width="0dp"android:layout_height="match_parent"android:layout_weight="1"android:clickable="true" >
                <ImageView
android:id="@+id/iv_new_home"android:layout_width="10dp"android:layout_height="10dp"android:layout_alignParentRight="true"android:layout_margin="3dp"android:src="@drawable/read_circle" />
                <Button
android:id="@+id/btn_home"android:layout_width="50dp"android:layout_height="50dp"android:layout_centerInParent="true"android:background="@drawable/tab_home_selector"android:clickable="false" />
                </RelativeLayout>
                <RelativeLayout
android:id="@+id/rl_encounter"android:layout_width="0dp"android:layout_height="match_parent"android:layout_weight="1"android:clickable="true" >
                <Button
android:id="@+id/btn_encounter"android:layout_width="50dp"android:layout_height="50dp"android:layout_centerInParent="true"android:background="@drawable/tab_enconter_selector"android:clickable="false" />
                </RelativeLayout>
                <RelativeLayout
android:id="@+id/rl_community"android:layout_width="0dp"android:layout_height="match_parent"android:layout_weight="1"android:clickable="true" >
                <ImageView
android:id="@+id/iv_new_community"android:layout_width="10dp"android:layout_height="10dp"android:layout_alignParentRight="true"android:layout_margin="3dp"android:src="@drawable/read_circle" />
                <Button
android:id="@+id/btn_community"android:layout_width="50dp"android:layout_height="50dp"android:layout_centerInParent="true"android:background="@drawable/tab_community_selector"android:clickable="false" />
                </RelativeLayout>
                <RelativeLayout
android:id="@+id/rl_message"android:layout_width="0dp"android:layout_height="match_parent"android:layout_weight="1"android:clickable="true" >
                <ImageView
android:id="@+id/iv_new_message"android:layout_width="10dp"android:layout_height="10dp"android:layout_alignParentRight="true"android:layout_margin="3dp"android:src="@drawable/read_circle" />
                <Button
android:id="@+id/btn_message"android:layout_width="50dp"android:layout_height="50dp"android:layout_centerInParent="true"android:background="@drawable/tab_message_selector"android:clickable="false" />
                </RelativeLayout>
                <RelativeLayout
android:id="@+id/rl_user"android:layout_width="0dp"android:layout_height="match_parent"android:layout_weight="1"android:clickable="true" >
                <Button
android:id="@+id/btn_user"android:layout_width="50dp"android:layout_height="50dp"android:layout_centerInParent="true"android:background="@drawable/tab_user_selector"android:clickable="false" />
                </RelativeLayout>
                </LinearLayout>
下面就是代码了
                package comzyh.bottomlayout;

import android.content.Context;
import android.util.AttributeSet;
import android.view.LayoutInflater;
import android.view.View;
import android.view.View.OnClickListener;
import android.widget.Button;
import android.widget.LinearLayout;

/**
 * 主界面底部的按钮切换布局
 *
 * @version 1.0
 * @author zyh
 */publicclassBottomLayoutextendsLinearLayoutimplementsOnClickListener {publicBottomLayout(Context context, AttributeSet attrs, int defStyleAttr) {
        super(context, attrs, defStyleAttr);
        init(context);
    }

    publicBottomLayout(Context context, AttributeSet attrs) {
        this(context, attrs, 0);
    }

    publicBottomLayout(Context context) {
        this(context, null, 0);
    }

    private Context context;
    private View rl_home, rl_encounter, rl_community, rl_message, rl_user;
    private View iv_new_message, iv_new_home;
    private Button btn_home, btn_encounter, btn_community, btn_message, btn_user;
    private OnItemClickListener listener;
    privateint currentPosition = 0;

    /**
     * 初始化
     *
     * @version 1.0
     * @author zyh
     * @param context
     */privatevoidinit(Context context) {
        this.context = context;
        LayoutInflater.from(context).inflate(R.layout.layout_bottom, this);
        // 5块等分的布局
        rl_home = findViewById(R.id.rl_home);
        rl_encounter = findViewById(R.id.rl_encounter);
        rl_community = findViewById(R.id.rl_community);
        rl_message = findViewById(R.id.rl_message);
        rl_user = findViewById(R.id.rl_user);

        // 5个按钮
        btn_home = (Button) findViewById(R.id.btn_home);
        btn_encounter = (Button) findViewById(R.id.btn_encounter);
        btn_community = (Button) findViewById(R.id.btn_community);
        btn_message = (Button) findViewById(R.id.btn_message);
        btn_user = (Button) findViewById(R.id.btn_user);

        // 小圆点
        iv_new_home = findViewById(R.id.iv_new_home);
        iv_new_message = findViewById(R.id.iv_new_message);

        hideHomeCircle();
        hideMessageCircle();
        changeButtonStatus(0);// 默认是位置0
        setListener();
    }

    /**
     * 显示首页按钮旁边的小红圈
     *
     * @version 1.0
     * @author zyh
     */publicvoidshowHomeCircle() {
        iv_new_home.setVisibility(View.VISIBLE);
    }

    /**
     * 隐藏首页按钮旁边的小红圈
     *
     * @version 1.0
     * @author zyh
     */publicvoidhideHomeCircle() {
        iv_new_home.setVisibility(View.GONE);
    }

    /**
     * 显示首页按钮旁边的小红圈
     *
     * @version 1.0
     * @author zyh
     */publicvoidshowMessageCircle() {
        iv_new_message.setVisibility(View.VISIBLE);
    }

    /**
     * 隐藏首页按钮旁边的小红圈
     *
     * @version 1.0
     * @author zyh
     */publicvoidhideMessageCircle() {
        iv_new_message.setVisibility(View.GONE);
    }

    /**
     * 为按钮设计按下监听
     *
     * @version 1.0
     * @author zyh
     */privatevoidsetListener() {
        rl_home.setOnClickListener(this);
        rl_encounter.setOnClickListener(this);
        rl_community.setOnClickListener(this);
        rl_message.setOnClickListener(this);
        rl_user.setOnClickListener(this);
    }

    /**
     * 提供给外部设置点击Item的接口
     *
     * @version 1.0
     * @author zyh
     * @param listener
     */publicvoidsetOnItemClickListener(OnItemClickListener listener) {
        this.listener = listener;
    }

    publicinterfaceOnItemClickListener {publicvoidonItemClick(int position);
    }

    @OverridepublicvoidonClick(View v) {
        currentPosition = 0;
        switch (v.getId()) {
            case R.id.rl_home:
                currentPosition = 0;
                break;
            case R.id.rl_encounter:
                currentPosition = 1;
                break;
            case R.id.rl_community:
                currentPosition = 2;
                break;
            case R.id.rl_message:
                currentPosition = 3;
                break;
            case R.id.rl_user:
                currentPosition = 4;
                break;
        }
        if (listener == null) {
            return;
        }
        listener.onItemClick(currentPosition);
        changeButtonStatus(currentPosition);
    }

    /**
     * 根据当前位置改变按钮选中状态
     *
     * @version 1.0
     * @author zyh
     * @param position
     */privatevoidchangeButtonStatus(int position) {
        btn_home.setSelected(position == 0);
        btn_encounter.setSelected(position == 1);
        btn_community.setSelected(position == 2);
        btn_message.setSelected(position == 3);
        btn_user.setSelected(position == 4);
    }
}
- 设置5个RelativeLayout为点击区域,防止有的地方点击没反应,设置到Button上(Button的background有可能变形)
- 封装Item点击的监听器
- 提供显示隐藏小圆点的方法
上面的布局可以进行一点优化 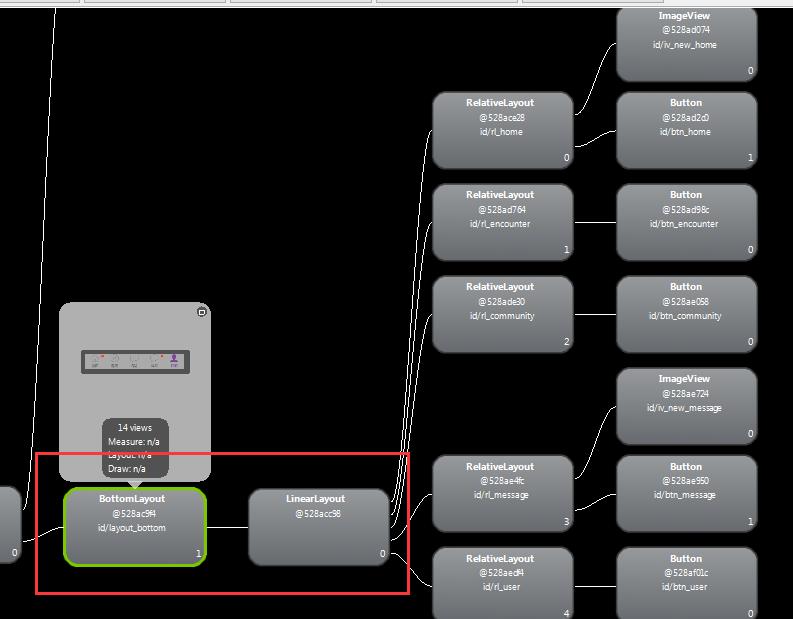
查看布局层次,发现中间多了一层LinearLayout,为什么呢?
因为我们的BottomLayout本身继承自LinearLayout,而且我们在代码中这样写的
LayoutInflater.from(context).inflate(R.layout.layout_bottom, this);
又添加了一层布局,怎么优化呢?
-
使用merge节点来消除冗余节点
所以布局文件我们可以写成下面<?xml version="1.0" encoding="utf-8"?> <mergexmlns:android="http://schemas.android.com/apk/res/android"android:gravity="center"android:orientation="horizontal" > <RelativeLayout android:id="@+id/rl_home"android:layout_width="0dp"android:layout_height="match_parent"android:layout_weight="1"android:clickable="true" > <ImageView android:id="@+id/iv_new_home"android:layout_width="10dp"android:layout_height="10dp"android:layout_alignParentRight="true"android:layout_margin="3dp"android:src="@drawable/read_circle" /> <Button android:id="@+id/btn_home"android:layout_width="50dp"android:layout_height="50dp"android:layout_centerInParent="true"android:background="@drawable/tab_home_selector"android:clickable="false" /> </RelativeLayout> <RelativeLayout android:id="@+id/rl_encounter"android:layout_width="0dp"android:layout_height="match_parent"android:layout_weight="1"android:clickable="true" > <Button android:id="@+id/btn_encounter"android:layout_width="50dp"android:layout_height="50dp"android:layout_centerInParent="true"android:background="@drawable/tab_enconter_selector"android:clickable="false" /> </RelativeLayout> <RelativeLayout android:id="@+id/rl_community"android:layout_width="0dp"android:layout_height="match_parent"android:layout_weight="1"android:clickable="true" > <Button android:id="@+id/btn_community"android:layout_width="50dp"android:layout_height="50dp"android:layout_centerInParent="true"android:background="@drawable/tab_community_selector"android:clickable="false" /> </RelativeLayout> <RelativeLayout android:id="@+id/rl_message"android:layout_width="0dp"android:layout_height="match_parent"android:layout_weight="1"android:clickable="true" > <ImageView android:id="@+id/iv_new_message"android:layout_width="10dp"android:layout_height="10dp"android:layout_alignParentRight="true"android:layout_margin="3dp"android:src="@drawable/read_circle" /> <Button android:id="@+id/btn_message"android:layout_width="50dp"android:layout_height="50dp"android:layout_centerInParent="true"android:background="@drawable/tab_message_selector"android:clickable="false" /> </RelativeLayout> <RelativeLayout android:id="@+id/rl_user"android:layout_width="0dp"android:layout_height="match_parent"android:layout_weight="1"android:clickable="true" > <Button android:id="@+id/btn_user"android:layout_width="50dp"android:layout_height="50dp"android:layout_centerInParent="true"android:background="@drawable/tab_user_selector"android:clickable="false" /> </RelativeLayout> </merge>
关于merge可以看我的这篇Android 视图优化merge标签分析
下面在主界面中
                <RelativeLayoutxmlns:android="http://schemas.android.com/apk/res/android"xmlns:tools="http://schemas.android.com/tools"android:layout_width="match_parent"android:layout_height="match_parent" >
                <TextView
android:layout_width="wrap_content"android:layout_height="wrap_content"android:text="@string/hello_world" />
                <comzyh.bottomlayout.BottomLayout
android:id="@+id/layout_bottom"android:layout_width="match_parent"android:layout_height="56dp"android:layout_alignParentBottom="true"android:background="@android:color/darker_gray" />
                </RelativeLayout>
使用自定义组合控件
                public

                    class
                    MainActivity
                    extends
                    Activity {
                private BottomLayout layout_bottom;

    @OverrideprotectedvoidonCreate(Bundle savedInstanceState) {
        super.onCreate(savedInstanceState);
        setContentView(R.layout.activity_main);
        layout_bottom = (BottomLayout) findViewById(R.id.layout_bottom);
        layout_bottom.setOnItemClickListener(new OnItemClickListener() {
            @OverridepublicvoidonItemClick(int position) {
                Toast.makeText(MainActivity.this, "点击了" + position, 0).show();
            }
        });

        new Handler().postDelayed(new Runnable() {
            publicvoidrun() {
                layout_bottom.showHomeCircle();
            }
        }, 5000);

        new Handler().postDelayed(new Runnable() {
            publicvoidrun() {
                layout_bottom.showMessageCircle();
            }
        }, 8000);
    }

}
原文:http://blog.csdn.net/hpu_zyh/article/details/43713187
内容总结
以上是互联网集市为您收集整理的Android自定义组合控件--底部多按钮切换全部内容,希望文章能够帮你解决Android自定义组合控件--底部多按钮切换所遇到的程序开发问题。 如果觉得互联网集市技术教程内容还不错,欢迎将互联网集市网站推荐给程序员好友。
内容备注
版权声明:本文内容由互联网用户自发贡献,该文观点与技术仅代表作者本人。本站仅提供信息存储空间服务,不拥有所有权,不承担相关法律责任。如发现本站有涉嫌侵权/违法违规的内容, 请发送邮件至 gblab@vip.qq.com 举报,一经查实,本站将立刻删除。
内容手机端
扫描二维码推送至手机访问。