首页 / 更多教程 / Selenium 高级应用
Selenium 高级应用
内容导读
互联网集市收集整理的这篇技术教程文章主要介绍了Selenium 高级应用,小编现在分享给大家,供广大互联网技能从业者学习和参考。文章包含7245字,纯文字阅读大概需要11分钟。
内容图文

对于这一段还蛮有感慨的,只想说,代码还是需要自己去敲的。
1. 改变用户代理
- import org.junit.AfterClass;
- import org.junit.BeforeClass;
- import org.junit.Test;
- import org.openqa.selenium.WebDriver;
- import org.openqa.selenium.firefox.FirefoxDriver;
- import org.openqa.selenium.firefox.FirefoxProfile;
- public class ProxyTest {
- static WebDriver driver;
- @BeforeClass
- public static void beforeClass(){
- //代理的IP和端口
- String proxyIP="192.168.12.0";
- int proxyPort=80;
- FirefoxProfile profile=new FirefoxProfile();
- //使用代理
- profile.setPreference("network.proxy.type", 1);
- //配置“HTTP代理:(N)”
- profile.setPreference("network.proxy.http", proxyIP);
- profile.setPreference("network.proxy.http_prot", proxyPort);
- //选中 “为所有协议使用相同代理(S)” 选框
- profile.setPreference("network.proxy.share_proxy_settings", true);
- //配置“不使用代理:(N)”文本框
- profile.setPreference("network.proxy.no_proxies_on", "localhost, 127.0.0.1");
- //以代理的方式启动火狐
- driver=new FirefoxDriver(profile);
- }
- @Test
- public void test() {
- driver.get("http://www.baidu.com");
- }
- @AfterClass
- public static void afterClass(){
- //driver.quit();
- }
- }
运行之后,在打开的火狐上查看代理设置(选项->高级->网络->连接->设置),显示如下:
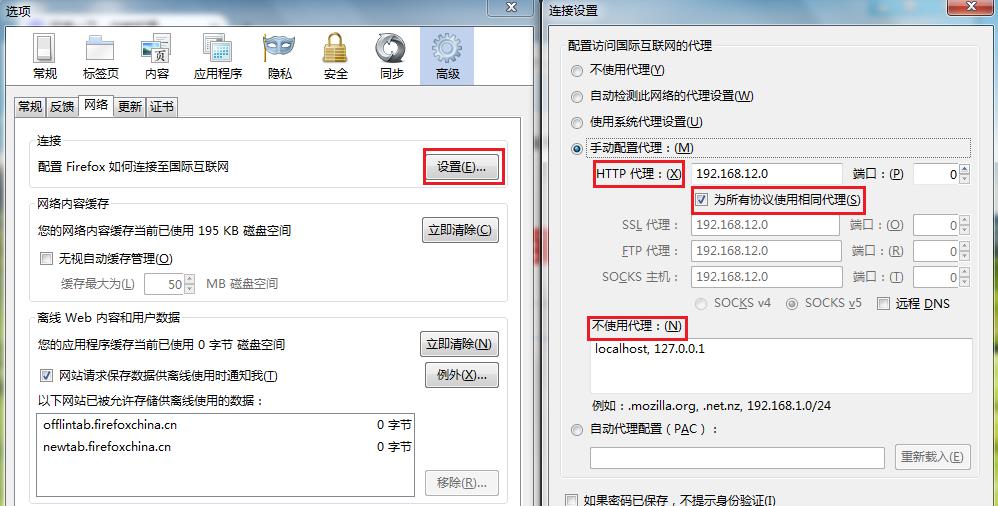
友情提示:测试完之后一定要改回来。默认是“使用系统代理设置”。
2.读取Cookies
增加cookie:
Cookie cookie = new Cookie("key", "value");
driver.manage().addCookie(cookie);
获取cookie的值:
Set<Cookie> allCookies = driver.manage().getCookies();
根据某个cookie的name获取cookie的值:
driver.manage().getCookieNamed("cookieName");
删除cookie:
driver.manage().deleteCookieNamed("CookieName");
driver.manage().deleteCookie(loadedCookie);
driver.manage().deleteAllCookies();
下面是一个例子:
- import java.util.Set;
- import org.junit.After;
- import org.junit.Before;
- import org.junit.Test;
- import org.openqa.selenium.Cookie;
- import org.openqa.selenium.WebDriver;
- import org.openqa.selenium.firefox.FirefoxDriver;
- public class CookieTest {
- WebDriver driver;
- @Before
- public void setUp() throws Exception {
- driver=new FirefoxDriver();
- }
- @After
- public void tearDown() throws Exception {
- driver.quit();
- }
- @Test
- public void test() {
- printCookie();
- //添加一个cookie
- Cookie cookie=new Cookie("s","selenium");
- driver.manage().addCookie(cookie);
- printCookie();
- //删除一个cookie
- driver.manage().deleteCookie(cookie); //driver.manage().deleteCookieNamed("s");也可以
- printCookie();
- }
- public void printCookie(){
- //获取并打印所有的cookie
- Set<Cookie> allCookies=driver.manage().getCookies();
- System.out.println("----------Begin---------------");
- for(Cookie c:allCookies){
- System.out.println(String.format("%s->%s",c.getName(),c.getValue()));
- }
- System.out.println("----------End---------------");
- }
- }
运行结果显示为:
----------Begin---------------
----------End---------------
----------Begin---------------
s->selenium
----------End---------------
----------Begin---------------
----------End---------------
可以看到添加cookie之前,系统的cookie为空。之后成功添加了cookie(s,selenium)并且最后成功删除。
3. 调用Java Script
selenium提供了executeScript
、executeAsyncScript两个方法来处理JS调用的问题。其中executeScript是同步方法,用它执行js代码会阻塞主线程执行,直到js代码执行完毕;executeAsyncScript方法是异步方法,它不会阻塞主线程执行。
- import org.junit.Test;
- import org.openqa.selenium.WebDriver;
- import org.openqa.selenium.firefox.FirefoxDriver;
- import org.openqa.selenium.JavascriptExecutor;
- public class JSTest {
- @Test
- public void test() {
- WebDriver driver=new FirefoxDriver();
- driver.get("http://www.baidu.com");
- JavascriptExecutor js=(JavascriptExecutor)driver;
- js.executeScript("document.getElementById(\"kw\").value=\"selenium\"");
- //利用js代码获取百度搜索框内文字
- String keyword = (String) (js.executeScript("var input = document.getElementById(\"kw\").value;return input"));
- System.out.println(keyword);
- driver.quit();
- }
- }
运行结果:
selenium
4. Webdriver截图
- import java.io.File;
- import java.io.IOException;
- import org.apache.commons.io.FileUtils;
- import org.junit.Test;
- import org.openqa.selenium.OutputType;
- import org.openqa.selenium.TakesScreenshot;
- import org.openqa.selenium.WebDriver;
- import org.openqa.selenium.firefox.FirefoxDriver;
- public class ScreenShotTest {
- @Test
- public void test() {
- WebDriver driver=new FirefoxDriver();
- driver.get("http://www.baidu.com");
- screenShot("selenium.jpg", (TakesScreenshot)driver);
- driver.quit();
- }
- public static void screenShot(String name,TakesScreenshot driver){
- String savaPath=System.getProperty("user.dir");
- File sourceFile=driver.getScreenshotAs(OutputType.FILE);
- try{
- System.out.println("Begin saving screenshot to path:"+savaPath);
- FileUtils.copyFile(sourceFile, new File(savaPath+"\\"+name));
- } catch(IOException e){
- System.out.println("Save screenshot failed!");
- e.printStackTrace();
- } finally{
- System.out.println("Finish screenshot!");
- }
- }
- }
运行结果:
Begin saving screenshot to path:D:\workspace_luna\SeleniumDemo
Finish screenshot!
由于eclipse的workspace不一样,会导致上面的路径不一样。不过没关系,我们打开对应的路径就可以看到selenium.jpg。打开以后是百度首页的截图。
5. 页面等待
因为Load页面需要一段时间,如果页面还没加载完就查找元素,必然是查找不到的。最好的方式,就是设置一个默认等待时间,在查找页面元素的时候如果找不到就等待一段时间再找,直到超时。Webdriver提供两种方法,一种是显性等待,另一种是隐性等待。
显性等待:
显示等待就是明确的要等到某个元素的出现或者是某个元素的可点击等条件,等不到,就一直等,除非在规定的时间之内都没找到,那么就跳出Exception.
- new WebDriverWait(driver, 10).until(ExpectedConditions.presenceOfElementLocated(By.id("kw")));
当然也可以自己重写内部类:
- WebElement e = (new WebDriverWait( driver, 10)).until(
- new ExpectedCondition< WebElement>(){
- @Override
- public WebElement apply( WebDriver d) {
- return d.findElement(By.linkText("Selenium_百度百科"));
- }
- });
下面的例子是:打开百度,搜索“selenium",等待搜索结果里出现“Selenium_百度百科”的时候点击该链接。
- import org.junit.Test;
- import org.openqa.selenium.By;
- import org.openqa.selenium.WebDriver;
- import org.openqa.selenium.WebElement;
- import org.openqa.selenium.firefox.FirefoxDriver;
- import org.openqa.selenium.support.ui.ExpectedCondition;
- import org.openqa.selenium.support.ui.ExpectedConditions;
- import org.openqa.selenium.support.ui.WebDriverWait;
- public class ExplicitWaitTest {
- @Test
- public void test() {
- WebDriver driver=new FirefoxDriver();
- driver.get("http://www.baidu.com");
- driver.findElement(By.id("kw")).sendKeys("selenium");
- driver.findElement(By.id("su")).click();
- //方法一
- //new WebDriverWait(driver,10).until(ExpectedConditions.presenceOfElementLocated(By.linkText("Selenium_百度百科")));
- //driver.findElement(By.linkText("Selenium_百度百科")).click();
- //方法二
- WebElement e = (new WebDriverWait( driver, 10)).until(
- new ExpectedCondition< WebElement>(){
- @Override
- public WebElement apply( WebDriver d) {
- return d.findElement(By.linkText("Selenium_百度百科"));
- }
- }
- );
- e.click();
- driver.quit();
- }
- }
运行的话是通过的,但是如果中间不显示等待的话,直接查找就会fail。
隐性等待:
隐形等待只是等待一段时间,元素不一定要出现,只要时间到了就会继续执行。
- driver.manage().timeouts().implicitlyWait(second, TimeUnit.SECONDS);
还是上面的例子,用隐性等待写就是:
- import java.util.concurrent.TimeUnit;
- import org.junit.Test;
- import org.openqa.selenium.By;
- import org.openqa.selenium.WebDriver;
- import org.openqa.selenium.firefox.FirefoxDriver;
- public class ImplicitWaitTest {
- @Test
- public void test() {
- WebDriver driver=new FirefoxDriver();
- driver.get("http://www.baidu.com");
- driver.findElement(By.id("kw")).sendKeys("selenium");
- driver.findElement(By.id("su")).click();
- driver.manage().timeouts().implicitlyWait(5, TimeUnit.SECONDS);
- driver.findElement(By.linkText("Selenium_百度百科")).click();
- driver.quit();
- }
- }
运行结果还是通过的。不过个人觉得看起来跟笨方法”Thread.sleep()"差不多,只不多比它更高效了而已。
原文:http://www.cnblogs.com/miniren/p/4638933.html
内容总结
以上是互联网集市为您收集整理的Selenium 高级应用全部内容,希望文章能够帮你解决Selenium 高级应用所遇到的程序开发问题。 如果觉得互联网集市技术教程内容还不错,欢迎将互联网集市网站推荐给程序员好友。
内容备注
版权声明:本文内容由互联网用户自发贡献,该文观点与技术仅代表作者本人。本站仅提供信息存储空间服务,不拥有所有权,不承担相关法律责任。如发现本站有涉嫌侵权/违法违规的内容, 请发送邮件至 gblab@vip.qq.com 举报,一经查实,本站将立刻删除。
内容手机端
扫描二维码推送至手机访问。