首页 / JAVA / java ssh三大框架搭建整合
java ssh三大框架搭建整合
内容导读
互联网集市收集整理的这篇技术教程文章主要介绍了java ssh三大框架搭建整合,小编现在分享给大家,供广大互联网技能从业者学习和参考。文章包含11992字,纯文字阅读大概需要18分钟。
内容图文

今天开个坑java ssh三大框架搭建整合(注解+XML 用全注解不是很好,有点地方需要用模板的时候XML直接可以复制一段)
1 所用框架、技术
|
编号 |
工具 |
版本 |
说明 |
|
|
Struts 2 |
2.3.20 |
|
|
|
Hibernate |
4.3.9 |
实现持久化操作 |
|
|
Spring |
4.1.5 |
|
|
|
Junit |
4 |
单元测试 |
2. 开发环境
|
操作系统 |
Windows 7 |
|
开发工具 |
Eclipse Java EE |
|
数据库 |
Oracle 11g |
|
Web容器 |
Tomcat 7.0.63 |
|
JAVA |
JDK 1.7 |
建立project
新建一个 dynamic web project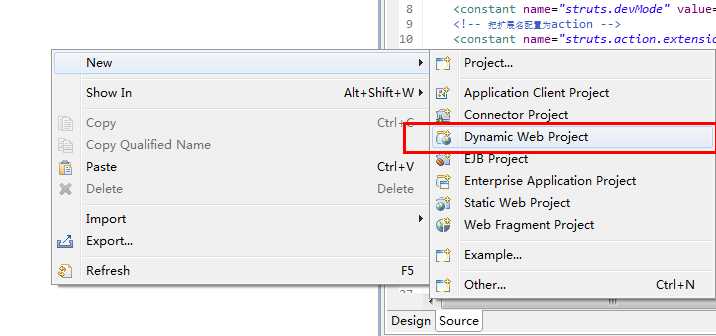
最终的整个工程结构是这样的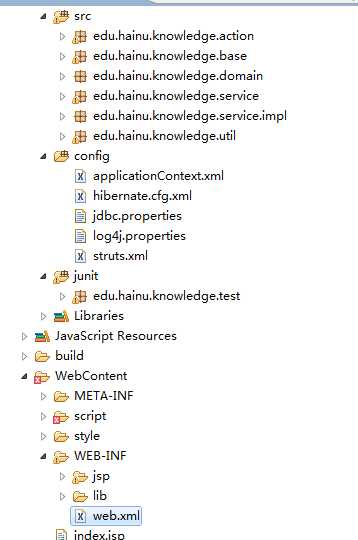
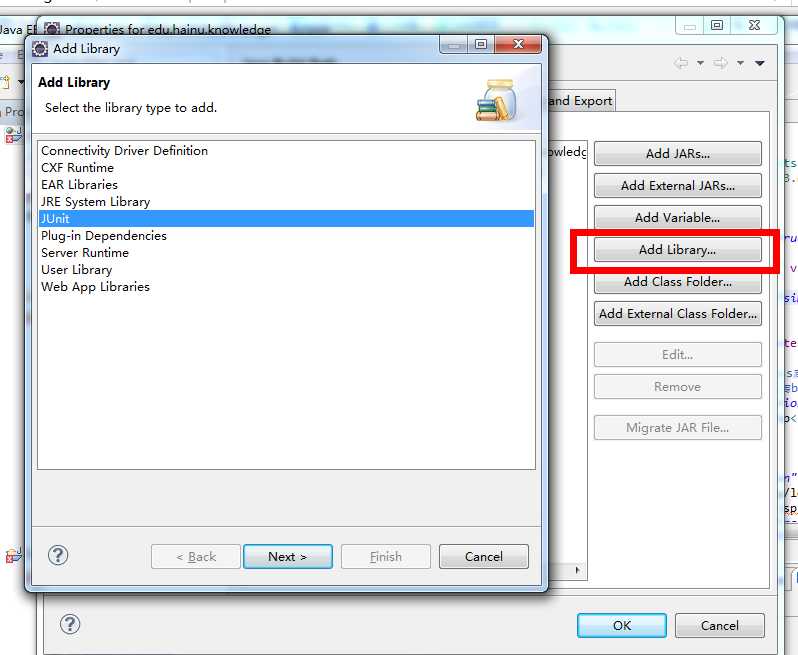
3.添加Junit
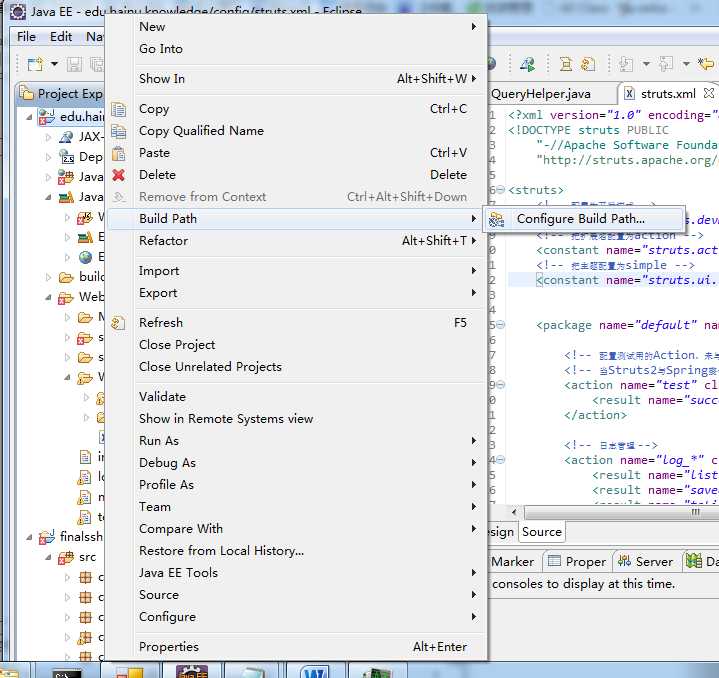
configure Build Path 后点Add library 选junit4 即可
4.添加Struts2
copy所需的jar包到lib文件夹(先排除struts2-spring-plugin.jar后面会说明原因) 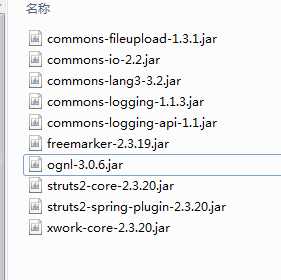
准备struts.xml,web.xml
模板,直接在Struts文件夹里面搜索文件名struts.xml,web.xml。
web.xml(示例)
我这些XML 元素web-app 有版本信息,不一致会报错。
             1
            <?
            xml version="1.0" encoding="UTF-8"
            ?>
             2
            <
            web-app
            version
            ="2.4"
             xmlns
            ="http://java.sun.com/xml/ns/j2ee"
             3
                     xmlns:xsi
            ="http://www.w3.org/2001/XMLSchema-instance"
             4
                     xsi:schemaLocation
            ="http://java.sun.com/xml/ns/j2ee http://java.sun.com/xml/ns/j2ee/web-app_2_4.xsd"
            >
             5
             6
             7
            <!--
             配置Struts2的核心的过滤器
            -->
             8
            <
            filter
            >
             9
            <
            filter-name
            >struts2</filter-name>10<filter-class>org.apache.struts2.dispatcher.ng.filter.StrutsPrepareAndExecuteFilter</filter-class>11</filter>12<filter-mapping>13<filter-name>struts2</filter-name>14<url-pattern>/*</url-pattern>15</filter-mapping>161718<!-- 程序启动页面-->19<welcome-file-list>20<welcome-file>index.jsp</welcome-file>21</welcome-file-list>2223</web-app>
struts.xml
             1
            <?
            xml version="1.0" encoding="UTF-8"
            ?>
             2
            <!
            DOCTYPE struts PUBLIC

             3
                "-//Apache Software Foundation//DTD Struts Configuration 2.3//EN"

             4
                "http://struts.apache.org/dtds/struts-2.3.dtd"
            >
             5
             6
            <
            struts
            >
             7
             8
            <!--
             配置为开发模式
            -->
             9
            <
            constant
            name
            ="struts.devMode"
             value
            ="true"
            />
            10
            <!--
             把扩展名配置为action
            -->
            11
            <
            constant
            name
            ="struts.action.extension"
             value
            ="action"
            />
            12
            <!--
             把主题配置为simple
            -->
            13
            <
            constant
            name
            ="struts.ui.theme"
             value
            ="simple"
            />
            14
            15
            16
            <
            package
            name
            ="default"
             namespace
            ="/"
             extends
            ="struts-default"
            >
            17
            18
            <!--
             配置测试用的Action,未与Spring整合,class属性写类的全名(包名.类名)
            -->
            19
            <!--
             当Struts2与Spring整合后,class属性可以写bean的名称(类名首字母小写)
            -->
            20
            <
            action
            name
            ="test"
             class
            ="edu.hainu.knowledge.test.StrutsAction"
            >
            21
            <
            result
            name
            ="success"
            >/index.jsp</result>22</action>232425</package>262728</struts>
StrutsAction.java(放在如图位置)
             1
            package
             edu.hainu.knowledge.test;

             2
             3
            import
             com.opensymphony.xwork2.ActionSupport;

             4
             5
             6
            public
            class StrutsAction extends ActionSupport{
 7 8//用于 测试单个Struts是否成功 9public String execute(){
10         System.out.println("success");
11return "success";
12    }
13 }
启动观察控制台有没有报错,报错的自行百度
用浏览器http://localhost:8080/edu.hainu.knowledge/test.action
http://服务器所在ip:端口号/projectName/actionName.action(注意我已经在struts.xml 配置类后缀为action)
其实这个地址可以也不用记住,我们可以直接run 一个页面,eclipse会自动访问该页面

页面成功跳转,添加struts2成功。
添加spring
添加jar包
applicationContext.xml (示例)
同样的可以去spring文件夹搜索applicationContext.xml (QAQ 不知道为什么找不到)
配置一下 component-scan base-package="edu.hainu.knowledge" 就是Sping将会扫描edu.hainu.knowledge包所有类上的注解
             1
            <?
            xml version="1.0" encoding="UTF-8"
            ?>
             2
            <
            beans
            xmlns
            ="http://www.springframework.org/schema/beans"
             3
                xmlns:xsi
            ="http://www.w3.org/2001/XMLSchema-instance"
             4
                xmlns:tx
            ="http://www.springframework.org/schema/tx"
             5
                xmlns:context
            ="http://www.springframework.org/schema/context"
             6
                xsi:schemaLocation
            ="http://www.springframework.org/schema/beans

             7
                    http://www.springframework.org/schema/beans/spring-beans.xsd

             8
                    http://www.springframework.org/schema/context

             9
                    http://www.springframework.org/schema/context/spring-context.xsd

            10
                        http://www.springframework.org/schema/tx http://www.springframework.org/schema/tx/spring-tx.xsd"
            >
            11
            12
            <!--
             自动扫描与装配bean
            -->
            13
            <
            context:component-scan
            base-package
            ="edu.hainu.knowledge"
            ></
            context:component-scan
            >
            14
            15
            </
            beans
            >
添加StrutsAction 的注解
        @Controller
@Scope("prototype")
             1
            package
             edu.hainu.knowledge.test;

             2
             3
            import
             org.springframework.context.annotation.Scope;

             4
            import
             org.springframework.stereotype.Controller;

             5
             6
            import
             com.opensymphony.xwork2.ActionSupport;

             7
             8
            @Controller

             9 @Scope("prototype")
10publicclass StrutsAction extends ActionSupport{
1112//用于 测试单个Struts是否成功13public String execute(){
14         System.out.println("success");
15return "success";
16    }
17 }
在junit的Spring类
             1
            package
             edu.hainu.knowledge.test;

             2
             3
            import
             org.junit.Test;

             4
            import
             org.springframework.context.ApplicationContext;

             5
            import
             org.springframework.context.support.ClassPathXmlApplicationContext;

             6
             7
             8
             9
            public
            class
             Spring {

            10
            11
            private ApplicationContext ac = new ClassPathXmlApplicationContext("applicationContext.xml");
121314//用于测试单个Spring是否成功15    @Test
16publicvoid testBean() throws Exception {
1718//Bean的名字 首字母要小写 19         StrutsAction StrutsAction = (StrutsAction) ac.getBean("strutsAction");
20        System.out.println(StrutsAction);
21    }
2223}
24
单元测试testBean()方法,能正常输出信息 edu.hainu.knowledge.test.StrutsAction@a383aab 表明添加Spring 成功
整合spring与struts2
在web.xml中配置Spring的监听器 (配置一下applicationContext.xml 所在位置)
             1
            <?
            xml version="1.0" encoding="UTF-8"
            ?>
             2
            <
            web-app
            version
            ="2.4"
             xmlns
            ="http://java.sun.com/xml/ns/j2ee"
             3
                     xmlns:xsi
            ="http://www.w3.org/2001/XMLSchema-instance"
             4
                     xsi:schemaLocation
            ="http://java.sun.com/xml/ns/j2ee http://java.sun.com/xml/ns/j2ee/web-app_2_4.xsd"
            >
             5
             6
             7
            <!--
             配置Spring的用于初始化容器对象的监听器
            -->
             8
            <
            listener
            >
             9
            <
            listener-class
            >org.springframework.web.context.ContextLoaderListener</listener-class>10</listener>11<context-param>12<param-name>contextConfigLocation</param-name>13<param-value>classpath:applicationContext*.xml</param-value>14</context-param>1516<!-- 配置Struts2的核心的过滤器 -->17<filter>18<filter-name>struts2</filter-name>19<filter-class>org.apache.struts2.dispatcher.ng.filter.StrutsPrepareAndExecuteFilter</filter-class>20</filter>21<filter-mapping>22<filter-name>struts2</filter-name>23<url-pattern>/*</url-pattern>24</filter-mapping>25262728<welcome-file-list>29<welcome-file>index.jsp</welcome-file>30</welcome-file-list>31</web-app>
添加jar包 struts2-spring-plugin-2.3.20.jar(这就是文章开头struts2 排除的jar包,不然会报错)
修改struts.xml ( <!-- 当Struts2与Spring整合后,class属性可以写bean的名称(类名首字母小写) -->)
             1
            <?
            xml version="1.0" encoding="UTF-8"
            ?>
             2
            <!
            DOCTYPE struts PUBLIC

             3
                "-//Apache Software Foundation//DTD Struts Configuration 2.3//EN"

             4
                "http://struts.apache.org/dtds/struts-2.3.dtd"
            >
             5
             6
            <
            struts
            >
             7
            <!--
             配置为开发模式
            -->
             8
            <
            constant
            name
            ="struts.devMode"
             value
            ="true"
            />
             9
            <!--
             把扩展名配置为action
            -->
            10
            <
            constant
            name
            ="struts.action.extension"
             value
            ="action"
            />
            11
            <!--
             把主题配置为simple
            -->
            12
            <
            constant
            name
            ="struts.ui.theme"
             value
            ="simple"
            />
            13
            14
            15
            <
            package
            name
            ="default"
             namespace
            ="/"
             extends
            ="struts-default"
            >
            16
            17
            <!--
             配置测试用的Action,未与Spring整合,class属性写类的全名
            -->
            18
            <!--
             当Struts2与Spring整合后,class属性可以写bean的名称
            -->
            19
            <
            action
            name
            ="test"
             class
            ="strutsAction"
            >
            20
            <
            result
            name
            ="success"
            >/index.jsp</result>21</action>2223<!-- 日志管理 -->24<action name="log_*" class="logAction" method="{1}">25<result name="list">/WEB-INF/jsp/logAction/list.jsp</result>26<result name="saveUI">/WEB-INF/jsp/logAction/saveUI.jsp</result>27<result name="toList" type="redirectAction">log_list</result>28</action>2930<!-- 首页 -->31<action name="home_*" class="homeAction" method="{1}">32<result name="{1}">/WEB-INF/jsp/homeAction/{1}.jsp</result>33</action>3435</package>3637<!-- Add packages here -->3839</struts>
重新启动,访问 http://localhost:8080/edu.hainu.knowledge/test.action
成功跳转表明 整合spring与struts2成功(主要是修改struts.xml 证明)
添加hibernate 并且整合 hibernate 与 spring (我的习惯是)
添加jar包 sqljdbc41.jar 用于sqlserver ojdbc6.jar 用于Oracle
applicationContext.xml
管理SessionFactory实例(只需要一个)
声明式事务管理
             1
            <?
            xml version="1.0" encoding="UTF-8"
            ?>
             2
            <
            beans
            xmlns
            ="http://www.springframework.org/schema/beans"
             3
                xmlns:xsi
            ="http://www.w3.org/2001/XMLSchema-instance"
             4
                xmlns:tx
            ="http://www.springframework.org/schema/tx"
             5
                xmlns:context
            ="http://www.springframework.org/schema/context"
             6
                xsi:schemaLocation
            ="http://www.springframework.org/schema/beans

             7
                    http://www.springframework.org/schema/beans/spring-beans.xsd

             8
                    http://www.springframework.org/schema/context

             9
                    http://www.springframework.org/schema/context/spring-context.xsd

            10
                        http://www.springframework.org/schema/tx http://www.springframework.org/schema/tx/spring-tx.xsd"
            >
            11
            12
            <!--
             自动扫描与装配bean
            -->
            13
            <
            context:component-scan
            base-package
            ="edu.hainu.knowledge"
            ></
            context:component-scan
            >
            14
            15
            <!--
             导入外部的properties文件
            -->
            16
            <
            context:property-placeholder
            location
            ="classpath:jdbc.properties"
            />
            17
            18
            19
            <!--
             配置SessionFactory
            -->
            20
            <
            bean
            id
            ="sessionFactory"
             class
            ="org.springframework.orm.hibernate4.LocalSessionFactoryBean"
            >
            21
            <!--
             指定hibernate的配置文件位置
            -->
            22
            <
            property
            name
            ="configLocation"
             value
            ="classpath:hibernate.cfg.xml"
            ></
            property
            >
            23
            <!--
             配置c3p0数据库连接池
            -->
            24
            <
            property
            name
            ="dataSource"
            >
            25
            <
            bean
            class
            ="com.mchange.v2.c3p0.ComboPooledDataSource"
            >
            26
            <!--
             数据连接信息
            -->
            27
            <
            property
            name
            ="jdbcUrl"
             value
            ="${jdbcUrl}"
            ></
            property
            >
            28
            <
            property
            name
            ="driverClass"
             value
            ="${driverClass}"
            ></
            property
            >
            29
            <
            property
            name
            ="user"
             value
            ="${user}"
            ></
            property
            >
            30
            <
            property
            name
            ="password"
             value
            ="${password}"
            ></
            property
            >
            31
            <!--
             其他配置
            -->
            32
            <!--
            初始化时获取三个连接,取值应在minPoolSize与maxPoolSize之间。Default: 3
            -->
            33
            <
            property
            name
            ="initialPoolSize"
             value
            ="3"
            ></
            property
            >
            34
            <!--
            连接池中保留的最小连接数。Default: 3
            -->
            35
            <
            property
            name
            ="minPoolSize"
             value
            ="3"
            ></
            property
            >
            36
            <!--
            连接池中保留的最大连接数。Default: 15
            -->
            37
            <
            property
            name
            ="maxPoolSize"
             value
            ="5"
            ></
            property
            >
            38
            <!--
            当连接池中的连接耗尽的时候c3p0一次同时获取的连接数。Default: 3
            -->
            39
            <
            property
            name
            ="acquireIncrement"
             value
            ="3"
            ></
            property
            >
            40
            <!--
             控制数据源内加载的PreparedStatements数量。如果maxStatements与maxStatementsPerConnection均为0,则缓存被关闭。Default: 0
            -->
            41
            <
            property
            name
            ="maxStatements"
             value
            ="8"
            ></
            property
            >
            42
            <!--
            maxStatementsPerConnection定义了连接池内单个连接所拥有的最大缓存statements数。Default: 0
            -->
            43
            <
            property
            name
            ="maxStatementsPerConnection"
             value
            ="5"
            ></
            property
            >
            44
            <!--
            最大空闲时间,1800秒内未使用则连接被丢弃。若为0则永不丢弃。Default: 0
            -->
            45
            <
            property
            name
            ="maxIdleTime"
             value
            ="1800"
            ></
            property
            >
            46
            </
            bean
            >
            47
            </
            property
            >
            48
            </
            bean
            >
            49
            50
            <!--
             配置声明式事务管理(采用注解的方式)
            -->
            51
            <
            bean
            id
            ="txManager"
             class
            ="org.springframework.orm.hibernate4.HibernateTransactionManager"
            >
            52
            <
            property
            name
            ="sessionFactory"
             ref
            ="sessionFactory"
            ></
            property
            >
            53
            </
            bean
            >
            54
            <
            tx:annotation-driven
            transaction-manager
            ="txManager"
            />
            55
            56
            57
            </
            beans
            >
jdbc.properties
//通过SERVICE_NAME连接
            1 jdbcUrl    =jdbc:oracle:thin:@//ip:1521/SERVICE_NAME2 driverClass    = oracle.jdbc.driver.OracleDriver
3 user        = user
4 password    = password
Hibernate.java
             1
            package
             edu.hainu.knowledge.test;

             2
             3
            import
             org.hibernate.SessionFactory;

             4
            import
             org.junit.Test;

             5
            import
             org.springframework.context.ApplicationContext;

             6
            import
             org.springframework.context.support.ClassPathXmlApplicationContext;

             7
             8
             9
            10
            public
            class
             Hibernate {

            11
            12
            private ApplicationContext ac = new ClassPathXmlApplicationContext("applicationContext.xml");
1314// 测试SessionFactory
15//用于测试Spring 与 hibernate16    @Test
17publicvoid testSessionFactory() throws Exception {
18         SessionFactory sessionFactory = (SessionFactory) ac.getBean("sessionFactory");
19        System.out.println(sessionFactory);
20    }
2122 }
单元测试 testSessionFactory()
控制台有输出org.hibernate.internal.SessionFactoryImpl@5cc5e9d2
整合 hibernate 与 spring 成功
下班啦,明天看看查漏补缺。
原文:http://www.cnblogs.com/linkarl/p/4730792.html
内容总结
以上是互联网集市为您收集整理的java ssh三大框架搭建整合全部内容,希望文章能够帮你解决java ssh三大框架搭建整合所遇到的程序开发问题。 如果觉得互联网集市技术教程内容还不错,欢迎将互联网集市网站推荐给程序员好友。
内容备注
版权声明:本文内容由互联网用户自发贡献,该文观点与技术仅代表作者本人。本站仅提供信息存储空间服务,不拥有所有权,不承担相关法律责任。如发现本站有涉嫌侵权/违法违规的内容, 请发送邮件至 gblab@vip.qq.com 举报,一经查实,本站将立刻删除。
内容手机端
扫描二维码推送至手机访问。