Silverlight 在运行时更改 ControlTemplate
内容导读
互联网集市收集整理的这篇技术教程文章主要介绍了Silverlight 在运行时更改 ControlTemplate,小编现在分享给大家,供广大互联网技能从业者学习和参考。文章包含4616字,纯文字阅读大概需要7分钟。
内容图文

You cannot create a ControlTemplate in Silverlight in C# alone. Unlike WPF (where you can set the VisualTree property), there is no property you can set that specifies the "content" of the ControlTemplate.
You can define your XAML as a string, and then load that dynamically in C# as explained by this blog post.
The code boils down to:
                var template = (ControlTemplate)XamlReader.Load("<ControlTemplate " +
       " xmlns=\"http://schemas.microsoft.com/winfx/2006/xaml/presentation\"" +
       " xmlns:x=\"http://schemas.microsoft.com/winfx/2006/xaml\">" +
       " content here " +
       "</ControlTemplate>");
这是在 stackoverflow 找到的回答。XamlReader.Load(string xaml),这个xaml有限制,不能写 x:Name ,例如“<ControlTemplate x:Name=\"ctName\",这样写运行时报错。我找到的解决办法:
建立资源文件,将需要运行时修改的设计代码写入资源文件中。例如:
                <?
                xml version="1.0" encoding="utf-8"
                ?>
                <
                esri:SimpleFillSymbol

                xmlns
                ="http://schemas.microsoft.com/winfx/2006/xaml/presentation"

    xmlns:x
                ="http://schemas.microsoft.com/winfx/2006/xaml"

    xmlns:d
                ="http://schemas.microsoft.com/expression/blend/2008"

    xmlns:mc
                ="http://schemas.openxmlformats.org/markup-compatibility/2006"

    xmlns:esri
                ="http://schemas.esri.com/arcgis/client/2009"
                >
                <
                esri:SimpleFillSymbol.ControlTemplate
                >
                <
                ControlTemplate
                >
                <
                Path
                x:Name
                ="Element"
                 Fill
                ="Red"
                 Stroke
                ="White"
                 StrokeThickness
                ="0.4"

                              Cursor
                ="Hand"
                >
                <
                VisualStateManager.VisualStateGroups
                >
                <
                VisualStateGroup
                x:Name
                ="SelectionStates"
                >
                <
                VisualState
                x:Name
                ="Unselected"
                >
                <
                Storyboard
                >
                <
                ColorAnimation
                Storyboard.TargetName
                ="Element"

                                                            Storyboard.TargetProperty
                ="(Path.Stroke).(SolidColorBrush.Color)"

                                                            To
                ="White"
                 Duration
                ="0:0:.25"
                />
                <
                DoubleAnimation
                Storyboard.TargetName
                ="Element"

                                                             Storyboard.TargetProperty
                ="StrokeThickness"

                                                             To
                ="0.4"
                 Duration
                ="00:00:.25"
                />
                <
                DoubleAnimation
                Storyboard.TargetName
                ="Element"

                                                             Storyboard.TargetProperty
                ="Opacity"

                                                             To
                ="0.5"
                 Duration
                ="00:00:.25"
                />
                </
                Storyboard
                >
                </
                VisualState
                >
                <
                VisualState
                x:Name
                ="Selected"
                >
                <
                Storyboard
                >
                <
                ColorAnimation
                Storyboard.TargetName
                ="Element"

                                                            Storyboard.TargetProperty
                ="(Path.Stroke).(SolidColorBrush.Color)"

                                                            To
                ="Black"
                 Duration
                ="0:0:.25"
                />
                <
                DoubleAnimation
                Storyboard.TargetName
                ="Element"

                                                             Storyboard.TargetProperty
                ="StrokeThickness"

                                                             To
                ="3"
                 Duration
                ="00:00:.25"
                />
                <
                DoubleAnimation
                Storyboard.TargetName
                ="Element"

                                                             Storyboard.TargetProperty
                ="Opacity"

                                                             To
                ="1"
                 Duration
                ="00:00:.25"
                />
                </
                Storyboard
                >
                </
                VisualState
                >
                </
                VisualStateGroup
                >
                </
                VisualStateManager.VisualStateGroups
                >
                </
                Path
                >
                </
                ControlTemplate
                >
                </
                esri:SimpleFillSymbol.ControlTemplate
                >
                </
                esri:SimpleFillSymbol
                >
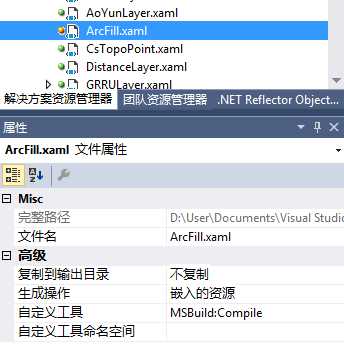
我需要运行时修改 Fill="Red" ,这个颜色。建立资源文件:ArcFill.xaml,将代码写入,设置 ArcFill.xaml 的属性:生成操作 为 嵌入的资源,以供读取使用。
读取资源文件:
StreamReader reader = new StreamReader(System.Reflection.Assembly.GetExecutingAssembly().GetManifestResourceStream("StMap.Resource.ArcFill.xaml"));
string strArcFill = reader.ReadToEnd();
SimpleFillSymbol sfs = XamlReader.Load(strArcFill) as SimpleFillSymbol;
资源文件文件中虽然包括了x:Name,但这样 XamlReader.Load 读取却没有任何问题。如果想改变颜色:
XamlReader.Load(strArcFill.Replace("Red", "Green")) as SimpleFillSymbol
这样直接查找替换,工作的很 OK,红色成功变成了绿色,完整的测试用代码:
            StreamReader reader = new StreamReader(System.Reflection.Assembly.GetExecutingAssembly().GetManifestResourceStream("StMap.Resource.ArcFill.xaml"));
            string strArcFill = reader.ReadToEnd();

            ClassBreaksRenderer newClassBreaksRenderer = new ClassBreaksRenderer();
            newClassBreaksRenderer.Field = "投诉量";

            newClassBreaksRenderer.Classes.Add(new ClassBreakInfo()
            {
                MinimumValue = 0,
                MaximumValue = 250,
                Symbol = XamlReader.Load(strArcFill.Replace("Red", "Blue")) as SimpleFillSymbol
            });

            newClassBreaksRenderer.Classes.Add(new ClassBreakInfo()
            {
                MaximumValue = 500,
                Symbol = XamlReader.Load(strArcFill.Replace("Red", "Green")) as SimpleFillSymbol
            });

            newClassBreaksRenderer.Classes.Add(new ClassBreakInfo()
            {
                MaximumValue = 750,
                Symbol = XamlReader.Load(strArcFill.Replace("Red", "Goldenrod")) as SimpleFillSymbol
            });

            PictureMarkerSymbol p = new PictureMarkerSymbol();

            newClassBreaksRenderer.Classes.Add(new ClassBreakInfo()
            {
                MaximumValue = 1000,
                Symbol = XamlReader.Load(strArcFill.Replace("Red", "DarkOrchid")) as SimpleFillSymbol
            });

            newClassBreaksRenderer.Classes.Add(new ClassBreakInfo()
            {
                MaximumValue = 9999999,
                Symbol = XamlReader.Load(strArcFill.Replace("Red", "Red")) as SimpleFillSymbol
            });

            GraphicsLayer graphicsLayer = MyMap.Layers["CY_L1"] as GraphicsLayer;
            graphicsLayer.Renderer = newClassBreaksRenderer;
效果图:

原文:http://www.cnblogs.com/tails/p/4485621.html
内容总结
以上是互联网集市为您收集整理的Silverlight 在运行时更改 ControlTemplate全部内容,希望文章能够帮你解决Silverlight 在运行时更改 ControlTemplate所遇到的程序开发问题。 如果觉得互联网集市技术教程内容还不错,欢迎将互联网集市网站推荐给程序员好友。
内容备注
版权声明:本文内容由互联网用户自发贡献,该文观点与技术仅代表作者本人。本站仅提供信息存储空间服务,不拥有所有权,不承担相关法律责任。如发现本站有涉嫌侵权/违法违规的内容, 请发送邮件至 gblab@vip.qq.com 举报,一经查实,本站将立刻删除。
内容手机端
扫描二维码推送至手机访问。