C#MVC实现为雇员配置角色(完整详细+数据库)
内容导读
互联网集市收集整理的这篇技术教程文章主要介绍了C#MVC实现为雇员配置角色(完整详细+数据库),小编现在分享给大家,供广大互联网技能从业者学习和参考。文章包含4655字,纯文字阅读大概需要7分钟。
内容图文
")
数据库创建“用户表”“角色表”“用户角色关系表”
            create table roles
(
RId
            int
             identity,
RName varchar(
            50
            ),
Remark varchar(
            50
            )
)
create table UserRole
(
Users_UId
            int
            ,
roles_Rid
            int

)
create table Users
(
UId
            int
             identity,
UName varchar(
            50
            ),
UPwd varchar(
            50
            )
)
数据库创建一个view视图
            create view USER_SHOW
AS

            select RName,RId,UName,UId from Users join UserRole on Users.UId=UserRole.Users_UId join roles on UserRole.roles_Rid=roles.RId
然后打开VS创建MVC
添加一个控制器
控制器需要引用
            using
             Dapper;

            using System.Data.SqlClient;
控制器代码如下
            public
             ActionResult Index()
        {

            using (SqlConnection conn = new SqlConnection("Data Source=.;Initial Catalog=Unit13;Integrated Security=True"))
            {
                List<UserAndRole> list = conn.Query<UserAndRole>("select UId,UName,stuff((select ‘,‘+RName from USER_SHOW where a.UId = UId for xml path(‘‘)),1,1,‘‘) as RName from USER_SHOW as a group by UId,UName").ToList();
                return View(list);
            }
        }

        // GET: Userpublic ActionResult Shezhi(int Uid)
        {
            using (SqlConnection conn = new SqlConnection("Data Source=.;Initial Catalog=Unit13;Integrated Security=True"))
            {
                Session["Uid"] = Uid;
                ViewBag.list = GetBind();
                List<UserAndRole> list = conn.Query<UserAndRole>($"select RId,RName from Users join UserRole on Users.UId = UserRole.Users_UId join roles on UserRole.roles_Rid = roles.RId where UId = {Uid}").ToList();
                return View(list);
            }
        }
        public List<UserAndRole> GetBind()
        {
            using (SqlConnection conn = new SqlConnection("Data Source=.;Initial Catalog=Unit13;Integrated Security=True"))
            {
                return conn.Query<UserAndRole>("select * from  roles ").ToList();
            }
        }

        publicint Delete(int Rid)
        {
            using (SqlConnection conn = new SqlConnection("Data Source=.;Initial Catalog=Unit13;Integrated Security=True"))
            {
                return conn.Execute($"delete from UserRole where roles_Rid={Rid}");
            }
        }

        publicint Add(string UId, string RId)
        {
            UId = Session["Uid"].ToString();
            using (SqlConnection conn = new SqlConnection("Data Source=.;Initial Catalog=Unit13;Integrated Security=True"))
            {
                object n = conn.ExecuteScalar($"select count(1) from UserRole where Users_UId={UId} and roles_Rid={RId}");
                if (Convert.ToInt32(n) == 0)
                {
                    return conn.Execute($"insert into UserRole values(‘{UId}‘,‘{RId}‘)");
                }
                else
                {
                    return0;
                }

            }
        }

        publicclass UserAndRole
        {
            publicint UId { get; set; }
            publicstring UName { get; set; }
            publicstring RName { get; set; }
            publicint RId { get; set; }

        }
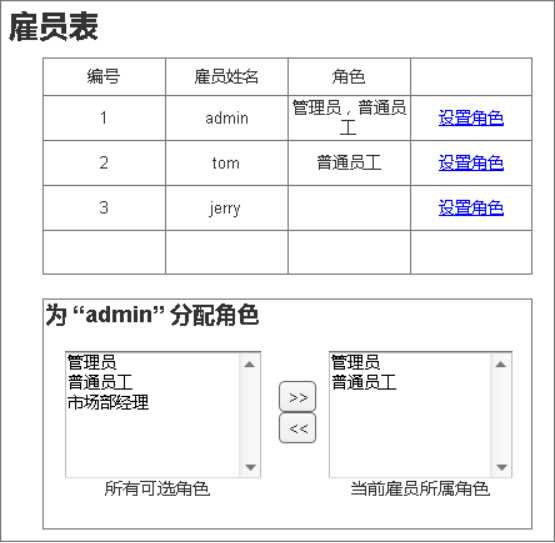
然后创建Index视图(
- 页面显示雇员信息
- 点击“设置角色”跳转Shezi页面为以下部分赋值
(1) 右侧显示的是所有“角色”
(2) 左侧显示的是当前雇员现有的角色)
)
            @using 配置角色.Controllers
@model List<UserController.UserAndRole>
@{
    ViewBag.Title = "Index";
}

<table class="table-bordered table">
    <tr>
        <td>编号</td>
        <td>雇员姓名</td>
        <td>角色</td>
        <td></td>
    </tr>
    @foreach (var item in Model)
    {
        <tr>
            <td>@item.UId</td>
            <td>@item.UName</td>
            <td>@item.RName</td>
            <td> <a href="/User/Shezhi?Uid=@item.UId">设置角色</a></td>
        </tr>
    }
</table>
运行效果

再添加一个Shezhi视图
            @{
    ViewBag.Title = "Shezhi";
}
@using 配置角色.Controllers
@model List<UserController.UserAndRole>

<div id="app" style="height:250px;width:100%;border:double">
    <div style="height:150px;width:250px;border:double;float:left;margin-top:45px;margin-left:20px">
        <span>所有可选角色:</span>
        <select id="Select1" multiple="true">
            @foreach (var item in ViewBag.list as List<UserController.UserAndRole>)
            {
                <option value="@item.RId">@item.RName</option>
            }

        </select>
    </div>
    <div style="height:150px;width:150px;float:left;margin-top:80px;margin-left:25%">
        <button onclick="Zuo()">←</button>
        <br>
        <button onclick="You()">→</button>
    </div>
    <div style="height:150px;width:250px;border:double;float:right;margin-top:45px;margin-right:20px">
        <span>当前雇员所属角色:</span>
        <select id="Select2" multiple="true">
            @foreach (var item in Model)
            {
                <option value="@item.RId">@item.RName</option>
            }

        </select>

        <input id="Hidden1" type="@Session["Uid"]" />
    </div>
</div>

<script>
    function Zuo() {
        //alert(1);var id = $("#Select2").val();
        if (id == null) {
            alert(‘请选择‘)
        }
        else {
            $.ajax({
                url: "/User/Delete?rid=" + id,
                success: function (d) {
                    if (d > 0) {
                        alert(‘成功‘);
                    }
                }

            })

        }

    }
    function You() {
        //alert(1);var UId = $("#Hidden1").val();
        var RId = $("#Select1").val();

        $.ajax({
            url: "/User/Add?Uid=" + UId + "&RId=" + RId,
            success: function (d) {
                if (d > 0) {
                    alert(‘成功‘);
                }
                else {
                    alert(‘用户已存在‘);
                }
            }

        })
    }

</script>
实现效果

(1) 右侧选择了,再点击中部的一个按钮可以删除
(2) 左侧的选择了,再点击中部的另一个按钮可以添加到左侧
原文:https://www.cnblogs.com/jnm121/p/12182573.html
内容总结
以上是互联网集市为您收集整理的C#MVC实现为雇员配置角色(完整详细+数据库)全部内容,希望文章能够帮你解决C#MVC实现为雇员配置角色(完整详细+数据库)所遇到的程序开发问题。 如果觉得互联网集市技术教程内容还不错,欢迎将互联网集市网站推荐给程序员好友。
内容备注
版权声明:本文内容由互联网用户自发贡献,该文观点与技术仅代表作者本人。本站仅提供信息存储空间服务,不拥有所有权,不承担相关法律责任。如发现本站有涉嫌侵权/违法违规的内容, 请发送邮件至 gblab@vip.qq.com 举报,一经查实,本站将立刻删除。
内容手机端
扫描二维码推送至手机访问。