阅读《Android 从入门到精通》(30)——字体
内容导读
互联网集市收集整理的这篇技术教程文章主要介绍了阅读《Android 从入门到精通》(30)——字体,小编现在分享给大家,供广大互联网技能从业者学习和参考。文章包含5143字,纯文字阅读大概需要8分钟。
内容图文
——字体")
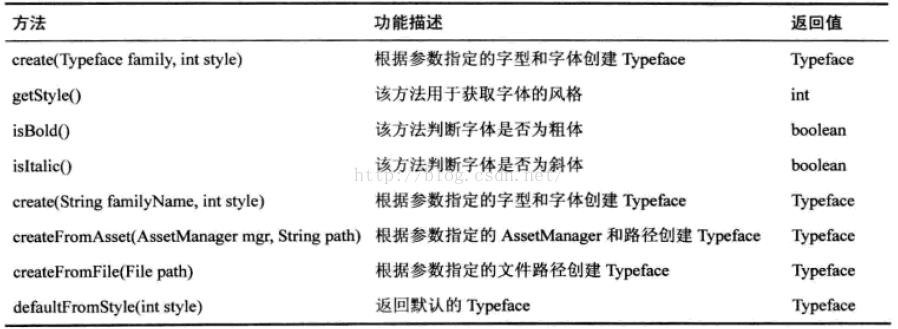
TypeFace 类方法
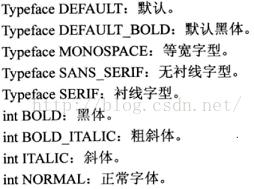
TypeFace 的五种字型和四种字体
TypeFace 示例
完整工程:
1.MainActivity.java
package com.sweetlover.activity;

import com.sweetlover.typeface.R;

import android.app.Activity;
import android.graphics.Color;
import android.graphics.Typeface;
import android.os.Bundle;
import android.widget.EditText;
import android.widget.RadioButton;
import android.widget.RadioGroup;
import android.widget.RadioGroup.OnCheckedChangeListener;
import android.widget.TextView;
import android.widget.Toast;

public class MainActivity extends Activity {

	private EditText editText = null;
	private RadioGroup radioGroup = null;
	private RadioButton[] radioBtn = null;
	private TextView textView = null;

	@Override
	protected void onCreate(Bundle savedInstanceState) {
		// TODO Auto-generated method stub
		super.onCreate(savedInstanceState);
		setContentView(R.layout.activity_main);

		editText = (EditText) findViewById(R.id.edittext1);
		radioGroup = (RadioGroup) findViewById(R.id.rg);
		radioBtn = new RadioButton[5];
		radioBtn[0] = (RadioButton) findViewById(R.id.rb1);
		radioBtn[1] = (RadioButton) findViewById(R.id.rb2);
		radioBtn[2] = (RadioButton) findViewById(R.id.rb3);
		radioBtn[3] = (RadioButton) findViewById(R.id.rb4);
		radioBtn[4] = (RadioButton) findViewById(R.id.rb5);
		textView = (TextView) findViewById(R.id.textview);

		radioGroup.setOnCheckedChangeListener(new CheckChangedListener());
	}

	class CheckChangedListener implements OnCheckedChangeListener {

		@Override
		public void onCheckedChanged(RadioGroup group, int checkedId) {
			// TODO Auto-generated method stub
			if (checkedId == radioBtn[0].getId() && radioBtn[0].isChecked()) {
				textView.setText(editText.getText());
				textView.setTextColor(Color.BLUE);
				textView.setTypeface(Typeface.DEFAULT, Typeface.NORMAL);
				Toast.makeText(MainActivity.this,
						radioBtn[0].getText() + " 被选择", Toast.LENGTH_SHORT)
						.show();
			} else if (checkedId == radioBtn[1].getId() && radioBtn[1].isChecked()) {
				textView.setText(editText.getText());
				textView.setTextColor(Color.BLUE);
				textView.setTypeface(Typeface.DEFAULT_BOLD, Typeface.BOLD);
				Toast.makeText(MainActivity.this,
						radioBtn[1].getText() + " 被选择", Toast.LENGTH_SHORT)
						.show();
			} else if (checkedId == radioBtn[2].getId() && radioBtn[2].isChecked()) {
				textView.setText(editText.getText());
				textView.setTextColor(Color.BLUE);
				textView.setTypeface(Typeface.MONOSPACE, Typeface.ITALIC);
				Toast.makeText(MainActivity.this,
						radioBtn[2].getText() + " 被选择", Toast.LENGTH_SHORT)
						.show();
			} else if (checkedId == radioBtn[3].getId() && radioBtn[3].isChecked()) {
				textView.setText(editText.getText());
				textView.setTextColor(Color.BLUE);
				textView.setTypeface(Typeface.MONOSPACE, Typeface.BOLD_ITALIC);
				Toast.makeText(MainActivity.this,
						radioBtn[3].getText() + " 被选择", Toast.LENGTH_SHORT)
						.show();
			} else if (checkedId == radioBtn[4].getId() && radioBtn[4].isChecked()) {
				textView.setText(editText.getText());
				textView.setTextColor(Color.BLUE);
				textView.setTypeface(Typeface.DEFAULT_BOLD, Typeface.BOLD);
				textView.getPaint().setFakeBoldText(true);
				Toast.makeText(MainActivity.this,
						radioBtn[4].getText() + " 被选择", Toast.LENGTH_SHORT)
						.show();
			}
		}
	}
}
2.activity_main.xml
<?xml version="1.0" encoding="utf-8"?>
<LinearLayout xmlns:android="http://schemas.android.com/apk/res/android"
    android:layout_width="match_parent"
    android:layout_height="match_parent"
    android:orientation="vertical" >

    <EditText
        android:id="@+id/edittext1"
        android:layout_width="300dp"
        android:layout_height="60dp"
        android:layout_gravity="center"
        android:textSize="30sp"
        android:hint="@string/note" />

    <RadioGroup
        android:id="@+id/rg"
        android:layout_width="wrap_content"
        android:layout_height="wrap_content"
        android:layout_gravity="center"
        android:orientation="vertical" >

        <RadioButton
            android:id="@+id/rb1"
            android:layout_width="wrap_content"
        	android:layout_height="wrap_content"
        	android:text="@string/rb1" />

        <RadioButton
            android:id="@+id/rb2"
            android:layout_width="wrap_content"
        	android:layout_height="wrap_content"
        	android:text="@string/rb2" />

        <RadioButton
            android:id="@+id/rb3"
            android:layout_width="wrap_content"
        	android:layout_height="wrap_content"
        	android:text="@string/rb3" />

        <RadioButton
            android:id="@+id/rb4"
            android:layout_width="wrap_content"
        	android:layout_height="wrap_content"
        	android:text="@string/rb4" />

        <RadioButton
            android:id="@+id/rb5"
            android:layout_width="wrap_content"
        	android:layout_height="wrap_content"
        	android:text="@string/rb5" />

    </RadioGroup>

    <TextView
        android:id="@+id/textview"
        android:layout_width="300dp"
        android:layout_height="60dp"
        android:layout_gravity="center"
        android:textSize="30sp"
        android:text="@string/note" />

</LinearLayout>
3.string.xml
<resources>

    <string name="app_name">TypeFace</string>
    <string name="note">请输入文字</string>
    <string name="rb1">默认</string>
    <string name="rb2">粗体</string>
    <string name="rb3">斜体</string>
    <string name="rb4">粗斜体</string>
    <string name="rb5">仿粗体</string>

</resources>
原文:http://blog.csdn.net/sweetloverft/article/details/50817697
内容总结
以上是互联网集市为您收集整理的阅读《Android 从入门到精通》(30)——字体全部内容,希望文章能够帮你解决阅读《Android 从入门到精通》(30)——字体所遇到的程序开发问题。 如果觉得互联网集市技术教程内容还不错,欢迎将互联网集市网站推荐给程序员好友。
内容备注
版权声明:本文内容由互联网用户自发贡献,该文观点与技术仅代表作者本人。本站仅提供信息存储空间服务,不拥有所有权,不承担相关法律责任。如发现本站有涉嫌侵权/违法违规的内容, 请发送邮件至 gblab@vip.qq.com 举报,一经查实,本站将立刻删除。
内容手机端
扫描二维码推送至手机访问。
来源:【匿名】