首页 / 虚拟机 / 给EXSI虚拟机中linux硬盘扩容
给EXSI虚拟机中linux硬盘扩容
内容导读
互联网集市收集整理的这篇技术教程文章主要介绍了给EXSI虚拟机中linux硬盘扩容,小编现在分享给大家,供广大互联网技能从业者学习和参考。文章包含3683字,纯文字阅读大概需要6分钟。
内容图文

给EXSI虚拟机中linux硬盘扩容
今天公司同事过来给我说要求把公司的exsi服务器上的一台虚拟机硬盘扩大,好吧,连上exsi后,直接在原来的硬盘40G上加了20G,等我添加完后,同事才告诉我那台是linux的系统,好吧,只能连上ssh来更改了.下面就是我用另外一台虚拟机来做的实验.
系统:centos 5.x
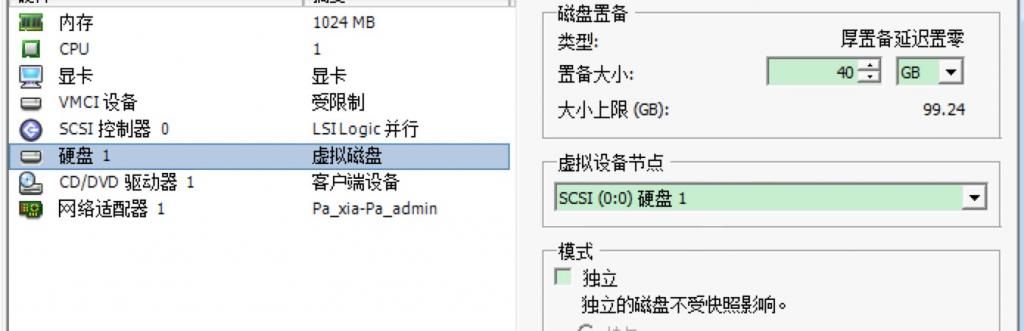
1.exsi扩容图
扩容前:
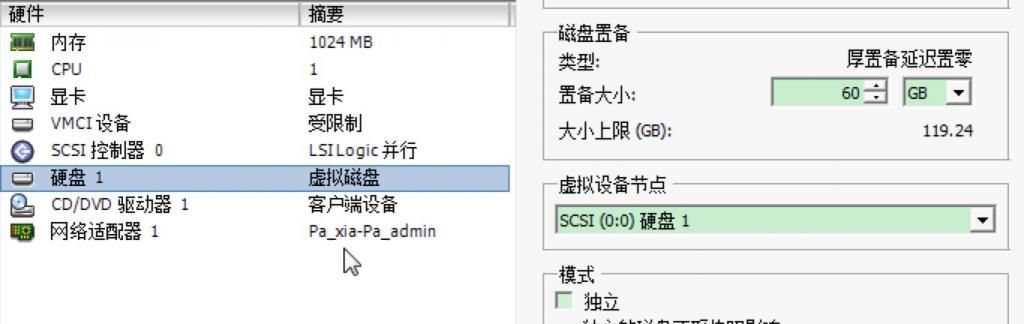
扩容后:
2.分区前准备
yum -y install parted
ps:CentOS最小化安装默认是没有partprobe命令,所以我们要用yum安装
3.查看目前硬盘状态
[root@localhost ~]# df -h
Filesystem Size Used Avail Use% Mounted on
/dev/mapper/VolGroup00-LogVol00
38G 3.2G 33G 9% /
/dev/sda1 99M 12M 82M 13% /boot
tmpfs 506M 0 506M 0% /dev/shm
[root@localhost ~]# fdisk -l
Disk /dev/sda: 64.4 GB, 64424509440 bytes
255 heads, 63 sectors/track, 7832 cylinders
Units = cylinders of 16065 * 512 = 8225280 bytes
Device Boot Start End Blocks Id System
/dev/sda1 * 1 13 104391 83 Linux
/dev/sda2 14 5221 41833260 8e Linux LVM
4.开始对硬盘扩容
[root@localhost ~]# fdisk /dev/sda
The number of cylinders for this disk is set to 7832.
There is nothing wrong with that, but this is larger than 1024,
and could in certain setups cause problems with:
1) software that runs at boot time (e.g., old versions of LILO)
2) booting and partitioning software from other OSs
(e.g., DOS FDISK, OS/2 FDISK)
Command (m for help): n
Command action
e extended
p primary partition (1-4)
p
Partition number (1-4): 3
First cylinder (5222-7832, default 5222):
Using default value 5222
Last cylinder or +size or +sizeM or +sizeK (5222-7832, default 7832):
Using default value 7832
Command (m for help): wq
The partition table has been altered!
Calling ioctl() to re-read partition table.
WARNING: Re-reading the partition table failed with error 16: Device or resource busy.
The kernel still uses the old table.
The new table will be used at the next reboot.
Syncing disks.
然后再执行:
[root@localhost ~]# fdisk -l
Disk /dev/sda: 64.4 GB, 64424509440 bytes
255 heads, 63 sectors/track, 7832 cylinders
Units = cylinders of 16065 * 512 = 8225280 bytes
Device Boot Start End Blocks Id System
/dev/sda1 * 1 13 104391 83 Linux
/dev/sda2 14 5221 41833260 8e Linux LVM
/dev/sda3 5222 7832 20972857+ 8e Linux
可以看到sda3已经出现了,表示为可用的状态.下面继续:
[root@localhost ~]# partprobe
[root@localhost ~]# partprobe /dev/sda3
ps:使用fdisk工具只是将分区信息写到磁盘,如果需要mkfs磁盘分区则需要重启系统,而使用partprobe则可以使kernel重新读取分区信息,从而避免重启系统.
5.创建物理卷及加入组
[root@localhost ~]# pvcreate /dev/sda3
Physical volume "/dev/sda3" successfully created
[root@localhost ~]# vgextend VolGroup00 /dev/sda3
Volume group "VolGroup00" successfully extended
查看物理卷情况
[root@localhost ~]# vgdisplay
--- Volume group ---
VG Name VolGroup00
System ID
Format lvm2
Metadata Areas 2
Metadata Sequence No 4
VG Access read/write
VG Status resizable
MAX LV 0
Cur LV 2
Open LV 2
Max PV 0
Cur PV 2
Act PV 2
VG Size 59.88 GB
PE Size 32.00 MB
Total PE 1916
Alloc PE / Size 1276 / 39.88 GB
Free PE / Size 640 / 20.00 GB
VG UUID qLjCMX-FZv2-Neha-Nze0-rAoq-p1R0-QV5pLu
[root@localhost ~]# lvresize -L +20G /dev/VolGroup00/LogVol00
Extending logical volume LogVol00 to 58.88 GB
Logical volume LogVol00 successfully resized
[root@localhost ~]# resize2fs /dev/VolGroup00/LogVol00
resize2fs 1.39 (29-May-2006)
Filesystem at /dev/VolGroup00/LogVol00 is mounted on /; on-line resizing required
Performing an on-line resize of /dev/VolGroup00/LogVol00 to 15433728 (4k) blocks.
The filesystem on /dev/VolGroup00/LogVol00 is now 15433728 blocks long.
6.验证
[root@localhost ~]# df -h
Filesystem Size Used Avail Use% Mounted on
/dev/mapper/VolGroup00-LogVol00
58G 3.2G 51G 6% /
/dev/sda1 99M 12M 82M 13% /boot
tmpfs 506M 0 506M 0% /dev/shm
好了,可以看到已经把新增加的容量添加进去了.
系统:centos 5.x
1.exsi扩容图
扩容前:
扩容后:
2.分区前准备
yum -y install parted
ps:CentOS最小化安装默认是没有partprobe命令,所以我们要用yum安装
3.查看目前硬盘状态
[root@localhost ~]# df -h
Filesystem Size Used Avail Use% Mounted on
/dev/mapper/VolGroup00-LogVol00
38G 3.2G 33G 9% /
/dev/sda1 99M 12M 82M 13% /boot
tmpfs 506M 0 506M 0% /dev/shm
[root@localhost ~]# fdisk -l
Disk /dev/sda: 64.4 GB, 64424509440 bytes
255 heads, 63 sectors/track, 7832 cylinders
Units = cylinders of 16065 * 512 = 8225280 bytes
Device Boot Start End Blocks Id System
/dev/sda1 * 1 13 104391 83 Linux
/dev/sda2 14 5221 41833260 8e Linux LVM
4.开始对硬盘扩容
[root@localhost ~]# fdisk /dev/sda
The number of cylinders for this disk is set to 7832.
There is nothing wrong with that, but this is larger than 1024,
and could in certain setups cause problems with:
1) software that runs at boot time (e.g., old versions of LILO)
2) booting and partitioning software from other OSs
(e.g., DOS FDISK, OS/2 FDISK)
Command (m for help): n
Command action
e extended
p primary partition (1-4)
p
Partition number (1-4): 3
First cylinder (5222-7832, default 5222):
Using default value 5222
Last cylinder or +size or +sizeM or +sizeK (5222-7832, default 7832):
Using default value 7832
Command (m for help): t (修改分区类型为 Linux LVM, 8e)
Partition number (1-4): 3
Hex code (type L to list codes): 8e
Changed system type of partition 3 to 8e (Linux LVM)
Command (m for help): wq
The partition table has been altered!
Calling ioctl() to re-read partition table.
WARNING: Re-reading the partition table failed with error 16: Device or resource busy.
The kernel still uses the old table.
The new table will be used at the next reboot.
Syncing disks.
然后再执行:
[root@localhost ~]# fdisk -l
Disk /dev/sda: 64.4 GB, 64424509440 bytes
255 heads, 63 sectors/track, 7832 cylinders
Units = cylinders of 16065 * 512 = 8225280 bytes
Device Boot Start End Blocks Id System
/dev/sda1 * 1 13 104391 83 Linux
/dev/sda2 14 5221 41833260 8e Linux LVM
/dev/sda3 5222 7832 20972857+ 8e Linux
可以看到sda3已经出现了,表示为可用的状态.下面继续:
[root@localhost ~]# partprobe
[root@localhost ~]# partprobe /dev/sda3
ps:使用fdisk工具只是将分区信息写到磁盘,如果需要mkfs磁盘分区则需要重启系统,而使用partprobe则可以使kernel重新读取分区信息,从而避免重启系统.
5.创建物理卷及加入组
[root@localhost ~]# pvcreate /dev/sda3
Physical volume "/dev/sda3" successfully created
[root@localhost ~]# vgextend VolGroup00 /dev/sda3
Volume group "VolGroup00" successfully extended
查看物理卷情况
[root@localhost ~]# vgdisplay
--- Volume group ---
VG Name VolGroup00
System ID
Format lvm2
Metadata Areas 2
Metadata Sequence No 4
VG Access read/write
VG Status resizable
MAX LV 0
Cur LV 2
Open LV 2
Max PV 0
Cur PV 2
Act PV 2
VG Size 59.88 GB
PE Size 32.00 MB
Total PE 1916
Alloc PE / Size 1276 / 39.88 GB
Free PE / Size 640 / 20.00 GB
VG UUID qLjCMX-FZv2-Neha-Nze0-rAoq-p1R0-QV5pLu
[root@localhost ~]# lvresize -L +20G /dev/VolGroup00/LogVol00
Extending logical volume LogVol00 to 58.88 GB
Logical volume LogVol00 successfully resized
[root@localhost ~]# resize2fs /dev/VolGroup00/LogVol00
resize2fs 1.39 (29-May-2006)
Filesystem at /dev/VolGroup00/LogVol00 is mounted on /; on-line resizing required
Performing an on-line resize of /dev/VolGroup00/LogVol00 to 15433728 (4k) blocks.
The filesystem on /dev/VolGroup00/LogVol00 is now 15433728 blocks long.
6.验证
[root@localhost ~]# df -h
Filesystem Size Used Avail Use% Mounted on
/dev/mapper/VolGroup00-LogVol00
58G 3.2G 51G 6% /
/dev/sda1 99M 12M 82M 13% /boot
tmpfs 506M 0 506M 0% /dev/shm
好了,可以看到已经把新增加的容量添加进去了.
原文:http://www.cnblogs.com/penm7587/p/7595342.html
内容总结
以上是互联网集市为您收集整理的给EXSI虚拟机中linux硬盘扩容全部内容,希望文章能够帮你解决给EXSI虚拟机中linux硬盘扩容所遇到的程序开发问题。 如果觉得互联网集市技术教程内容还不错,欢迎将互联网集市网站推荐给程序员好友。
内容备注
版权声明:本文内容由互联网用户自发贡献,该文观点与技术仅代表作者本人。本站仅提供信息存储空间服务,不拥有所有权,不承担相关法律责任。如发现本站有涉嫌侵权/违法违规的内容, 请发送邮件至 gblab@vip.qq.com 举报,一经查实,本站将立刻删除。
内容手机端
扫描二维码推送至手机访问。
来源:【匿名】