构建基础的SpringMVC+Hibernate+SpringloC项目
内容导读
互联网集市收集整理的这篇技术教程文章主要介绍了构建基础的SpringMVC+Hibernate+SpringloC项目,小编现在分享给大家,供广大互联网技能从业者学习和参考。文章包含9875字,纯文字阅读大概需要15分钟。
内容图文

一. SpringMVC
阅读我的上一篇文章《使用MyEclipse2015构建SpringMVC项目》,知道基本的构建方法,先构建一个纯springmvc项目,再对web.xml按照本文中做法简单改动。
二. Hibernate
之后用类似方法添加hibernate框架,并生成hibernate.cfg.xml和HibernateSessionFactory.java这个工厂文件。
进入MyEclipse Database Explorer,首先添加自己的服务器,之后,连接服务器,在所需的表(可多选)上右键Hibernate Reverse Engineering,根据所需功能生成实体类,不要忘记选择好主键策略。
三. Spring
这里给出只用springmvc-servlet.xml而不使用application.xml的方法
web.xml
            <?
            xml version="1.0" encoding="UTF-8"
            ?>
            <
            web-app
            xmlns:xsi
            ="http://www.w3.org/2001/XMLSchema-instance"
             xmlns
            ="http://java.sun.com/xml/ns/javaee"
             xsi:schemaLocation
            ="http://java.sun.com/xml/ns/javaee http://java.sun.com/xml/ns/javaee/web-app_3_0.xsd"
             version
            ="3.0"
            >
            <
            servlet
            >
            <
            servlet-name
            >springmvc</servlet-name><servlet-class>org.springframework.web.servlet.DispatcherServlet</servlet-class><init-param><param-name>contextConfigLocation</param-name><param-value>classpath:springmvc-servlet.xml</param-value></init-param></servlet><servlet-mapping><servlet-name>springmvc</servlet-name><url-pattern>/</url-pattern></servlet-mapping><display-name>Spring4</display-name><listener><listener-class>org.springframework.web.context.ContextLoaderListener</listener-class></listener><context-param><param-name>contextConfigLocation</param-name><param-value>classpath:springmvc-servlet.xml</param-value></context-param><welcome-file-list><welcome-file>index.jsp</welcome-file></welcome-file-list></web-app>
src目录下的springmvc-servlet
            <?
            xml version="1.0" encoding="UTF-8"
            ?>
            <
            beans
            xmlns
            ="http://www.springframework.org/schema/beans"

    xmlns:xsi
            ="http://www.w3.org/2001/XMLSchema-instance"

    xmlns:context
            ="http://www.springframework.org/schema/context"

    xmlns:mvc
            ="http://www.springframework.org/schema/mvc"

    xsi:schemaLocation
            ="http://www.springframework.org/schema/beans http://www.springframework.org/schema/beans/spring-beans.xsd
        http://www.springframework.org/schema/context http://www.springframework.org/schema/context/spring-context-4.1.xsd
        http://www.springframework.org/schema/mvc http://www.springframework.org/schema/mvc/spring-mvc-4.1.xsd"
            >
            <!--
             scan the package and the sub package
            --此处选择你需要注释的文件所在的公共包>
            <
            context:component-scan
            base-package
            ="com.cielo.*"
            />
            <!--
             don‘t handle the static resource
            -->
            <
            mvc:default-servlet-handler
            />
            <!--
             if you use annotation you must configure following setting
            -->
            <
            mvc:annotation-driven
            />
            <!--
             configure the InternalResourceViewResolver
            -->
            <
            bean
            class
            ="org.springframework.web.servlet.view.InternalResourceViewResolver"

            id
            ="internalResourceViewResolver"
            >
            <!--
             前缀
            -->
            <
            property
            name
            ="prefix"
             value
            ="/WEB-INF/jsp/"
            />
            <!--
             后缀
            -->
            <
            property
            name
            ="suffix"
             value
            =".jsp"
            />
            </
            bean
            >
            </
            beans
            >
这样,你就可以用近乎于无配置的方法去处理耦合
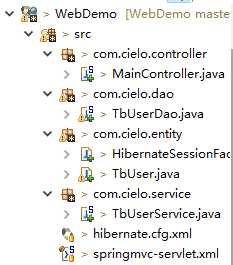
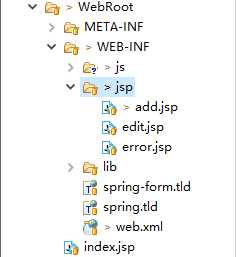
目录结构
四.Spring Annotation标签
spring目前支持用几乎无配置文件方法进行项目构建,这里简单列一个标签表
@Component
spring目前用来实现自动生成beans的标签,但是实际开发中,为了更方便阅读,一般使用三个与此等效的标签来表明层次,分别是
@Controller, @Service, @Repository
对应控制器层,业务层和DAO层。
@Autowired
根据类型名称实现自动装配,可以配合@Qualifier("Bean名称")来实现依据名字自动装配。
@Resource
根据变量名称实现自动装配。
需要注意一下,以上两个标签想实现自动装配,被装配的类要实现set和get方法
@RequestMapping("/url")
@RequestMapping(value="url",method=RequestMethod.方法名)
这个标签来定义Controller层的控制器/函数的对应连接,第二种方法可以选择post或者get方法,从而获取post和get数据。
贴一下上图目录结构中一些部分的代码
MainController.java
            package
             com.cielo.controller;


            import
             javax.servlet.http.HttpServletRequest;


            import
             org.springframework.beans.factory.annotation.Autowired;

            import
             org.springframework.stereotype.Controller;

            import
             org.springframework.web.bind.annotation.RequestMapping;

            import
             org.springframework.web.bind.annotation.RequestMethod;


            import
             com.cielo.service.TbUserService;

@Controller
@RequestMapping("/Main")
publicclass MainController {
    @Autowired
    TbUserService tbUserService;
    @RequestMapping("/add")
    public String add() {
        return "add";
    }

    @RequestMapping(value = "/edit", method = RequestMethod.POST)
    public String edit(HttpServletRequest request) {
        boolean success = tbUserService.addAUserByNameAndPassword(
                request.getParameter("name"), request.getParameter("password"));
        if (success)
            return "edit";
        return "error";
    }

    public TbUserService getTbUserService() {
        return tbUserService;
    }

    publicvoid setTbUserService(TbUserService tbUserService) {
        this.tbUserService = tbUserService;
    }
}
TbUserService.java
            package
             com.cielo.service;


            import
             org.springframework.beans.factory.annotation.Autowired;

            import
             org.springframework.stereotype.Service;


            import
             com.cielo.dao.TbUserDao;

            import
             com.cielo.entity.TbUser;
@Service

            public
            class
             TbUserService {
    @Autowired

            private
             TbUserDao tbUserDao;

            public
            boolean
             addAUserByNameAndPassword(String name, String password) {
        TbUser tbUser = new TbUser();
        tbUser.setName(name);
        tbUser.setPassword(password);
        return tbUserDao.add(tbUser);
    }
    public TbUserDao getTbUserDao() {
        return tbUserDao;
    }
    publicvoid setTbUserDao(TbUserDao tbUserDao) {
        this.tbUserDao = tbUserDao;
    }
    public TbUserService(TbUserDao tbUserDao) {
        this.tbUserDao = tbUserDao;
    }
    public TbUserService() {
        // TODO Auto-generated constructor stub    }
}
TbUserDao.java(Dao负责直接和数据库对接操作,比较长,折叠给出)


                package
                 com.cielo.dao;


                import
                 java.util.List;


                import
                 org.hibernate.Query;

                import
                 org.hibernate.Session;

                import
                 org.springframework.stereotype.Repository;


                import
                 com.cielo.entity.HibernateSessionFactory;

                import
                 com.cielo.entity.TbUser;
@Repository

                public
                class
                 TbUserDao {

                public
                boolean
                 add(TbUser tbUser) {
        Session session = null;
        try {
            session = HibernateSessionFactory.getSession();
            session.beginTransaction();
            session.save(tbUser);
            session.getTransaction().commit();
            System.out.println("Success to add the user");
            returntrue;
        } catch (Exception e) {
            session.getTransaction().rollback();
            System.out.println("Fail to add the user");
            e.printStackTrace();
        }
        returnfalse;
    }

    public TbUser selectById(int id){
        Session session=null;
        try{
            session=HibernateSessionFactory.getSession();
            String hql="from TbUser as tb_user where tb_user.id=:id";
            Query query=session.createQuery(hql);
            query.setInteger("id", id);
            List list=query.list();
            return (TbUser) list.get(0);
        }catch(Exception e){
            System.out.println("Fail to select the item by id");
            e.printStackTrace();
        }
        returnnull;
    }

    public TbUser selectByName(String name){
        Session session=null;
        try{
            session=HibernateSessionFactory.getSession();
            String hql="from TbUser as tb_user where tb_user.name=:name";
            Query query=session.createQuery(hql);
            query.setString("name", name);
            List list=query.list();
            return (TbUser) list.get(0);
        }catch(Exception e){
            System.out.println("Fail to select the item by name");
            e.printStackTrace();
        }
        returnnull;
    }

    publicboolean deleteById(int id){
        Session session=null;
        try{
            session=HibernateSessionFactory.getSession();
            session.beginTransaction();
            String hqlString="delete from TbUser tb_user where tb_user.id=:id";
            Query query=session.createQuery(hqlString);
            query.setInteger("id", id);
            session.getTransaction().commit();
            returntrue;
        }catch(Exception e){
            session.getTransaction().rollback();
            System.out.println("Fail to delete the item by id");
            e.printStackTrace();
        }
        returnfalse;
    }

    publicboolean deleteByName(String name){
        Session session=null;
        try{
            session=HibernateSessionFactory.getSession();
            session.beginTransaction();
            String hqlString="delete from TbUser tb_user where tb_user.name=:name";
            Query query=session.createQuery(hqlString);
            query.setString("name", name);
            session.getTransaction().commit();
            returntrue;
        }catch(Exception e){
            session.getTransaction().rollback();
            System.out.println("Fail to delete the item by name");
            e.printStackTrace();
        }
        returnfalse;
    }

    publicboolean deleteByTbUser(TbUser tbUser){
        Session session=null;
        try{
            session=HibernateSessionFactory.getSession();
            session.beginTransaction();
            session.delete(tbUser);
            session.getTransaction().commit();
            returntrue;
        }catch(Exception e){
            session.getTransaction().rollback();
            System.out.println("Fail to delete the item by tbUser");
            e.printStackTrace();
        }
        returnfalse;
    }

    publicboolean update(TbUser tbUser) {
        Session session = null;
        try {
            session = HibernateSessionFactory.getSession();
            session.beginTransaction();
            session.update(tbUser);
            session.getTransaction().commit();
            System.out.println("Success to update the user");
            returntrue;
        } catch (Exception e) {
            session.getTransaction().rollback();
            System.out.println("Fail to update the user");
            e.printStackTrace();
        }
        returnfalse;
    }

    public TbUserDao() {
        // TODO Auto-generated constructor stub    }
}
TbUser实体类,利用hibernate自动生成的标签,不再需要hbm文件去对应,只需要再hibernate.cfg.xml中设置一下Mapping即可
                package
                 com.cielo.entity;


                import
                 javax.persistence.Column;

                import
                 javax.persistence.Entity;

                import
                 javax.persistence.GeneratedValue;

                import
                 javax.persistence.Id;

                import
                 javax.persistence.Table;


                /**

 * TbUser entity.
                @author
                 MyEclipse Persistence Tools

                */

@Entity
@Table(name = "tb_user", schema = "dbo", catalog = "Web")
publicclass TbUser implements java.io.Serializable {

    // Fieldsprivate Integer id;
    private String name;
    private String password;

    // Constructors/** default constructor */public TbUser() {
    }

    /** full constructor */public TbUser(Integer id, String name, String password) {
        this.id = id;
        this.name = name;
        this.password = password;
    }

    // Property accessors    @Id
    @Column(name = "id", unique = true, nullable = false)
    @GeneratedValue
    public Integer getId() {
        returnthis.id;
    }

    publicvoid setId(Integer id) {
        this.id = id;
    }

    @Column(name = "name", nullable = false)
    public String getName() {
        returnthis.name;
    }

    publicvoid setName(String name) {
        this.name = name;
    }

    @Column(name = "password", nullable = false)
    public String getPassword() {
        returnthis.password;
    }

    publicvoid setPassword(String password) {
        this.password = password;
    }

}
完整代码见github上此项目
原文:http://www.cnblogs.com/cielosun/p/5765818.html
内容总结
以上是互联网集市为您收集整理的构建基础的SpringMVC+Hibernate+SpringloC项目全部内容,希望文章能够帮你解决构建基础的SpringMVC+Hibernate+SpringloC项目所遇到的程序开发问题。 如果觉得互联网集市技术教程内容还不错,欢迎将互联网集市网站推荐给程序员好友。
内容备注
版权声明:本文内容由互联网用户自发贡献,该文观点与技术仅代表作者本人。本站仅提供信息存储空间服务,不拥有所有权,不承担相关法律责任。如发现本站有涉嫌侵权/违法违规的内容, 请发送邮件至 gblab@vip.qq.com 举报,一经查实,本站将立刻删除。
内容手机端
扫描二维码推送至手机访问。