【Typescript】环境搭建(1)
内容导读
互联网集市收集整理的这篇技术教程文章主要介绍了【Typescript】环境搭建(1),小编现在分享给大家,供广大互联网技能从业者学习和参考。文章包含2866字,纯文字阅读大概需要5分钟。
内容图文
")
后面会写一些Typescript相关的一些内容,会先从简单的环境搭建,基本类型,枚举类型,类,接口等基础开始。再慢慢记录一些实战内容。
项目目录结构: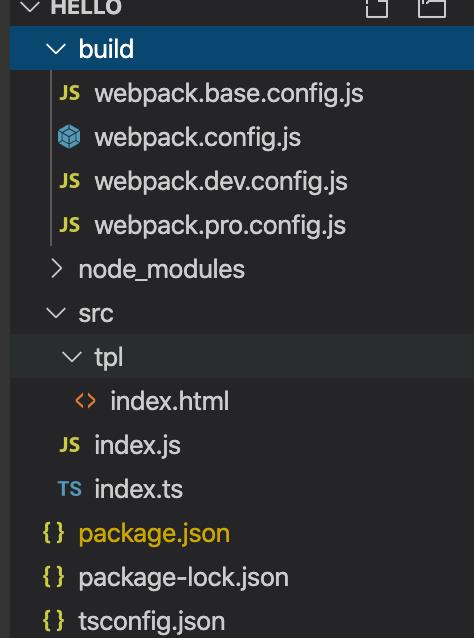
环境搭建
1、安装TS
TS 安装可以选择全局安装npm i typescript -g
2、TS config
tsc --init
创建成功以后会在跟目录下创建一个tsconfig.json
3、package.json
npm init
会创建一个package.json文件。可以拷贝下面的内容,然后执行npm install 安装
        {
  "name": "Typescript",
  "version": "1.0.0",
  "description": "",
  "main": "./src/index.ts",
  "scripts": {
    "start": "webpack-dev-server --mode=development --config ./build/webpack.config.js",
    "build": "webpack --mode=production --config ./build/webpack.config.js",
    "lint": "eslint src --ext .js,.ts",
    "test": "jest"
  },
  "author": "",
  "license": "ISC",
  "devDependencies": {
    "@types/jest": "^24.0.15",
    "@types/jquery": "^3.3.29",
    "@types/source-map": "^0.5.2",
    "@typescript-eslint/eslint-plugin": "^1.10.2",
    "@typescript-eslint/parser": "^1.10.2",
    "awesome-typescript-loader": "^5.2.1",
    "clean-webpack-plugin": "^3.0.0",
    "eslint": "^5.16.0",
    "fork-ts-checker-webpack-plugin": "^1.3.7",
    "html-webpack-plugin": "^3.2.0",
    "jest": "^24.8.0",
    "ts-jest": "^24.0.2",
    "ts-loader": "^6.0.2",
    "typescript": "^3.5.1",
    "webpack": "^4.32.2",
    "webpack-cli": "^3.3.2",
    "webpack-dev-server": "^3.5.1",
    "webpack-merge": "^4.2.1"
  }
}
创建index.html
创建src/tpl/index.html文件
        <!DOCTYPE html>
<html lang="en">
<head>
    <meta charset="UTF-8">
    <meta name="viewport" content="width=device-width, initial-scale=1.0">
    <meta http-equiv="X-UA-Compatible" content="ie=edge">
    <title>TypeScript in Action</title>
</head>
<body>
    <div ></div>
</body>
</html>
创建ts文件
新建src, 新建index.ts
        let text: string = ‘Hello Typescript‘;
document.querySelectorAll(‘.app‘)[0].innerHTML = hello;
webpack 配置
创建build文件。新建webpack.base.config.js, webpack.config.js, webpack.dev.config.js, webpack.pro.config.js
webpack.base.config.js:
        const HtmlWebpackPlugin = require(‘html-webpack-plugin‘)

module.exports = {
    entry: ‘./src/index.ts‘,
    output: {
        filename: ‘app.js‘
    },
    resolve: {
        extensions: [‘.js‘, ‘.ts‘, ‘.tsx‘]
    },
    module: {
        rules: [
            {
                test: /\.tsx?$/i,
                use: [{
                    loader: ‘ts-loader‘
                }],
                exclude: /node_modules/
            }
        ]
    },
    plugins: [
        new HtmlWebpackPlugin({
            template: ‘./src/tpl/index.html‘
        })
    ]
}
webpack.config.js:
        const merge = require(‘webpack-merge‘)
const baseConfig = require(‘./webpack.base.config‘)
const devConfig = require(‘./webpack.dev.config‘)
const proConfig = require(‘./webpack.pro.config‘)

module.exports = (env, argv) => {
    let config = argv.mode === ‘development‘ ? devConfig : proConfig;
    return merge(baseConfig, config);
};
webpack.dev.config.js:
        module.exports = {
    devtool: ‘cheap-module-eval-source-map‘
}
webpack.pro.config.js:
        const { CleanWebpackPlugin } = require(‘clean-webpack-plugin‘)

module.exports = {
    plugins: [
        new CleanWebpackPlugin()
    ]
}
启动
npm run start
原文:https://www.cnblogs.com/Joannamo/p/14489103.html
内容总结
以上是互联网集市为您收集整理的【Typescript】环境搭建(1)全部内容,希望文章能够帮你解决【Typescript】环境搭建(1)所遇到的程序开发问题。 如果觉得互联网集市技术教程内容还不错,欢迎将互联网集市网站推荐给程序员好友。
内容备注
版权声明:本文内容由互联网用户自发贡献,该文观点与技术仅代表作者本人。本站仅提供信息存储空间服务,不拥有所有权,不承担相关法律责任。如发现本站有涉嫌侵权/违法违规的内容, 请发送邮件至 gblab@vip.qq.com 举报,一经查实,本站将立刻删除。
内容手机端
扫描二维码推送至手机访问。