【iOS基础控件 - 15】- UINavigationController 多控制器 简单使用
内容导读
互联网集市收集整理的这篇技术教程文章主要介绍了【iOS基础控件 - 15】- UINavigationController 多控制器 简单使用,小编现在分享给大家,供广大互联网技能从业者学习和参考。文章包含7190字,纯文字阅读大概需要11分钟。
内容图文

A.概念
1.通常一个app有多个控制器
2.需要对这些控制器进行管理
3.有多个view的时候,用一个父view去管理多个子view
4.控制器管理也是如此,使用给一个父控制器,去控制子控制器
为了方便管理控制器,系统提供了两个控制器
- UINavigationController
- UITabBarController
B.UINavigationController的使用
UINavigationController的使用步骤
初始化UINavigationController
设置UIWindow的rootViewController为UINavigationController
初始化UINavigationController
设置UIWindow的rootViewController为UINavigationController
根据具体情况,通过push方法添加对应个数的子控制器
1.初始化
2.设置为rootViewController
 1 - (BOOL)application:(UIApplication *)application didFinishLaunchingWithOptions:(NSDictionary *)launchOptions {
 2     // 设置window
 3     self.window = [[UIWindow alloc] init];
 4     self.window.frame = [[UIScreen mainScreen] bounds];
 5     self.window.backgroundColor = [UIColor grayColor]; // window是灰色背景
 6     [self.window makeKeyAndVisible];
 7
 8
 9     // 设置UINavigationController
10     UINavigationController *nvController = [[UINavigationController alloc] init];
11     nvController.view.backgroundColor = [UIColor blueColor]; // 设置蓝色背景
12     self.window.rootViewController = nvController;
13
14     return YES;
15 }
3.通过push方法,增加子控制器
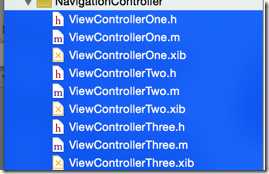
(1)创建3个控制器和绑定的xib文件
")
(2)一次push进navigationController的子控制器栈
 1     // 配置第一个子控制器
 2     ViewControllerOne *vc1 = [[ViewControllerOne alloc] init];
 3     [nvController pushViewController:vc1 animated:YES];
 4
 5     // 配置第二个子控制器
 6     ViewControllerTwo *vc2 = [[ViewControllerTwo alloc] init];
 7     [nvController pushViewController:vc2 animated:YES];
 8
 9     // 配置第三个子控制器,这是栈顶的控制器
10     ViewControllerThree *vc3 = [[ViewControllerThree alloc] init];
11     [nvController pushViewController:vc3 animated:YES];
(3)显示的是栈顶控制器的view
")
C.子控制器的管理原理
1.导航条在状态栏(高度20)下,高度44
1 - (void)applicationDidBecomeActive:(UIApplication *)application {
2     // 必须在加载完毕激活app后,所有的view的尺寸位置才能确定
3     UINavigationController *nvController = (UINavigationController *)self.window.rootViewController;
4     NSLog(@"%@", NSStringFromCGRect(nvController.view.frame)); // 整个导航控制器的frame
5     NSLog(@"%@", NSStringFromCGRect(nvController.navigationBar.frame)); // 导航条的frame
6 }
7
out:
NavigationController[2669:183137] {{0, 0}, {320, 480}}
2014-12-19 21:16:30.413 NavigationController[2669:183137] {{0, 20}, {320, 44}}
2.UINavigationController有一个子控制器的栈,使用push方法就是往栈里面添加子控制器
1 @property(nonatomic,copy) NSArray *viewControllers; // The current view controller stack.
3.push子控制器的同时,替换window上的view,显示的总是栈顶控制器的view
1 - (void)pushViewController:(UIViewController *)viewController animated:(BOOL)animated; // Uses a horizontal slide transition. Has no effect if the view controller is already in the stack.
D.子控制器栈的操作
1.栈和添加子控制器
(1)使用"pushViewController"
1     // 配置第一个子控制器
2     ViewControllerOne *vc1 = [[ViewControllerOne alloc] init];
3     [nvController pushViewController:vc1 animated:YES];
(2)使用 "addChildController"
- UINavigationController中的”viewControllers"成员是一个数组,就是子控制器栈
- "childViewControllers"的功能也是一样的(这是UIViewController的成员属性)
- "addChildController"和"pushViewController"的功能一样(这是UIViewController的方法)
// 配置第一个子控制器
1     ViewControllerOne *vc1 = [[ViewControllerOne alloc] init];
2     [nvController addChildViewController:vc1];
(3)直接放入viewControllers数组
1     // 配置第一个子控制器
2     ViewControllerOne *vc1 = [[ViewControllerOne alloc] init];
3     nvController.viewControllers = @[vc1];
(4)初始化的时候指定rootViewController
1     // 传入一个viewController作为 nvController的 rootViewController
2     nvController = [[UINavigationController alloc] initWithRootViewController:vc1];
注意:不要混用"pushViewController"和"addChildViewController",有些情况会出现没有把控制器加入到栈。而且很混乱,完全不能预见结果。
(5)使用事件进行入栈
a.给第二个控制器的view加上两个按钮,分别跳向第三个和第四个控制器的view
")
b.点击事件方法
每个控制器都有一个navigationController属性,通知navigationController进行操作
 1 - (IBAction)goToThree {
 2     // 配置第三个子控制器
 3     ViewControllerThree *vc3 = [[ViewControllerThree alloc] init];
 4     [self.navigationController pushViewController:vc3 animated:YES];
 5 }
 6
 7 - (IBAction)gotoFour {
 8     // 配置第四个子控制器
 9     ViewControllerFour *vc4 = [[ViewControllerFour alloc] init];
10     [self.navigationController pushViewController:vc4 animated:YES];
11 }
2.主动出栈
(1)使用"popViewControllerAnimated:YES",弹出一个控制器
1 // 这里是第三个,要回到第二个
2 - (IBAction)backtoTwo {
3     [self.navigationController popViewControllerAnimated:YES];
4 }
(2)使用 "popToViewController" 弹出控制器,直到指定的控制器
(3)使用 "popToRootViewController" 弹出占内的控制器,直到rootViewController,回到栈底的控制器
1 // 现在是第三个控制器的view,要回到第一个控制器的view
2 - (IBAction)backtoOne {
3     // 其实这里拿不到第一个控制器vc1的引用
4 //    [self.navigationController popToViewController:vc1 animated:YES];
5
6     // 直接弹出,直到导航器的rootViewController,就是第一个子控制器vc1了
7     [self.navigationController popToRootViewControllerAnimated:YES];
8 }
E.设置导航条
1.导航条内容由栈顶控制器控制
2.使用navigationItem控制导航条内容
(1)标题title / titleView(这是UIViewController的成员属性)
1 @property(nonatomic,copy) NSString *title; // Localized title for use by a parent controller.
sample:设置第一个控制器的title
1 - (void)viewDidLoad {
2     [super viewDidLoad];
3     self.navigationItem.title = @"第一个view";
4 }
")
(2)leftBarButtonItem / leftBarButtonItems,会覆盖“返回”按钮
(3)rightBarButtonItem / rightBarButtonItems
 1 - (void)viewDidLoad {
 2     [super viewDidLoad];
 3     self.navigationItem.title = @"第二个控制器";
 4
 5 //     设置左上角的item
 6     self.navigationItem.leftBarButtonItem = [[UIBarButtonItem alloc] initWithTitle:@"我要回去" style:UIBarButtonItemStylePlain target:nil action:nil];
 7
 8     // 设置右上角的item
 9     // 使用bar按钮
10     UIBarButtonItem *item1 = [[UIBarButtonItem alloc] initWithBarButtonSystemItem:UIBarButtonSystemItemCompose target:nil action:nil];
11
12     // 使用自定义view
13     UIBarButtonItem *item2 = [[UIBarButtonItem alloc] initWithCustomView:[UIButton buttonWithType:UIButtonTypeContactAdd]];
14
15     // 这是这是从右到左排列显示
16     self.navigationItem.rightBarButtonItems = @[item1,item2];
17 }
")
注意: leftBarButtonItems 显示出来是按照数组顺序从左到右,而rightBarButtonItems是从右到左
例如把上面右边的items都放到左边:
self.navigationItem.leftBarButtonItems = @[item1, item2];
")
3.设置了上一级title之后,如果没有覆盖leftBarButtonItem(s),会自动使用上一级的title替换"返回"按钮的文字
")
-->左上角显示的文字是由上一级的控制器控制的
navigationItem.backBarButtonItem
1 // 第二个控制器
2 - (void)viewDidLoad {
3     [super viewDidLoad];
4      ...
5     // 设置第二个控制器的“返回”样式
6     self.navigationItem.backBarButtonItem = [[UIBarButtonItem alloc] initWithTitle:@"速速回2" style:UIBarButtonItemStylePlain target:nil action:nil];
7 }
4.navigatonBar就是整条导航条
nvController.navigationBar
当所有东西加载完毕之后,导航条的frame才能被初始化完毕
1 - (void)applicationDidBecomeActive:(UIApplication *)application {
2     // 必须在加载完毕激活app后,所有的view的尺寸位置才能确定
3     UINavigationController *nvController = (UINavigationController *)self.window.rootViewController;
4     NSLog(@"%@", NSStringFromCGRect(nvController.view.frame)); // 整个导航控制器的frame
5     NSLog(@"%@", NSStringFromCGRect(nvController.navigationBar.frame)); // 导航条的frame
6 }
out:
2014-12-19 23:12:51.049 NavigationController[4214:236071] {{0, 0}, {320, 480}}
2014-12-19 23:12:51.050 NavigationController[4214:236071] {{0, 20}, {320, 44}}
最后的点击链接图:
F.利用storyboard导航
1.创建一个基本的导航界面
(1)创建一个single view application,删除自带的ViewController类
(2)删除原来的ViewController,拖入一个NavigationController,并设置为Initial View Controller
(3)删除自带的rootViewController,拖入一个UIViewController
(4)设置新拖入的UIViewController为导航器的rootViewController
(5)设置UIView,这就是第一个页面
双击相应位置就可以编辑文字(例如title),但是使用storyboard方法不能拖入BarButtonItems组。
(6)拖入一个UIView到UIViewController,并且加入一些元素
运行效果:
2.创建跳转导航功能
(1)在第一个控制器的view中加入两个跳转按钮,拖入两个UIViewController
(2)拖曳指向,使用"push"事件
实现效果:这样在第一个控制器界面,就能跳转到第二个或者第三个控制器的界面了
注意:不要制造往回导航的按钮,其实是重新创建了一个控制器加入到控制器栈中
G.控制器的生命周期
1.生命周期方法
2.内存警告处理流程
当内存不够的时候,优先回收不存在屏幕上的view
所以应该在viewDidUnload方法中释放数据
原文:http://www.cnblogs.com/kengsir/p/4281913.html
内容总结
以上是互联网集市为您收集整理的【iOS基础控件 - 15】- UINavigationController 多控制器 简单使用全部内容,希望文章能够帮你解决【iOS基础控件 - 15】- UINavigationController 多控制器 简单使用所遇到的程序开发问题。 如果觉得互联网集市技术教程内容还不错,欢迎将互联网集市网站推荐给程序员好友。
内容备注
版权声明:本文内容由互联网用户自发贡献,该文观点与技术仅代表作者本人。本站仅提供信息存储空间服务,不拥有所有权,不承担相关法律责任。如发现本站有涉嫌侵权/违法违规的内容, 请发送邮件至 gblab@vip.qq.com 举报,一经查实,本站将立刻删除。
内容手机端
扫描二维码推送至手机访问。
来源:【匿名】