JavaScript教程之移动端轮播图效果的实现
内容导读
互联网集市收集整理的这篇技术教程文章主要介绍了JavaScript教程之移动端轮播图效果的实现,小编现在分享给大家,供广大互联网技能从业者学习和参考。文章包含4981字,纯文字阅读大概需要8分钟。
内容图文
 这篇文章主要为大家详细介绍了js实现移动端轮播图效果,具有一定的参考价值,感兴趣的小伙伴们可以参考一下
本文实例为大家分享了移动端轮播图效果展示的具体代码,供大家参考,具体内容如下
<!DOCTYPE html>
<html lang="en">
<head>
<meta charset="UTF-8">
<meta name="viewport" content="width=device-width, user-scalable=no, initial-scale=1.0, maximum-scale=1.0, minimum-scale=1.0">
<title>Document</title>
<link rel="stylesheet" href="reset.css" rel="external nofollow" >
<style>
html,body{
width:100%;
overflow-x:hidden;
}
html{
font-size:100px;
}
.banner{
position:relative;
height:3rem;
overflow:hidden;
}
.banner .wrapper{
position:absolute;
top:0;
left:-100%;
height:100%;
}
.banner .wrapper .slide{
float:left;
height:100%;
background:#eee;
}
.banner .wrapper .slide img{
display:none;
width:100%;
height:100%;
}
.tip{
position:absolute;
left:0;
bottom:.1rem;
width:100%;
height:.16rem;
text-align:center;
}
.tip li{
display:inline-block;
margin:0 .03rem;
width:.16rem;
height:.16rem;
background:rgba(0,0,0,0.2);
border-radius:50%;
vertical-align:top;
}
.tip li.bg{
background:#007aff;
}
</style>
</head>
<body>
<section class='banner'>
<p class='wrapper'>
<!--实现无缝滚动:把第一张放末尾 最后一张放开头-->
<p class='slide'><img src="img/banner5.jpg" alt=""></p>
<p class='slide'><img src="img/banner1.jpg" alt=""></p>
<p class='slide'><img src="img/banner2.jpg" alt=""></p>
<p class='slide'><img src="img/banner3.jpg" alt=""></p>
<p class='slide'><img src="img/banner4.jpg" alt=""></p>
<p class='slide'><img src="img/banner5.jpg" alt=""></p>
<p class='slide'><img src="img/banner1.jpg" alt=""></p>
</p>
<ul class='tip'>
<li class='bg'></li>
<li></li>
<li></li>
<li></li>
<li></li>
</ul>
</section>
<script charset='utf-8' src='zepto.min.js'></script>
<script charset='utf-8'>
//REM
~function(){
document.documentElement.style.fontSize = document.documentElement.clientWidth/640*100 + 'px';
}()
//页面中如果自己使用了TOUCH MOVE等原生事件,需要把浏览器的默认行为阻止掉
$(document).on('touchmove touchstart touchend',function(ev){
ev.preventDefault();
})
//BANNER
var bannerRender = (function(){
var winW = document.documentElement.clientWidth,
maxL = 0,
minL = 0;
var $banner = $('.banner'),
$wrapper = $banner.children('.wrapper'),
$slideList = $wrapper.children('.slide'),
$imgList = $wrapper.find('img');
var step = 1,
count = 0,
followTimer = null;
//public fn
function isSwipe(strX,strY,endX,endY){
return Math.abs(endX - strX)>30 || Math.abs(endY - strY) > 30)
}
function swipeDir(strX,strY,endX,endY){
return Math.abs(endX - strX)>=Math.abs(endY - strY)?(endX - strX>0?'right':'left'):(endY - strY>0?'down':'up');
}
//touch start
function dragStart(ev){
var point = ev.touches[0];
$wrapper.attr({
strL:parseFloat($wrapper.css('left')),
strX:point.clientX,
strY:point.clientY,
isMove:false,
dir:null,
changeX:null
})
}
//touch move
function dragIng(ev){
var point = ev.touches[0];
var endX = point.clientX,
endY = point.clientY,
strX = parseFloat($wrapper.attr('strX')),
strY = parseFloat($wrapper.attr('strY')),
strL = parseFloat($wrapper.attr('strL')),
changeX = endX - strX;
//计算出是否滑动以及滑动的方向:只有是左右滑动才进行处理
var isMove = isSwipe(strX,strY,endX,endY),
dir = swipeDir(strX,strY,endX,endY);
if(isMove && /(left|right)/i.test(dir)){
$wrapper.attr({
isMove:true,
dir:dir,
changeX:changeX
});
var curL = strL+changeX;
curL = curL>maxL?maxL:(curL<minL?minL:curL);
$wrapper[0].style.webkitTransitionDuration = '0s';
$wrapper.css('left',curL);
}
}
//touch end
function dragEnd(){
var isMove = $wrapper.attr('isMove'),
dir = $wrapper.attr('dir'),
changeX = parseFloat($wrapper.attr('changeX'));
if(isMove && /(left|right)/i.test(dir)){
if(Math.abs(changeX)>=winW/2){
if(dir==='left'){
step++;
}else{
step--;
}
}
}
$wrapper[0].style.webkitTransitionDuration = '.2s';
$wrapper.css('left',-step*winW);
lazyImg();
//动画运动过程中,我们监听一个定时器:动画运动完成判断当前是否运动到边界,如果运动到达了边界,我们让其立马回到自己的真实位置
window.clearTimeout(followTimer)
followTimer = window.setTimeout(function(){
if(step===0){
$wrapper[0].style.webkitTransitionDuration = '0s';
$wrapper.css('left',-(count-2)*winW);
step = count-2;
lazyImg();
}
if(step===count-1){
$wrapper[0].style.webkitTransitionDuration = '0s';
$wrapper.css('left',-winW);
step = 1;
lazyImg();
}
window.clearTimeout(followTimer)
},200)
}
//图片延迟加载,让当前的活动块及相邻的两个活动块进行加载
function lazyImg(){
var $cur = $slideList.eq(step),
$tar = $cur.add($cur.prev()).add($cur.next());
$tar.each(function(index,item){
var $img = $(item).children('img');
if($img.attr('isLoad')==='true'){
//ATTR存储或者获取的属性值都是一个字符串,如果当前的图片已经加载过了,我们就不需要重新的加载了
return;
}
var oImg = new Image;
oImg.src = $img.attr('src');
oImg.onload = function(){
$img.attr({
src:this.src,
isLoad:true
}).css('display','block')
oImg = null;
}
})
}
return{
init:function(){
//init css style
count = $slideList.length;
minL = -($slideList.length-1)*winW;
$wrapper.css('width',$slideList.length*winW);
$slideList.css('width',winW);
//lazy img
lazyImg();
$banner.on('touchstart',dragStart).on('touchmove',dragIng).on('touchend',dragEnd)
}
}
})()
bannerRender.init();
</script>
</body>
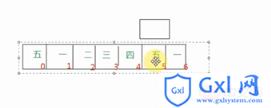
</html>边界判断逻辑可参照下图
以上就是JavaScript教程之移动端轮播图效果的实现的详细内容,更多请关注Gxl网其它相关文章!
内容总结
以上是互联网集市为您收集整理的JavaScript教程之移动端轮播图效果的实现全部内容,希望文章能够帮你解决JavaScript教程之移动端轮播图效果的实现所遇到的程序开发问题。 如果觉得互联网集市技术教程内容还不错,欢迎将互联网集市网站推荐给程序员好友。
内容备注
版权声明:本文内容由互联网用户自发贡献,该文观点与技术仅代表作者本人。本站仅提供信息存储空间服务,不拥有所有权,不承担相关法律责任。如发现本站有涉嫌侵权/违法违规的内容, 请发送邮件至 gblab@vip.qq.com 举报,一经查实,本站将立刻删除。
内容手机端
扫描二维码推送至手机访问。
来源:【匿名】