首页 / VUE / 详解前后端分离之VueJS前端
详解前后端分离之VueJS前端
内容导读
互联网集市收集整理的这篇技术教程文章主要介绍了详解前后端分离之VueJS前端,小编现在分享给大家,供广大互联网技能从业者学习和参考。文章包含3749字,纯文字阅读大概需要6分钟。
内容图文

前言
前端用什么框架都可以,这里选择小巧的vuejs。
要实现的功能很简单:
1、登录功能,成功将服务器返回的token存在本地
2、使用带token的header访问服务器的一个资源
本次实验环境:
"dependencies": {
  "vue": "^2.2.1"
 },
 "devDependencies": {
  "babel-core": "^6.0.0",
  "babel-loader": "^6.0.0",
  "babel-preset-latest": "^6.0.0",
  "cross-env": "^3.0.0",
  "css-loader": "^0.25.0",
  "file-loader": "^0.9.0",
  "vue-loader": "^11.1.4",
  "vue-template-compiler": "^2.2.1",
  "webpack": "^2.2.0",
  "webpack-dev-server": "^2.2.0"
 }
开发IDE:Atom
首先建一个项目
使用webpack构建
/Atom# vue init webpack-simple vue-jwt-demo
...
/Atom# cd vue-jwt-demo/
/Atom/vue-jwt-demo# cnpm install
/Atom/vue-jwt-demo# npm run dev
安装插件
/Atom/vue-jwt-demo# cnpm install vue-router

/Atom/vue-jwt-demo# cnpm install vue-resource
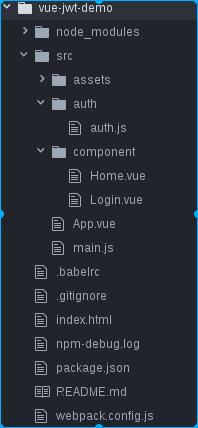
整体目录
auth.js
完成token的存取
const SERVER_URL = 'http://localhost:8081'
const LOGIN_URL = SERVER_URL+'/login2'

export default{
  data:{
    authenticated:false
  },
  login(context,info){
    context.$http.post(LOGIN_URL,info).then(function(data){
      console.log(data.bodyText)
      localStorage.setItem('token',data.bodyText);
      this.authenticated = true
      //跳到home页
      this.$router.push('home')
    },function(err){
      console.log(err+","+err.body.message)
      context.error = err.body.message
    })
  },
  getAuthHeader(){
    return {
      'Authorization':'Bearer '+localStorage.getItem('token')
    }
  },
  checkAuth(){
    var token = localStorage.getItem('token')
    if(token){
      this.authenticated = true
    }else{
      this.authenticated = false
    }
  }
}
main.js
程序入口:完成路由和初始化
import Vue from 'vue'
import App from './App.vue'
import Login from './component/Login.vue'
import Home from './component/Home.vue'
import VueRouter from 'vue-router'
import VueResource from 'vue-resource'
import auth from './auth/auth'

Vue.use(VueRouter)
Vue.use(VueResource)

//在启动APP时进行校验是否有token
auth.checkAuth()

const routes= [
  {
    path:'/',redirect:'/login'
  },
  {
    path:'/login',component:Login
  },
  {
    path:'/home',component:Home
  }
]

const router = new VueRouter({
  routes
})
new Vue({
 router,
 render: h => h(App)
}).$mount('#app')
App.vue
页面载体
<template>
 <div id="app">
  <h1>{{msg}}</h1>
  <router-view></router-view>
 </div>
</template>

<script>
export default {
 name: 'app',
 data () {
  return {
   msg: 'Vue前后端分离demo'
  }
 }
}
</script>
Login.vue
登录页面
<template>
 <div>
  <h2>登录</h2>
  <p>{{ error }}</p>
  <div>
   <input
    type="text"
    placeholder="Enter your username"
    v-model="info.username"
   >
  </div>
  <div>
   <input
    type="password"
    placeholder="Enter your password"
    v-model="info.password"
   >
  </div>
  <button @click="submit()">登录</button>
 </div>
</template>

<script>
import auth from '../auth/auth'

export default {

 data() {
  return {
   info: {
    username: '',
    password: ''
   },
   error: ''
  }
 },
 methods: {
  submit() {
   var info = {
    username: this.info.username,
    password: this.info.password
   }
   auth.login(this, info)
  }
 }
}
</script>
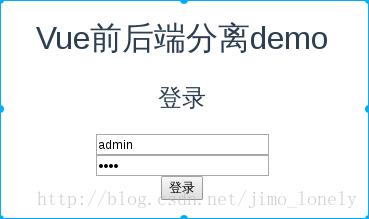
效果:丑是丑了点
Home.vue
主页面,访问一个获取邮箱的请求
<template>
 <div id="home">
  <h1>{{msg}}</h1>
  <button @click="getEmail()">Get Email</button>
  <h2>Email:{{email}}</h2>
 </div>
</template>

<script>
import auth from '../auth/auth'

export default {
 name: 'home',
 data () {
  return {
   msg: '欢迎您登录成功',
   email:''
  }
  },
  beforeCreate(){
    //如果没有token的话需要重新登录
     if(!auth.authenticated){
      this.$router.push('login')
    }
  },
  methods:{
    getEmail(){
      this.$http.get('http://localhost:8081/user/getEmail',{
        headers:auth.getAuthHeader()
      }).then(function(re){
        this.email = re.bodyText
      },function(){
        console.log("get email error")
      })
    }
  }
}
</script>

<style>
#app {
 font-family: 'Avenir', Helvetica, Arial, sans-serif;
 -webkit-font-smoothing: antialiased;
 -moz-osx-font-smoothing: grayscale;
 text-align: center;
 color: #2c3e50;
 margin-top: 60px;
}

h1, h2 {
 font-weight: normal;
}

a {
 color: #42b983;
}
</style>
对应在服务端:
@GetMapping("/getEmail")
  public String getEmail() {
    return "xxxx@qq.com";
  }

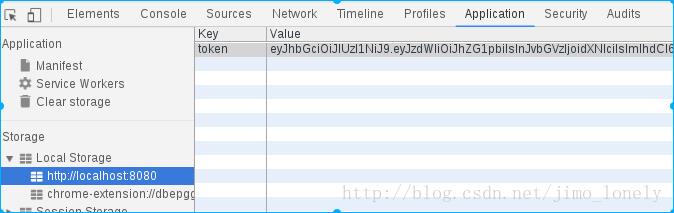
可看到浏览器的本地存储:
代码:https://github.com/jimolonely/vue-jwt-demo
以上就是本文的全部内容,希望对大家的学习有所帮助,也希望大家多多支持脚本之家。
内容总结
以上是互联网集市为您收集整理的详解前后端分离之VueJS前端全部内容,希望文章能够帮你解决详解前后端分离之VueJS前端所遇到的程序开发问题。 如果觉得互联网集市技术教程内容还不错,欢迎将互联网集市网站推荐给程序员好友。
内容备注
版权声明:本文内容由互联网用户自发贡献,该文观点与技术仅代表作者本人。本站仅提供信息存储空间服务,不拥有所有权,不承担相关法律责任。如发现本站有涉嫌侵权/违法违规的内容, 请发送邮件至 gblab@vip.qq.com 举报,一经查实,本站将立刻删除。
内容手机端
扫描二维码推送至手机访问。