Bootstrap表单控件使用方法详解
内容导读
互联网集市收集整理的这篇技术教程文章主要介绍了Bootstrap表单控件使用方法详解,小编现在分享给大家,供广大互联网技能从业者学习和参考。文章包含2838字,纯文字阅读大概需要5分钟。
内容图文

表单作为Bootstrap的核心内容,主要功能是用来与用户做交流的一个网页控件,良好的表单设计能够让网页与用户更好的沟通。
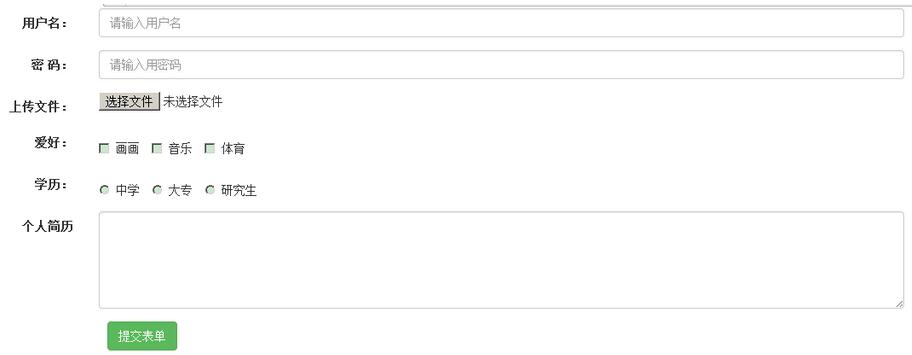
<!DOCTYPE html>
<html lang="en">
 <head>
 <meta charset="utf-8">

 <!-- 使用最新的浏览器内核解析 -->
 <meta http-equiv="X-UA-Compatible" content="IE=edge">
 <!-- 移动设备优先 -->
 <meta name="viewport" content="width=device-width, initial-scale=1">

 <!-- Bootstrap CSS -->
 <link rel="stylesheet" href="bootstrap/css/bootstrap.min.css">

 <!--[if lt IE 9]>
  <script src="//cdn.bootcss.com/html5shiv/3.7.2/html5shiv.min.js"></script>
  <scri></script>
 <![<endifdiv class="form-group"></endifdiv>]-->
 </head>
 <body>
 <div class="container">
 <!--
  表单的栅格系统使用 form-horizontal
  div的栅格系统使用 row
 -->
 <form class="form-horizontal">
 <div class="form-group">
  <label class="col-md-2 control-label" for="username">用户名:</label>

  <div class="col-md-10">
  <input id="username" class="form-control" type="text" name="username" value="" placeholder="请输入用户名"></input>
  </div>
 </div>
 <div class="form-group">
  <label class="col-md-2 control-label" for="password">密 码:</label>
  <div class="col-md-10">
  <input id="password" class="form-control" type="password" name="password" value="" placeholder="请输入用密码"></input>
  </div>
 </div>

 <div class="form-group">
  <label class="col-md-2 control-label" for="file">上传文件:</label>
  <div class="col-md-10">
  <input id="file" type="file" name="file" value=""></input>
  </div>
 </div>

 <div class="form-group">
  <label class="col-md-2 control-label" >爱好:</label>
  <div class="col-md-10">
  <div class="checkbox">
  <label class="checkbox-inline">
   <input type="checkbox">画画</input>
  </label>

  <label class="checkbox-inline">
   <input type="checkbox">音乐</input>
  </label>

  <label class="checkbox-inline">
   <input type="checkbox">体育</input>
  </label>
  </div>
  </div>
 </div>

  <div class="form-group">
  <label class="col-md-2 control-label">学历:</label>
  <div class="col-md-10">
  <div class="radio">
  <label class="radio-inline">
   <input name="raido" type="radio">中学</input>
  </label>

  <label class="radio-inline">
   <input name="raido" type="radio">大专</input>
  </label>

  <label class="radio-inline">
   <input name="raido" type="radio">研究生</input>
  </label>
  </div>
  </div>
 </div>

 <div class="form-group">
  <label class="col-md-2 control-label">个人简历</label>
  <div class="col-md-10">
  <textarea class="form-control" name="person" rows="5" placeholder="请输入">


  </textarea>
  </div>
 </div>

 <div class="col-md-10 col-md-offset-2">
 <button type="button" class="btn btn-success">提交表单</button>
 </div>
 </form>


 </div>


 <!-- jQuery first, then Bootstrap JS. -->
 <script src="bootstrap/js/jquery.min.js"></script>
 <script src="bootstrap/js/bootstrap.js"></script>
 </body>
</html>
如果大家还想深入学习,可以点击这里进行学习,再为大家附3个精彩的专题:
Bootstrap学习教程
Bootstrap实战教程
Bootstrap Table使用教程
Bootstrap插件使用教程
以上就是本文的全部内容,希望对大家的学习有所帮助,也希望大家多多支持脚本之家。
内容总结
以上是互联网集市为您收集整理的Bootstrap表单控件使用方法详解全部内容,希望文章能够帮你解决Bootstrap表单控件使用方法详解所遇到的程序开发问题。 如果觉得互联网集市技术教程内容还不错,欢迎将互联网集市网站推荐给程序员好友。
内容备注
版权声明:本文内容由互联网用户自发贡献,该文观点与技术仅代表作者本人。本站仅提供信息存储空间服务,不拥有所有权,不承担相关法律责任。如发现本站有涉嫌侵权/违法违规的内容, 请发送邮件至 gblab@vip.qq.com 举报,一经查实,本站将立刻删除。
内容手机端
扫描二维码推送至手机访问。
来源:【匿名】