Angular的Bootstrap(引导)和Compiler(编译)机制
内容导读
互联网集市收集整理的这篇技术教程文章主要介绍了Angular的Bootstrap(引导)和Compiler(编译)机制,小编现在分享给大家,供广大互联网技能从业者学习和参考。文章包含3666字,纯文字阅读大概需要6分钟。
内容图文
和Compiler(编译)机制")
在上节简单介绍了Angular js框架,在这节将继续Angular的Bootstrap(引导)和Compiler(编译)机制。
一:Bootstrap:Angular的初始化
1:Angular推荐的自动化初始如下:
<!doctype html>
<html xmlns:ng="http://angularjs.org" ng-app>
<body>
...
<script src="angular.js">
</body>
</html
利用ngapp标示你需要自动引导应用程序的根节点,一般典型为html tag。在DOMContentLoaded事件触发Angular会自动寻找ngapp作为应用的根节点,如果找到则会进行如下操作:
1.加载module(模块)相关directive(指令)。
2.创建应用程序injector(Angular的注入机制).
3.编译处理ng-app作为根节点的指令。这里允许你自定义选择DOM节点作为应用根节点。
<!doctype html>
<html ng-app="optionalModuleName">
<body>
I can add: {{ + }}.
<script src="angular.js"></script>
</body>
</html>
2:手动初始化:
如果想对对初始化有更多的控制权,可以采用自定义手动引导方法初始化代替angular的自动初始化。比如你需要在angular编译模板之前做一些事情,比如改变模板某些内容。手动引导方式将会如下:
<!doctype html>
<html xmlns:ng="http://angularjs.org">
<body>
Hello {{'World'}}!
<script src="http://code.angularjs.org/angular.js"></script>
<script>
angular.element(document).ready(function() {
angular.bootstrap(document);
});
</script>
</body>
</html>
1.在页面所有代码加载完成后,找到html模板根节点(典型为document元素).
2.调用api/angular.bootstrap(angular.bootstrap(element[, modules]))编译模板使其可执行.
二:Compiler:Angular的编译
Angular的编译机制允许开发人员给浏览器添加新的Html语法,允许我们添加一些html节点,attribute,甚至创建一些自定义的节点,attribute。Angular把这些行为的扩展成为指令directives.Angular带来了有用的directive,并允许我们创建特定领域的directive。
1: Compiler处理分为两个步骤:
1.转换DOM,收集directive,返回Link(连接)function。
2.合并指令和Scope产生一个活生生的View。scop mode中的任何改变都会通过反应到view中,并来自view的用户交互也会同步到scope model,并scope是一个单一数据源。
2:指令Directive
Directive是一个会被特殊的html设计编辑处理的行为。其可以被放置在节点的names, attributes, class 上,甚至是html注释中。下面是Angular自带的ng-bind的等价写法:
<span ng-bind="exp"></span>
<span class="ng-bind: exp;"></span>
<ng-bind></ng-bind>
<!-- directive: ng-bind exp –>
directive仅仅是一个在dom中会被Angular执行的一个function。下面是一个拖拽的实例,其可以被应用于span,div的attribute上:
angular.module('drag', []).directive('draggable', function ($document) {
var startX = ,
startY = ,
x = ,
y = ;
return function (scope, element, attr) {
element.css({
position: 'relative',
border: 'px solid red',
backgroundColor: 'lightgrey',
cursor: 'pointer'
});
element.bind('mousedown', function (event) {
startX = event.screenX - x;
startY = event.screenY - y;
$document.bind('mousemove', mousemove);
$document.bind('mouseup', mouseup);
});
function mousemove(event) {
y = event.screenY - startY;
x = event.screenX - startX;
element.css({
top: y + 'px',
left: x + 'px'
});
}
function mouseup() {
$document.unbind('mousemove', mousemove);
$document.unbind('mouseup', mouseup);
}
}
});
Demo
you can drag and move me to anywhere !
3:view理解
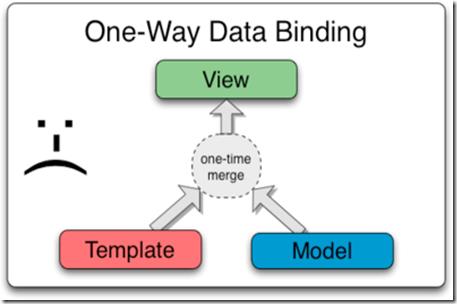
有许多的模板引擎都被设计为模板(template)和数据(model)的合并返回一个字符串,再利用innerHTML追加在DOM节点,这以为则数据的任何改变都必须重新合并生成新的内容追加在DOM上。形如下图属于单向绑定技术:
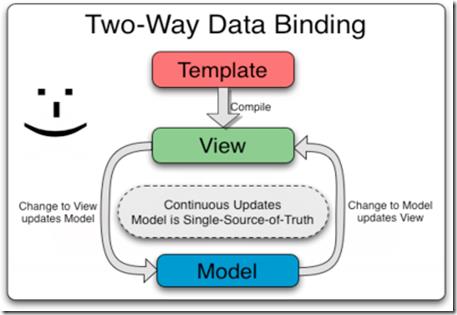
而Angular则不同利用directive指令而非字符串,返回值是一个合并数据model的link function。view和model的绑定是自动,透明的,不需要开发人员添加额外的action去更新view,Angular在这里不仅是数据model的绑定,还有行为概念。作为双向的绑定,形如下图:
资料:
1.Angular官网:http://angularjs.org/
2.代码下载:https://github.com/angular/angular.js
以上所述是小编给大家介绍的Angular的Bootstrap(引导)和Compiler(编译)机制,希望对大家有所帮助,如果大家有任何疑问请给我留言,小编会及时回复大家的。在此也非常感谢大家对脚本之家网站的支持!
内容总结
以上是互联网集市为您收集整理的Angular的Bootstrap(引导)和Compiler(编译)机制全部内容,希望文章能够帮你解决Angular的Bootstrap(引导)和Compiler(编译)机制所遇到的程序开发问题。 如果觉得互联网集市技术教程内容还不错,欢迎将互联网集市网站推荐给程序员好友。
内容备注
版权声明:本文内容由互联网用户自发贡献,该文观点与技术仅代表作者本人。本站仅提供信息存储空间服务,不拥有所有权,不承担相关法律责任。如发现本站有涉嫌侵权/违法违规的内容, 请发送邮件至 gblab@vip.qq.com 举报,一经查实,本站将立刻删除。
内容手机端
扫描二维码推送至手机访问。