css3如何实现元素环绕中心点布局(代码示例)
内容导读
互联网集市收集整理的这篇技术教程文章主要介绍了css3如何实现元素环绕中心点布局(代码示例),小编现在分享给大家,供广大互联网技能从业者学习和参考。文章包含2243字,纯文字阅读大概需要4分钟。
内容图文
") 本篇文章给大家带来的内容是关于css3如何实现元素环绕中心点布局(代码示例),有一定的参考价值,有需要的朋友可以参考一下,希望对你有所帮助。
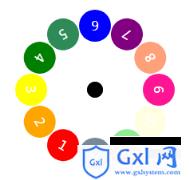
本篇文章给大家带来的内容是关于css3如何实现元素环绕中心点布局(代码示例),有一定的参考价值,有需要的朋友可以参考一下,希望对你有所帮助。效果如图:
代码实现:
<style>
    *{
        margin: 0;
        padding: 0;
        box-sizing: border-box;
    }
    .surround-box,
    .center-point{
        position: absolute;
        top:  50%;
        left: 50%;
        width:  20px;
        height:  20px;
        margin-left: -10px;
        margin-top: -10px;
        border-radius: 50%;
        background-color: #000;
    }
    .circle{
        /* 这里一定要绝对定位,这样位置才能铺开来 */
        position: absolute;
        top:  -10px;
        left: -10px;
        width: 40px;
        height:  40px;
        line-height: 40px;
        border-radius:  50%;
        text-align: center;
        color: #fff;
    }
    .circle1{
        background-color: red;
        /* rotateZ控制方向,每个元素旋转30度,12个元素刚好360度。translateY控制每个元素距中心点的距离 */
        transform: rotateZ(30deg) translateY(80px);
    }
    .circle2{
        background-color: orange;
        transform: rotateZ(60deg) translateY(80px);
    }
    .circle3{
        background-color: yellow;
        transform: rotateZ(90deg) translateY(80px);
    }
    .circle4{
        background-color: green;
        transform: rotateZ(120deg) translateY(80px);
    }
    .circle5{
        background-color: seagreen;
        transform: rotateZ(150deg) translateY(80px);
    }
    .circle6{
        background-color: blue;
        transform: rotateZ(180deg) translateY(80px);
    }
    .circle7{
        background-color: purple;
        transform: rotateZ(210deg) translateY(80px);
    }
    .circle8{
        background-color: lightsalmon;
        transform: rotateZ(240deg) translateY(80px);
    }
    .circle9{
        background-color: deeppink;
        transform: rotateZ(270deg) translateY(80px);
    }
    .circle10{
        background-color: lightyellow;
        transform: rotateZ(300deg) translateY(80px);
    }
    .circle11{
        background-color: lightgreen;
        transform: rotateZ(330deg) translateY(80px);
    }
    .circle12{
        background-color: lightslategrey;
        transform: rotateZ(360deg) translateY(80px);
    }
</style>
<body>
<div class="center-point"></div>
<div class="surround-box">
<div class="circle circle1">1</div>
<div class="circle circle2">2</div>
<div class="circle circle3">3</div>
<div class="circle circle4">4</div>
<div class="circle circle5">5</div>
<div class="circle circle6">6</div>
<div class="circle circle7">7</div>
<div class="circle circle8">8</div>
<div class="circle circle9">9</div>
<div class="circle circle10">10</div>
<div class="circle circle11">11</div>
<div class="circle circle12">12</div>
</div>
</body>以上就是css3如何实现元素环绕中心点布局(代码示例)的详细内容,更多请关注Gxl网其它相关文章!
内容总结
以上是互联网集市为您收集整理的css3如何实现元素环绕中心点布局(代码示例)全部内容,希望文章能够帮你解决css3如何实现元素环绕中心点布局(代码示例)所遇到的程序开发问题。 如果觉得互联网集市技术教程内容还不错,欢迎将互联网集市网站推荐给程序员好友。
内容备注
版权声明:本文内容由互联网用户自发贡献,该文观点与技术仅代表作者本人。本站仅提供信息存储空间服务,不拥有所有权,不承担相关法律责任。如发现本站有涉嫌侵权/违法违规的内容, 请发送邮件至 gblab@vip.qq.com 举报,一经查实,本站将立刻删除。
内容手机端
扫描二维码推送至手机访问。
来源:【匿名】