如何使用CSS和Vanilla.js实现展示苹果设备的交互动画(附源码)
内容导读
互联网集市收集整理的这篇技术教程文章主要介绍了如何使用CSS和Vanilla.js实现展示苹果设备的交互动画(附源码),小编现在分享给大家,供广大互联网技能从业者学习和参考。文章包含5544字,纯文字阅读大概需要8分钟。
内容图文
") 本篇文章给大家带来的内容是关于如何用CSS和Vanilla.js实现展示苹果设备的交互动画(附源码),有一定的参考价值,有需要的朋友可以参考一下,希望对你有所帮助。
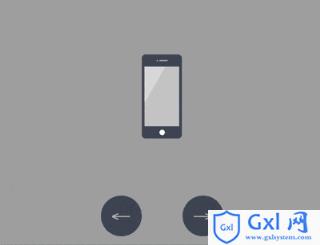
本篇文章给大家带来的内容是关于如何用CSS和Vanilla.js实现展示苹果设备的交互动画(附源码),有一定的参考价值,有需要的朋友可以参考一下,希望对你有所帮助。效果预览
源代码下载
https://github.com/comehope/front-end-daily-challenges
代码解读
定义 dom,包含 5 个子元素,分别代表 iphone, mini, ipad, macbook, imac 这 5 种设备:
<div class="container">
    <div class="device iphone"></div>
    <div class="device mini"></div>
    <div class="device ipad"></div>
    <div class="device macbook"></div>
    <div class="device imac"></div>
</div>
居中显示:
body {
    margin: 0;
    height: 100vh;
    display: flex;
    align-items: center;
    justify-content: center;
    background-color: #aaa;
}
设置容器中子元素的布局方式:
.container {
    position: relative;
    display: flex;
    flex-direction: column;
    align-items: center;
}
设置设备的共有属性,线性渐变图案将作为屏幕的背景:
.device {
    box-sizing: border-box;
    position: relative;
    display: flex;
    justify-content: center;
    background: linear-gradient(120deg, #ddd 30%, #ccc 30%);
}

.device::before,
.device::after {
    content: '';
    position: absolute;
}
iphone, mini, ipad 的造型相似,都有顶部摄像头、传感器开口和底部按钮,所以这些共有属性可以一起设置,用 ::before 伪元素画出顶部细节,::after 伪元素画出底部按钮:
.iphone::before,
.mini::before,
.ipad::before {
    width: 2px;
    height: 2px;
    border-style: solid;
    border-color: #a5adbe;
    border-width: 0 12px 0 2px;
}

.iphone::after,
.mini::after,
.ipad::after {
    width: 8px;
    height: 8px;
    background-color: white;
    border-radius: 50%;
}
接下来逐个画出设备。先画出 iphone 的轮廓:
.iphone {
    width: 59px;
    height: 124px;
    border: #484f5e solid;
    border-width: 18px 4px;
    border-radius: 6px;
}
定位 iphone 的顶部和底部细节:
.iphone::before {
    top: -10px;
}

.iphone::after {
    bottom: -13px;
}
类似地,画出 mini:
.mini {
    width: 93px;
    height: 138px;
    border: #484f5e solid;
    border-width: 14px 5px;
    border-radius: 10px;
}

.mini::before {
    top: -8px;
}

.mini::after {
    bottom: -11px;
}
再画出 ipad:
.ipad {
    width: 134px;
    height: 176px;
    border: #484f5e solid;
    border-width: 18px 13px;
    border-radius: 12px;
}

.ipad::before {
    top: -10px;
}

.ipad::after {
    bottom: -13px;
}
接下来画 macbook,先画屏幕:
.macbook {
    width: 234px;
    height: 155px;
    border: 8px solid #484f5e;
    border-radius: 7px 7px 0 0;
}
用 ::before 伪元素画出摄像头:
.macbook::before {
    width: 294px;
    height: 14px;
    background-color: #e8ebf0;
    top: calc(100% + 8px);
    border-radius: 0 0 14px 14px;
}
用 ::after 伪元素画出主机:
.macbook::after {
    width: 3px;
    height: 3px;
    background-color: #a5adbe;
    top: -6px;
    border-radius: 50%;
}
接下来画 imac,先画屏幕,屏幕的左、上、右的黑色边框没有用 border 属性画,是因为 border 会在端点处遗留一个斜角,所以改用 box-shadow 实现:
.imac {
    width: 360px;
    height: 215px;
    border-radius: 10px;
    box-shadow:
        inset 0 14px #484f5e,
        inset 14px 0 #484f5e,
        inset -14px 0 #484f5e;
    border-bottom: 33px solid #e8ebf1;
    transform: translateY(14px);
}
用 ::before 伪元素画出梯形的底座:
.imac::before {
    width: 90px;
    height: 0;
    top: calc(100% + 33px);
    border: solid transparent;
    border-bottom-color: #e2e4e8;
    border-width: 0 10px 47px 10px;
}
用 ::after 伪元素画出顶部的摄像头和屏幕底部的按钮,注意按钮是用 box-shadow 实现的:
.imac::after {
    width: 4px;
    height: 4px;
    background-color: #a5adbe;
    top: 5px;
    border-radius: 50%;
    box-shadow: 0 191px 0 4px #464e5d;
}
至此,设备全部绘制完成。
删除除 iphone 之外的其他设备的 dom 元素,只保留 1 个 dom 元素,后面的动画效果都在这个 dom 元素上变化:
<div class="container">
        <div class="device iphone"></div>
        <!-- <div class="device mini"></div>
        <div class="device ipad"></div>
        <div class="device macbook"></div>
        <div class="device imac"></div> -->
    </div>
设置容器尺寸,子元素垂直居中,设备的高度占容器高度的 75%:
.container {
    width: 360px;
    height: 350px;
    justify-content: center;
}

.device {
    transform: translateY(-25%);
}
在 dom 中增加 2 个按钮元素,分别用 .left 和 .right 表示:
<div class="container">
    <div class="device iphone"></div>
    <div class="buttons">
        <span class="left"></span>
        <span class="right"></span>
    </div>
</div>
定位按钮的位置:
.buttons {
    position: absolute;
    width: inherit;
    font-size: 30px;
    height: 2em;
    bottom: 0;
    display: flex;
    justify-content: space-around;
}

.buttons > * {
    position: relative;
    width: 4em;
}
按钮为向左和向右的箭头:
.buttons > *::before {
    position: absolute;
}

.buttons .left::before {
    content: '←';
    right: 0;
}

.buttons .right::before {
    content: '→';
}
设置按钮样式为圆形:
.buttons > *t::before {
    position: absolute;
    width: 2em;
    height: 2em;
    background-color: #484f5e;
    color: silver;
    text-align: center;
    line-height: 2em;
    border-radius: 1em;
    cursor: pointer;
}
增加鼠标悬停效果:
.buttons > *::before {
    transition: 0.2s;
}

.buttons .left:hover::before {
    width: 4em;
    content: '?';
}

.buttons .right:hover::before {
    width: 4em;
    content: '?';
}
增加按钮点击效果:
.buttons > *:active {
    transform: scale(0.9);
    filter: brightness(0.8);
}
至此,按钮制作完毕,接下来创建交互脚本。
定义一个获取元素的函数 $:
const $ = (className) => document.getElementsByClassName(className)[0]
定义一个存放设备名称的数组:
let devices = ['iphone', 'mini', 'ipad', 'macbook', 'imac']
定义点击行为对数据的加工方法,当点击左侧按钮时,把数组最左边的 1 个元素移到最右边,相反地,当点击右侧按钮时,把数组最右边的 1 个元素移到最左边,这样就可以从 2 个方向循环遍历数组了:
let loop = {
    'left': () => devices.unshift(devices.pop()),
    'right': () => devices.push(devices.shift())
}
定义点击事件,根据数组的变化切换设备:
Array.from($('buttons').children).forEach(element =>
    element.addEventListener('click', function(e) {
        loop[e.target.className]()
        $('device').className = 'device ' + devices[0]
    })
)
最后,设置设备切换的缓动效果:
.device,
.device::before,
.device::after {
    transition: 0.4s cubic-bezier(0.5, 1.7, 0.5, 1.2);
}
大功告成!
以上就是如何使用CSS和Vanilla.js实现展示苹果设备的交互动画(附源码)的详细内容,更多请关注Gxl网其它相关文章!
内容总结
以上是互联网集市为您收集整理的如何使用CSS和Vanilla.js实现展示苹果设备的交互动画(附源码)全部内容,希望文章能够帮你解决如何使用CSS和Vanilla.js实现展示苹果设备的交互动画(附源码)所遇到的程序开发问题。 如果觉得互联网集市技术教程内容还不错,欢迎将互联网集市网站推荐给程序员好友。
内容备注
版权声明:本文内容由互联网用户自发贡献,该文观点与技术仅代表作者本人。本站仅提供信息存储空间服务,不拥有所有权,不承担相关法律责任。如发现本站有涉嫌侵权/违法违规的内容, 请发送邮件至 gblab@vip.qq.com 举报,一经查实,本站将立刻删除。
内容手机端
扫描二维码推送至手机访问。