定时从多个Excel导入数据到SQL数据库
内容导读
互联网集市收集整理的这篇技术教程文章主要介绍了定时从多个Excel导入数据到SQL数据库,小编现在分享给大家,供广大互联网技能从业者学习和参考。文章包含8800字,纯文字阅读大概需要13分钟。
内容图文

The operation could not be completed.
ADDITIONAL INFORMATION: The ‘Microsoft.ACE.OLEDB.12.0‘ provider is not registered on the local machine. (System.Data)
需要下载组件:https://www.microsoft.com/en-us/download/details.aspx?id=23734
Step 2 - Choosing a Destination Database
The next step is to tell the wizard which database you want the data to be imported to.
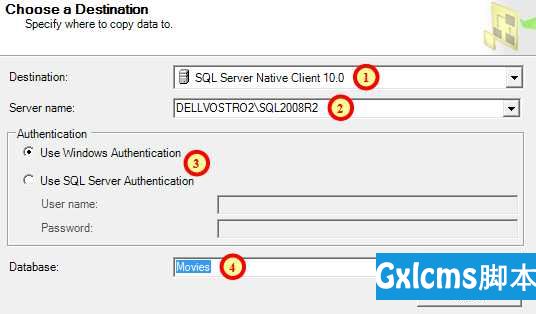
Specify where the data should go when it is imported. The numbered steps are explained below.
- Choose the type of destination source for your data. The option you select here affects the other options on this page of the wizard.
- As we selected a SQL Server destination for part 1, we need to say which SQL Server we want to use here.
- This option specifies the authentication to be used to connect to the server you‘ve chosen.
- Choose the database you want to send the data to, or click New... to create a new database.
- Click the Next button at the bottom of the wizard.
Step 6 - Saving the SSIS Package
If you chose to save the package in the previous step you can specify the name and location here.
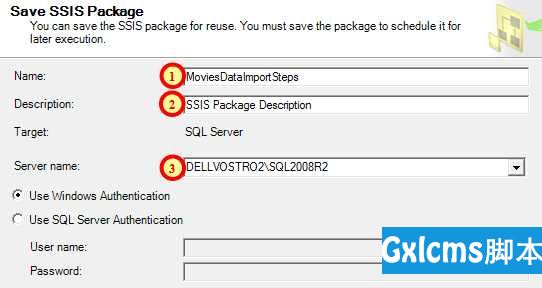
Save the SSIS package according to the options you select here.
- Type in a recognisable name for the package - we‘ll need this later on when we choose to schedule the import steps.
- You can optionally type in a description here.
- Choose the server or filename to save the package depending on the option you selected in the previous step of the wizard.
- Click Next at the bottom of the dialog box.
Step 7 - Completing the Wizard
The final step summarises the choices you have made and simply asks to you to confirm everything you have done by clicking Finish at the bottom of the dialog box.

Simply click Finish to confirm the settings you have applied.
If everything works properly you should see a list of tasks being performed in a separate dialog box.
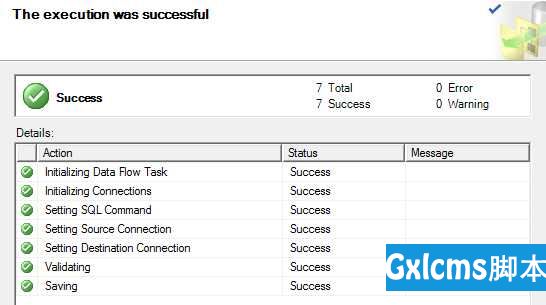
Success! Now all you need to do is click Close.
Viewing an SSIS Package Saved as a File
You can view your SSIS package in one of two different ways, depending on whether you saved it as part of your computer‘s file system or on the SQL Server.
If the package is saved as a file on your computer you can simply browse for it in a Windows Explorer window.
The file will have a dtsx extension.
Viewing an SSIS Package Saved in SQL Server
In order to view a package saved in SQL Server you must first connect to an SSIS server:
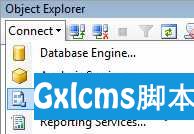
Click Connect at the top of the Object Explorer window and choose Integration Services...
需要使用Run As管理员才能打开
You will be able to see your SSIS package by expanding the sequence of folders shown below:
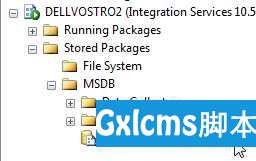
The SSIS package that we created earlier is shown here.
You can even run the package by right-clicking on it and choosing Run Package.
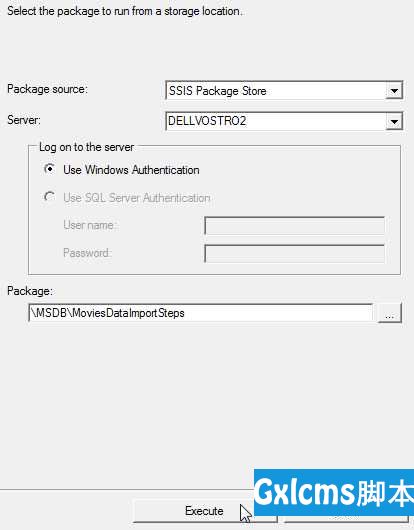
Simply click Execute to run the import steps you saved earlier.
Step 3 - Choose which Data to Import
In this step you can specify exactly which data you want to import from the data source you selected in step 1.
Here we‘re going to select all of the data from the Excel spreadsheet, rather than write a separate query to get the data. Click Next to move on to the next step.
Step 4 - Configure the Tables to which the Data will be Imported
This step lets you choose which tables the data you are importing will end up in, and also what should happen to the existing data in those tables.
Choose what will be imported and where it will be imported to. The numbered steps are described below.
- Choose the tables, or in this case worksheets, you want to import the data from.
- Choose which table the selected worksheet will be imported to.
- Click Edit Mappings... for more options, as described below.
Use this dialog box to customise the individual fields in the imported data.
- Choose what to do with data that is already in the table you are importing into. Here we‘re creating the destination table each time.
- We‘ve also chosen to drop and re-create the destination table each time we run the import.
- Use the Mappings table to control the names and data types of the imported fields.
- Click OK and then Next.
Step 5 - Choose When to Run the Import Steps
In this step you can choose whether to run the import immediately or to save the import steps for use later on.
Choose when you want the import to happen.
- We‘ve chosen to not run our import when the wizard ends.
- We‘ve also chosen to save an SSIS Package that contains all of the information required to run the import at a later time. We‘ve selected to save the package onto the SQL Server, rather than as a separate file on our computer.
- Choose the level of protection for the package. Here we‘ve chosen not to save sensitive data in the package, meaning that if other people attempt to use this package they will be prompted to fill in the missing information.
- Click Next at the bottom of the dialog box.
Step 7 - Completing the Wizard
The final step summarises the choices you have made and simply asks to you to confirm everything you have done by clicking Finish at the bottom of the dialog box.
Simply click Finish to confirm the settings you have applied.
If everything works properly you should see a list of tasks being performed in a separate dialog box.
Success! Now all you need to do is click Close.
Viewing an SSIS Package Saved as a File
You can view your SSIS package in one of two different ways, depending on whether you saved it as part of your computer‘s file system or on the SQL Server.
If the package is saved as a file on your computer you can simply browse for it in a Windows Explorer window.
The file will have a dtsx extension.
Viewing an SSIS Package Saved in SQL Server
In order to view a package saved in SQL Server you must first connect to an SSIS server:
Click Connect at the top of the Object Explorer window and choose Integration Services...
You will be able to see your SSIS package by expanding the sequence of folders shown below:
The SSIS package that we created earlier is shown here.
You can even run the package by right-clicking on it and choosing Run Package.
Simply click Execute to run the import steps you saved earlier.
Scheduling a Job in SQL Server
The final stage of this blog series is to create a scheduled job to execute the SSIS package on a regular basis.
The SQL Server Agent
You can schedule jobs using the SQL Server Agent. You should find this at the bottom of the list of objects in any database server that you‘ve connected to in SQL Server Management Studio:
The SQL Server Agent appears at the bottom of the list of objects in a database server.
Creating a Job
To create a new job using SQL Server Agent:
Right-click the Jobs folder and choose New Job...
You can then use the dialog box to set up the job you want to create. The steps we need to follow in order to schedule our SSIS package execution are described below.
Step 1 - Enter a Name for the Job
The first step is to give the new job a sensible name, as shown below:
In the General category, enter a descriptive name for the job.
Step 2 - Create the Job Steps
Next, you can create the steps that will make up the job. Our job should have only one step and here‘s how to create it:
- Select the Steps page of the dialog box.
Build a list of steps for the job using this page of the dialog box.
- Click the New... button to add a new step to the job.
Use this dialog box to specify the settings for this job step.
- Enter a sensible name for this step of the job.
- Choose the type of action to perform. Here we want to execute an SSIS package.
- Choose where the SSIS package is stored. Here we‘ve selected the package that we saved earlier on our SQL Server.
- Click the ellipsis (...) to choose the package you want to execute.
- Click OK to return to the New Job dialog box.
The job should now consist of a single step:
Our entire job consists of a single step, but we could always add more to this by clicking the New...button at the bottom of the dialog box.
Step 3 - Creating the Job Schedule
To ensure that the job runs at a specific time you need to specify the schedule for the job. To do this:
- Select the Schedules page of the dialog box.
Use this page to set up the job schedule.
- Click New... to create a new schedule.
- Complete the dialog box as shown below:
The options in this page of the dialog box are self-explanatory. The options we have selected here ensures the job will be carried out each week at 9am on a Monday morning.
- Click OK to return to the New Job dialog box.
Step 5 - Creating the Job
When you have finished applying all of the settings listed above, you can create the job by simply clicking OK on the New Job dialog box.
Your new job will appear in the Jobs folder within SQL Server Agent.
继续添加第二个Excel,Task--> Import Data之后如下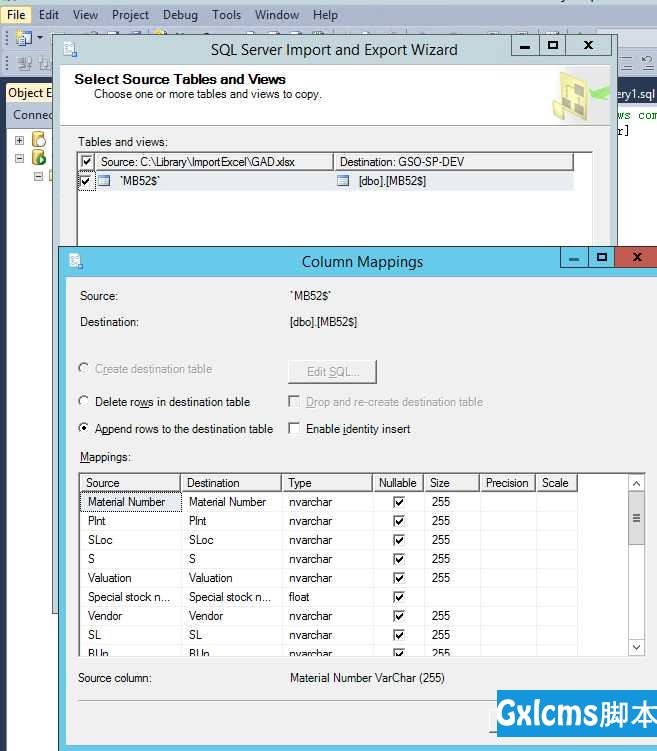 添加Schedule的步骤,并设置第一个步骤Success之后跑到下一个步骤。

定时从多个Excel导入数据到SQL数据库
标签:
本文系统来源:http://www.cnblogs.com/batter152/p/5955898.html
内容总结
以上是互联网集市为您收集整理的定时从多个Excel导入数据到SQL数据库全部内容,希望文章能够帮你解决定时从多个Excel导入数据到SQL数据库所遇到的程序开发问题。 如果觉得互联网集市技术教程内容还不错,欢迎将互联网集市网站推荐给程序员好友。
内容备注
版权声明:本文内容由互联网用户自发贡献,该文观点与技术仅代表作者本人。本站仅提供信息存储空间服务,不拥有所有权,不承担相关法律责任。如发现本站有涉嫌侵权/违法违规的内容, 请发送邮件至 gblab@vip.qq.com 举报,一经查实,本站将立刻删除。
内容手机端
扫描二维码推送至手机访问。