Oracle JET 单页面应用程序Router 使用(上)
内容导读
互联网集市收集整理的这篇技术教程文章主要介绍了Oracle JET 单页面应用程序Router 使用(上),小编现在分享给大家,供广大互联网技能从业者学习和参考。文章包含5422字,纯文字阅读大概需要8分钟。
内容图文
")
a)添加 ojrouter 模块。
‘ojs/ojrouter‘
b)创建路由实例,oj.Router.rootInstance 表示唯一根路由,该路由的名称是 “root” 。
self.router = oj.Router.rootInstance;
c)配置路由器状态,属性: label:链接字符串,没有定义标题属性时,用于页面的标题。
value:与该状态相关联的对象。
isDefault:设置起始页面
      self.router.configure({
            ‘pref‘: { label: ‘Preface‘, isDefault: true},
            ‘chap1‘: { label: ‘Chapter 1‘},
            ‘chap2‘: { label: ‘Chapter 2‘},
            ‘chap3‘ : {label: ‘Chapter 3‘}
          });
d)URL适配器,可选。
oj.Router.defaults[‘urlAdapter‘] = new oj.Router.urlParamAdapter;
(2)main.js
require([‘ojs/ojcore‘, ‘knockout‘, ‘appController‘, ‘ojs/ojknockout‘, ‘ojs/ojrouter‘, ‘ojs/ojmodule‘],
  function (oj, ko, app) {
    $(function() {
        oj.Router.sync().then(
          function() {
            ko.applyBindings(app, document.getElementById(‘routingContainer‘));
          },
          function(error) {
            oj.Logger.error(‘Error in root start: ‘ + error.message);
          }
        );
    });
  }
);
a)添加 ojrouter 模块和 ojmodule(需要使用 ojmodule 时添加)
‘ojs/ojrouter‘, ‘ojs/ojmodule‘
b)将路由器与当前 URL 同步。必须在路由器配置后才能调用,以将 URL 与路由器状态同步。
oj.Router.sync().then()
c)将 appController 挂载到 HTML 上
ko.applyBindings(app, document.getElementById(‘routingContainer‘))
(3)index.html
  <div id="routing-container">
      <div id=‘buttons-container‘ data-bind="ojComponent: {component:‘ojToolbar‘}">
        <div data-bind="ojComponent: { component: ‘ojButtonset‘,
                                        checked: router.stateId,
                                        focusManagement: ‘none‘}">
          <!-- ko foreach: router.states -->
            <label data-bind="attr: {for : id}"></label>
            <input type="radio" name="chapter" data-bind="value: id,
                                                          attr: { id: id},
                                                          ojComponent: { component: ‘ojButton‘,
                                                                          label: label}"/>
          <!-- /ko -->
        </div>
      </div>
      <div data-bind="ojModule: router.moduleConfig"></div>
    </div>
a)选择时触发状态转换
定义 checked 属性给予 router.stateId 观察值。它使用双向绑定。当点击一个按钮时,id 被写入到 stateId 中,使路由器状态转换。
b)观察状态并更新相关部分
data-bind="ojModule: router.moduleConfig"
使用需要创建相应的 views 和 viewModels
c) router.states 可以获取到路由配置转化的数组以供遍历展示内容
(4)实际效果如前简单模型相同。
4.使用子路由
(1)appController.js
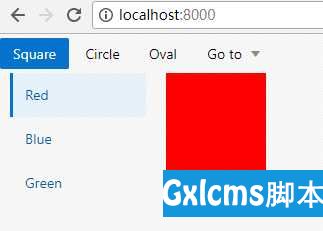
define([‘ojs/ojcore‘, ‘knockout‘, ‘ojs/ojknockout‘, ‘ojs/ojrouter‘, ‘ojs/ojbutton‘, ‘ojs/ojtoolbar‘, ‘ojs/ojnavigationlist‘],
  function(oj, ko) {
    function ControllerViewModel() {
      var self = this;
      // 创建根路由
      self.shapeRouter = oj.Router.rootInstance;
      self.shapeRouter.configure({
        ‘square‘: { label: ‘Square‘, isDefault: true },
        ‘circle‘: { label: ‘Circle‘ },
        ‘oval‘: { label: ‘Oval‘}
      });
      // 创建子路由配置
      self.colorRouter = self.shapeRouter.createChildRouter(‘color‘).configure({
        ‘red‘: { label: ‘Red‘, isDefault: true },
        ‘blue‘: { label: ‘Blue‘ },
        ‘green‘: {label: ‘Green‘}
      });
      self.menuItemSelect = function(event, ui) {
        self.shapeRouter.go(ui.item.children(‘a‘).text());
      }
    }

    return new ControllerViewModel();
  }
);
a)创建根路由
b)创建子路由并配置
使用 createChildRouter(‘name‘) 创建子路由并添加 configure 配置。
(function(event, ui) 这里的 ui 是 jqueryui 的内容。ui 为当前选择的对象,ui.item获得对象的元素,这里为 ul)
(2)main.js 与上例相同
(3)index.html
<div id="routing-container">
    <!-- 导航栏部分 -->
      <div id="toolbar" data-bind="ojComponent: { component: ‘ojToolbar‘}">
     <!-- 父路由导航栏部分 -->
        <div data-bind="ojComponent: { component: ‘ojButtonset‘,
                                       checked: shapeRouter.stateId,
                                       focusManagement: ‘none‘ }">
          <!-- ko foreach: shapeRouter.states -->
            <label data-bind="attr: {for: id}"></label>
            <input type="radio" name="shape" data-bind="value: id, attr: { id: id},
                                                        ojComponent: {component: ‘ojButton‘,
                                                                      label: label}"></input>
          <!-- /ko -->
        </div>
     <!-- 直接跳转指定位置 -->
        <button id="menuButton" data-bind="ojComponent: { component: ‘ojButton‘, label: ‘Go to‘,
                                                          menu: ‘#gotoMenu‘}">

        </button>
     <!-- 列表显示跳转位置 -->
        <ul id="gotoMenu" style="display: none" data-bind="ojComponent: { component: ‘ojMenu‘,
                                                                           select: menuItemSelect }">
          <!-- ko foreach: shapeRouter.states -->
            <li>
              <a data-bind="text: label"></a>
              <ul data-bind="foreach: $root.colorRouter.states">
                <li>
                  <a data-bind="text: ‘/‘ + $parent.id + ‘/‘ + id"></a>
                </li>
              </ul>
            </li>
          <!-- /ko -->
        </ul>
      </div>
      <hr/>
    <!-- 展示部分 -->
      <div id="pageContent" class="oj-flex oj-flex-items-pad">
     <!-- 子路由导航栏 -->
        <div class="oj-xl-2 oj-lg-2 oj-md-2 oj-sm-12 oj-flex-item">
          <div id="colors" data-bind="ojComponent: { component: ‘ojNavigationList‘,
                                                     selection: colorRouter.stateId,
                                                     drillMode: ‘none‘}">
            <ul data-bind="foreach: colorRouter.states">
              <li data-bind="attr: {id: id}">
                <a data-bind="text: label"></a>
              </li>
            </ul>
          </div>
        </div>
     <!-- 图形显示 -->
        <div class="oj-xl-10 oj-md-10 oj-sm-12 oj-flex-item">
          <div data-bind="css: shapeRouter.stateId(), style: { background: colorRouter.stateId() }"></div>
        </div>
      </div>
    </div>
a)stateId 可以让 knockout 观察,而 steteId() 则可以读取当前的 Id 的值。
(4)CSS
.square { width: 100px; height: 100px; }
.circle { width: 100px; height: 100px;
          -moz-border-radius: 50px;
          -webkit-border-radius: 50px;
          border-radius: 50px; }
.oval   { width: 200px; height: 100px;
          -moz-border-radius: 100px / 50px;
          -webkit-border-radius: 100px / 50px;
          border-radius: 100px / 50px; }
(5)效果显示:


Oracle JET 单页面应用程序Router 使用(上)
标签:data- 支持 chap 内容 显示 变化 style 记录 query
本文系统来源:http://www.cnblogs.com/Easty/p/7225822.html
内容总结
以上是互联网集市为您收集整理的Oracle JET 单页面应用程序Router 使用(上)全部内容,希望文章能够帮你解决Oracle JET 单页面应用程序Router 使用(上)所遇到的程序开发问题。 如果觉得互联网集市技术教程内容还不错,欢迎将互联网集市网站推荐给程序员好友。
内容备注
版权声明:本文内容由互联网用户自发贡献,该文观点与技术仅代表作者本人。本站仅提供信息存储空间服务,不拥有所有权,不承担相关法律责任。如发现本站有涉嫌侵权/违法违规的内容, 请发送邮件至 gblab@vip.qq.com 举报,一经查实,本站将立刻删除。
内容手机端
扫描二维码推送至手机访问。