CentOS7.4下MySQL5.7.28二进制方式安装
内容导读
互联网集市收集整理的这篇技术教程文章主要介绍了CentOS7.4下MySQL5.7.28二进制方式安装,小编现在分享给大家,供广大互联网技能从业者学习和参考。文章包含4020字,纯文字阅读大概需要6分钟。
内容图文
 Linux系统版本:CentOS7.4
MySQL版本:5.7.28
在Linux平台有RPM包、二进制包、源码包3中安装方式,这一篇文章主要是以RPM包为例来介绍如何在Linux平台下进行MySQL的安装。
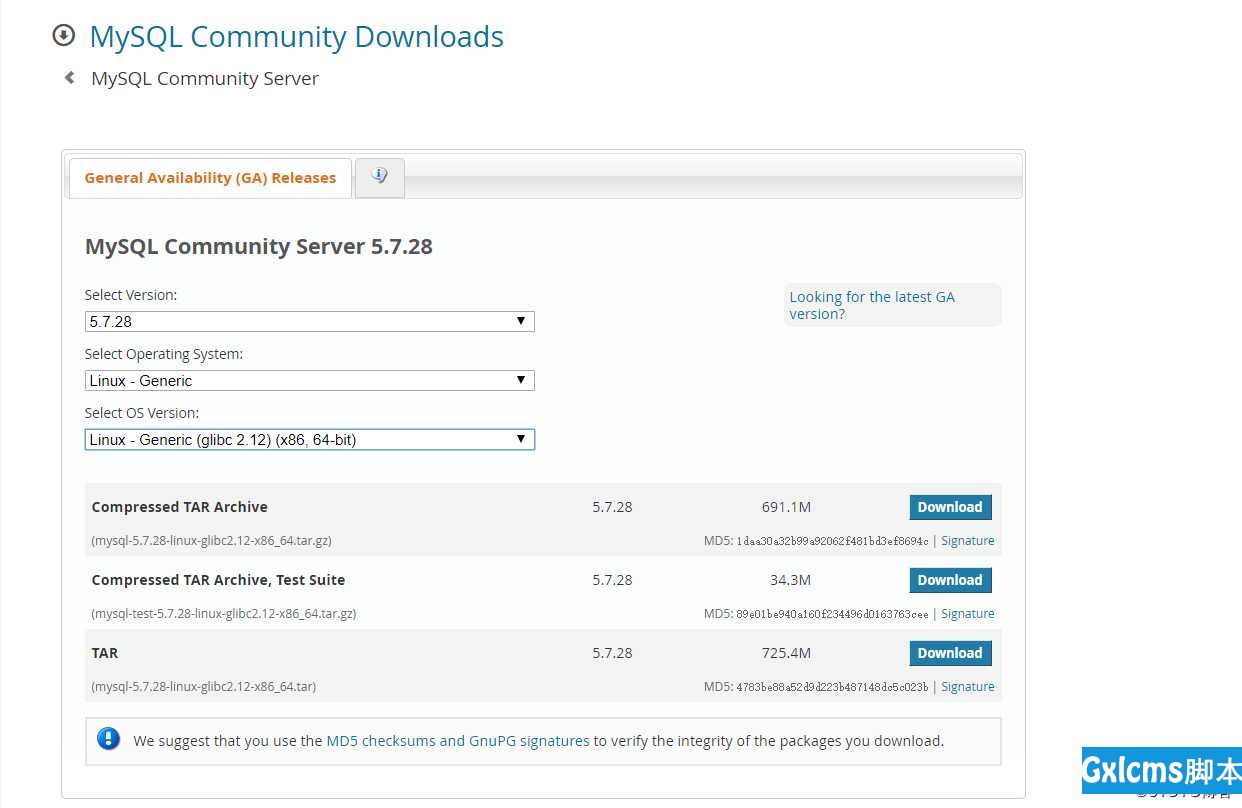
下载地址:
https://cdn.mysql.com//Downloads/MySQL-5.7/mysql-5.7.28-linux-glibc2.12-x86_64.tar.gz
具体安装步骤如下:
(1)首先卸载mariadb,不然后面会和安装mysql需要的库冲突:
[root@localhost ~]# rpm -qa | grep mariadb
mariadb-libs-5.5.56-2.el7.x86_64
[root@localhost ~]# rpm -e --nodeps mariadb-libs-5.5.56-2.el7.x86_64
(2)用root用户登录系统,增加mysql用户和组,数据库安装在此用户下:
[root@localhost ~]# groupadd mysql
[root@localhost ~]# useradd -r -g mysql -s /bin/false mysql
(3)准备数据目录
以/app/data为例,建议使用逻辑卷
[root@localhost ~]# mkdir -p /app/data
[root@localhost ~]# chown mysql.mysql /app/data/
[root@localhost ~]# chmod 750 /app/data
(4)准备二进制文件:
[root@localhost ~]# tar xvf mysql-5.7.28-linux-glibc2.12-x86_64.tar.gz -C /usr/local/
root@localhost ~]# cd /usr/local
[root@localhost local]# ln -sv mysql-5.7.28-linux-glibc2.12-x86_64 mysql
‘mysql’ -> ‘mysql-5.7.28-linux-glibc2.12-x86_64’
(5)初始化MySQL:
[root@localhost ~]# cd /usr/local/mysql
[root@localhost mysql]# bin/mysqld --initialize --user=mysql --basedir=/usr/local/mysql --datadir=/app/data
2019-11-03T09:47:18.263716Z 0 [Warning] TIMESTAMP with implicit DEFAULT value is deprecated. Please use --explicit_defaults_for_timestamp server option (see documentation for more details).
2019-11-03T09:47:19.059462Z 0 [Warning] InnoDB: New log files created, LSN=45790
2019-11-03T09:47:19.140866Z 0 [Warning] InnoDB: Creating foreign key constraint system tables.
2019-11-03T09:47:19.207569Z 0 [Warning] No existing UUID has been found, so we assume that this is the first time that this server has been started. Generating a new UUID: ed1cd8ec-fe1e-11e9-8c9c-000c29f8617a.
2019-11-03T09:47:19.209181Z 0 [Warning] Gtid table is not ready to be used. Table ‘mysql.gtid_executed‘ cannot be opened.
2019-11-03T09:47:19.646366Z 0 [Warning] CA certificate ca.pem is self signed.
2019-11-03T09:47:20.056792Z 1 [Note] A temporary password is generated for root@localhost: rY-6f??#!<zO
其中--basedir mysql基础目录 --datadir mysql数据存放目录,并创建了root用户的临时密码:rY-6f??#!<zO
(6)开启ssl连接:
[root@localhost mysql]# bin/mysql_ssl_rsa_setup
2019-11-03 23:09:55 [ERROR]   Failed to access directory pointed by --datadir. Please make sure that directory exists and is accessible by mysql_ssl_rsa_setup. Supplied value : /usr/local/mysql/data
[root@localhost mysql]# bin/mysql_ssl_rsa_setup --datadir=/app/data
命令后面不加参数报错,加了--datadir后不报错
(7)编辑配置文件,保存退出:
[root@localhost mysql]# vim /etc/my.cnf
[mysqld]
# GENERAL
datadir=/app/data
socket=/app/data/mysql.sock
user=mysql
default-storage-engine=InnoDB

[mysqld_safe]
log-error=/app/data/mysql-error.log
pid-file=/app/data/mysqld.pid

[client]
socket=/app/data/mysql.sock
(8)启动MySQL:
[root@localhost mysql]# bin/mysqld_safe --user=mysql &(9)配置环境变量:
[root@localhost ~]# vim /etc/profile
#添加下面一行
export PATH=$PATH:/usr/local/mysql/bin
[root@localhost ~]# source /etc/profile
(10)设置开机启动:
[root@localhost mysql]# cp support-files/mysql.server /etc/init.d/mysql.server
[root@localhost mysql]# chkconfig --add mysql.server
(11)测试登录成功:
[root@localhost ~]# mysql -uroot -p
Enter password:
Welcome to the MySQL monitor.  Commands end with ; or \g.
Your MySQL connection id is 2
Server version: 5.7.28

Copyright (c) 2000, 2019, Oracle and/or its affiliates. All rights reserved.

Oracle is a registered trademark of Oracle Corporation and/or its
affiliates. Other names may be trademarks of their respective
owners.

Type ‘help;‘ or ‘\h‘ for help. Type ‘\c‘ to clear the current input statement.

mysql>
CentOS7.4下MySQL5.7.28二进制方式安装
标签:下载地址 def dep 步骤 linux kconfig time dir mariadb
本文系统来源:https://blog.51cto.com/13486869/2447451
内容总结
以上是互联网集市为您收集整理的CentOS7.4下MySQL5.7.28二进制方式安装全部内容,希望文章能够帮你解决CentOS7.4下MySQL5.7.28二进制方式安装所遇到的程序开发问题。 如果觉得互联网集市技术教程内容还不错,欢迎将互联网集市网站推荐给程序员好友。
内容备注
版权声明:本文内容由互联网用户自发贡献,该文观点与技术仅代表作者本人。本站仅提供信息存储空间服务,不拥有所有权,不承担相关法律责任。如发现本站有涉嫌侵权/违法违规的内容, 请发送邮件至 gblab@vip.qq.com 举报,一经查实,本站将立刻删除。
内容手机端
扫描二维码推送至手机访问。