Java学习不走弯路教程(22 SpringMVC)
内容导读
互联网集市收集整理的这篇技术教程文章主要介绍了Java学习不走弯路教程(22 SpringMVC),小编现在分享给大家,供广大互联网技能从业者学习和参考。文章包含4516字,纯文字阅读大概需要7分钟。
内容图文
")
SpringMVC
一. 前言
在前上一章教程中,我们实现了spring框架。
本章将在上一章的基础上,进一步扩展程序。
注:
1.本文针对初学Java的同学训练学习思路,请不要太纠结于细节问题。
2.本文旨在达到抛砖引玉的效果,希望大家扩展本例子,以学到更多知识的精髓。
学习本章需要准备的知识:
1.读完本系列教程的前面章节。
2.了解SpringMVC的基本用法。
二. 步入正题
话不多说,大家自己理解,下面步入正题:
我们用SpringMVC来替换Web层
首先把如下Jar包下载并放到工程的lib目录下:
commons-logging-1.2.jar
spring-aop-5.1.0.RELEASE.jar
spring-beans-5.1.0.RELEASE.jar
spring-context-5.1.0.RELEASE.jar
spring-core-5.1.0.RELEASE.jar
spring-expression-5.1.0.RELEASE.jar
spring-web-5.1.0.RELEASE.jar
spring-webmvc-5.1.0.RELEASE.jar
工程的包结构如下: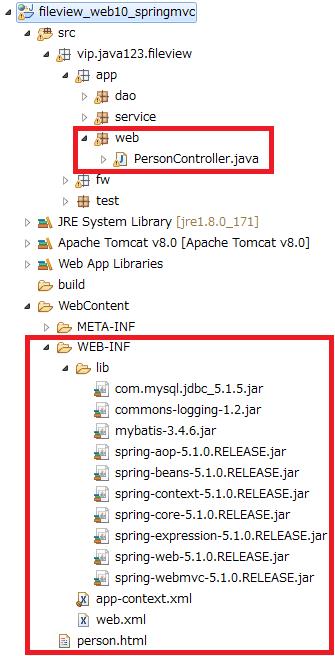
首先我们把自己写的DispacherServlet换成Spring的,修改Web.xml如下:
<?xml version="1.0" encoding="UTF-8"?>
<web-app xmlns:xsi="http://www.w3.org/2001/XMLSchema-instance" xmlns="http://java.sun.com/xml/ns/javaee" xsi:schemaLocation="http://java.sun.com/xml/ns/javaee http://java.sun.com/xml/ns/javaee/web-app_3_0.xsd" id="WebApp_ID" version="3.0">
  <display-name>fileview_web05</display-name>

    <listener>
        <listener-class>org.springframework.web.context.ContextLoaderListener</listener-class>
    </listener>

    <context-param>
        <param-name>contextConfigLocation</param-name>
        <param-value>/WEB-INF/app-context.xml</param-value>
    </context-param>

    <servlet>
        <servlet-name>app</servlet-name>
        <servlet-class>org.springframework.web.servlet.DispatcherServlet</servlet-class>
        <init-param>
            <param-name>contextConfigLocation</param-name>
            <param-value></param-value>
        </init-param>
        <load-on-startup>1</load-on-startup>
    </servlet>

    <servlet-mapping>
        <servlet-name>app</servlet-name>
        <url-pattern>*.do</url-pattern>
    </servlet-mapping>

</web-app>
然后配置Web.xml中加载的app-context.xml,主要是配置controller的扫描路径,和加载MVC驱动。
<?xml version="1.0" encoding="UTF-8"?>
<beans xmlns="http://www.springframework.org/schema/beans"
    xmlns:mvc="http://www.springframework.org/schema/mvc"
    xmlns:xsi="http://www.w3.org/2001/XMLSchema-instance"
    xmlns:p="http://www.springframework.org/schema/p"
    xmlns:context="http://www.springframework.org/schema/context"
    xsi:schemaLocation="
        http://www.springframework.org/schema/beans
        http://www.springframework.org/schema/beans/spring-beans.xsd
        http://www.springframework.org/schema/context
        http://www.springframework.org/schema/context/spring-context.xsd
        http://www.springframework.org/schema/mvc
        http://www.springframework.org/schema/mvc/spring-mvc.xsd">

    <context:component-scan base-package="vip.java123.fileview.app.web"/>
    <mvc:annotation-driven/>

</beans>
修改我们的Controller如下:
 1 package vip.java123.fileview.app.web;
 2
 3 import org.springframework.context.ApplicationContext;
 4 import org.springframework.context.support.ClassPathXmlApplicationContext;
 5 import org.springframework.stereotype.Controller;
 6 import org.springframework.web.bind.annotation.RequestMapping;
 7 import org.springframework.web.bind.annotation.RequestMethod;
 8 import org.springframework.web.bind.annotation.RequestParam;
 9 import org.springframework.web.bind.annotation.ResponseBody;
10
11 import vip.java123.fileview.app.dao.entity.Person;
12 import vip.java123.fileview.app.service.PersonService;
13
14 /**
15  *
16  * @author http://www.java123.vip
17  *
18  */
19 @Controller
20 public class PersonController {
21
22     public PersonService personService;
23
24     public PersonController() {
25
26         // 加载配置文件
27         ApplicationContext context = new ClassPathXmlApplicationContext("vip/java123/fileview/app/service/services.xml");
28
29         // 初始化service
30         personService = context.getBean("personService", PersonService.class);
31
32     }
33
34     @RequestMapping(value = "/person.do", method = RequestMethod.GET)
35     @ResponseBody
36     public String query(@RequestParam("personid")String personId) {
37
38         System.out.println("in query");
39
40         Person personResult = personService.getPerson(personId);
41
42         StringBuffer result = new StringBuffer();
43         result.append("id:"+personResult.id);
44         result.append("<br/>username:"+personResult.username);
45         result.append("<br/>password:"+personResult.passwd);
46
47         return result.toString();
48     }
49
50 }
三. 测试
启动服务器:
向服务器请求person.html文件,在浏览器端输入1,点query按钮: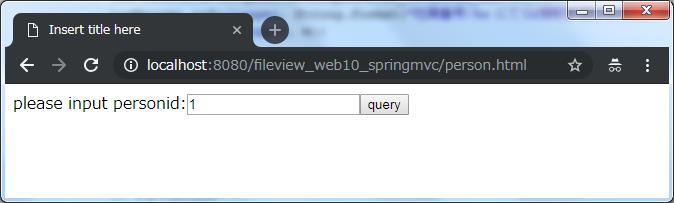
显示查询结果: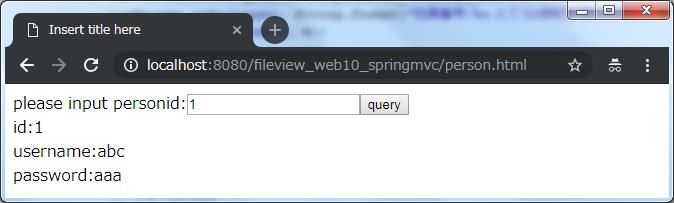
完整程序请大家从[这里]下载
如有问题,大家来我的网站进行提问。
https://www.java123.vip/qa
版权声明:本教程版权归java123.vip所有,禁止任何形式的转载与引用。
内容总结
以上是互联网集市为您收集整理的Java学习不走弯路教程(22 SpringMVC)全部内容,希望文章能够帮你解决Java学习不走弯路教程(22 SpringMVC)所遇到的程序开发问题。 如果觉得互联网集市技术教程内容还不错,欢迎将互联网集市网站推荐给程序员好友。
内容备注
版权声明:本文内容由互联网用户自发贡献,该文观点与技术仅代表作者本人。本站仅提供信息存储空间服务,不拥有所有权,不承担相关法律责任。如发现本站有涉嫌侵权/违法违规的内容, 请发送邮件至 gblab@vip.qq.com 举报,一经查实,本站将立刻删除。
内容手机端
扫描二维码推送至手机访问。