Spring Boot从入门到精通(七)集成Redis实现Session共享
内容导读
互联网集市收集整理的这篇技术教程文章主要介绍了Spring Boot从入门到精通(七)集成Redis实现Session共享,小编现在分享给大家,供广大互联网技能从业者学习和参考。文章包含16314字,纯文字阅读大概需要24分钟。
内容图文
集成Redis实现Session共享")
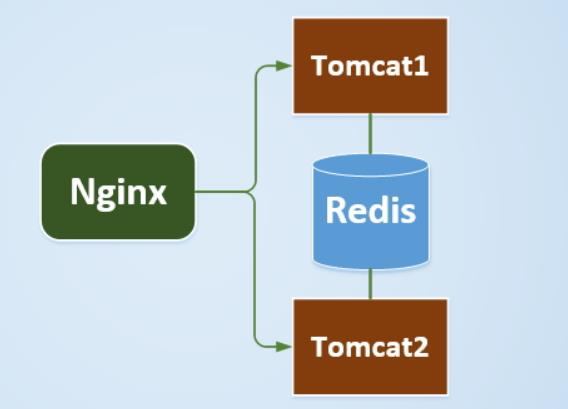
单点登录(SSO)是指在多个应用系统中,登录用户只需要登录验证一次就可以访问所有相互信任的应用系统,Redis Session共享是实现单点登录的一种方式。本文是通过Spring Boot框架集成Redis缓存来实现session共享的,分享给大家仅供参考和学习。

有些人可能是初级Java工程师甚至刚刚接触Java编程,因此先普及一下Session的概念:Session是服务器端的一个key-value的数据结构,开发者经常把Session与cookie配合使用,用于保持登录用户的回话。
当客户端在第一次访问服务端时,服务端会响应一个sessionId并且将它存入到本地cookie中,之后每次访问都会将cookie中的sessionId放入到请求头中去请求服务器。如果通过这个sessionid无法找到对应的值,那么服务器会创建一个新的sessionid并且响应给客户端。
本文在前一篇“Spring Boot从入门到精通(六)集成Redis实现缓存机制”文章中的项目源码基础上(关注“Java精选”微信公众号,切换至后台->聚合->开源项目,可以查看Spring Boot系列从入门到精通教程),使用Spring Boot框架集成Redis缓存来实现session共享。Maven项目pom.xml文件在Spring Boot项目中pom.xml文件中,增加配置信息如下:
<dependency>
        <groupId>org.springframework.session</groupId>
        <artifactId>spring-session-data-redis</artifactId>
</dependency>
配置Redis缓存类文件
在前一篇文章源码的基础上(文章末尾有Spring Boot从入门到精通系列文章地址),集成Redis实现缓存机制的源码的基础上增加@EnableRedisHttpSession即可,具体代码如下:
package com.yoodb.study.demo04.datasource;

import org.springframework.boot.context.properties.ConfigurationProperties;
import org.springframework.cache.annotation.CachingConfigurerSupport;
import org.springframework.context.annotation.Bean;
import org.springframework.context.annotation.Configuration;
import org.springframework.data.redis.connection.RedisConnectionFactory;
import org.springframework.data.redis.core.RedisTemplate;
import org.springframework.data.redis.serializer.StringRedisSerializer;
import org.springframework.session.data.redis.config.annotation.web.http.EnableRedisHttpSession;


@Configuration
@EnableRedisHttpSession(maxInactiveIntervalInSeconds = 86400*30)
public class RedisConfig extends CachingConfigurerSupport {

    @Bean("redisTemplate")
    @ConfigurationProperties(prefix="spring.redis")
    public RedisTemplate<String, Object> redisTemplate(RedisConnectionFactory factory){
        RedisTemplate<String, Object> redisTemplate = new RedisTemplate<>();
        redisTemplate.setConnectionFactory(factory);

        //将key的序列化设置成StringRedisSerializer
        StringRedisSerializer keySerializer = new StringRedisSerializer();
        redisTemplate.setKeySerializer(keySerializer);
        redisTemplate.setHashKeySerializer(keySerializer);

        redisTemplate.afterPropertiesSet();
        return redisTemplate;
    }

}
@EnableRedisHttpSession:开启Session共享功能。使用此注解之后Session调用会自动通过Redis存储和获取。另外,想要达到Session共享的目的,在其他的系统上只需要做同样的配置即可。
其中maxInactiveIntervalInSeconds参数是设置Session失效时间,使用Redis
Session之后,原Spring Boot的server.session.timeout属性不再生效。
Spring Session Redis的源码分析打开@EnableRedisHttpSession注解源码如下:
//
// Source code recreated from a .class file by IntelliJ IDEA
// (powered by Fernflower decompiler)
//

package org.springframework.session.data.redis.config.annotation.web.http;

import java.lang.annotation.Documented;
import java.lang.annotation.ElementType;
import java.lang.annotation.Retention;
import java.lang.annotation.RetentionPolicy;
import java.lang.annotation.Target;
import org.springframework.context.annotation.Configuration;
import org.springframework.context.annotation.Import;
import org.springframework.session.FlushMode;
import org.springframework.session.SaveMode;
import org.springframework.session.data.redis.RedisFlushMode;

@Retention(RetentionPolicy.RUNTIME)
@Target({ElementType.TYPE})
@Documented
@Import({RedisHttpSessionConfiguration.class})
@Configuration(
    proxyBeanMethods = false
)
public @interface EnableRedisHttpSession {

	//Session默认过期时间,秒为单位,默认30分钟
    int maxInactiveIntervalInSeconds() default 1800;
	//配置key的namespace,默认的是spring:session,如果不同的应用共用一个redis,应该为应用配置不同的namespace,这样才能区分这个Session是来自哪个应用。
    String redisNamespace() default "spring:session";

	//配置刷新Redis中Session的方式,默认是ON_SAVE模式,只有当Response提交后才会将Session提交到Redis
    //此模式也可以配置成IMMEDIATE模式,这样的话所有对Session的更改都会立即更新到Redis。
    /** @deprecated */
    @Deprecated
    RedisFlushMode redisFlushMode() default RedisFlushMode.ON_SAVE;

    FlushMode flushMode() default FlushMode.ON_SAVE;
	//清理过期Session的定时任务默认0,到时间自动清理。
    String cleanupCron() default "0 * * * * *";

    SaveMode saveMode() default SaveMode.ON_SET_ATTRIBUTE;
}
Controller类文件
前一篇项目源码的基础上,在BootUserController类文件中增加两个方法,具体代码如下:
package com.yoodb.study.demo04;

import java.util.HashMap;
import java.util.List;
import java.util.Map;

import com.yoodb.study.demo04.bean.BootUser;
import com.yoodb.study.demo04.service.BootUserService;
import org.springframework.beans.factory.annotation.Autowired;
import org.springframework.web.bind.annotation.GetMapping;
import org.springframework.web.bind.annotation.RequestMapping;
import org.springframework.web.bind.annotation.RestController;

import javax.servlet.http.HttpServletRequest;

@RestController
@RequestMapping("/myt")
public class BootUserController {
    @Autowired
    private BootUserService service;

    @RequestMapping("/getUsers")
    public List<BootUser> getUsers() {
        List<BootUser> list = service.getUsers();
        return list;
    }

    @GetMapping(value = "/first")
    public Map<String, Object> firstResp (HttpServletRequest request){
        Map<String, Object> map = new HashMap<>();
        StringBuffer requestUrl = request.getRequestURL();
        request.getSession().setAttribute("requestUrl",requestUrl );
        map.put("requestUrl", requestUrl);
        return map;
    }

    @GetMapping(value = "/sessions")
    public Object sessions (HttpServletRequest request){
        Map<String, Object> map = new HashMap<>();
        map.put("sessionId", request.getSession().getId());
        map.put("message", request.getSession().getAttribute("requestUrl"));
        return map;
    }

}
Spring Boot项目启动
1、访问8080端口项目启动成功之后测试访问,访问8080端口的first地址:http://localhost:8080/myt/first返回json结果:
{"requestUrl":"http://localhost:8080/myt/first"}
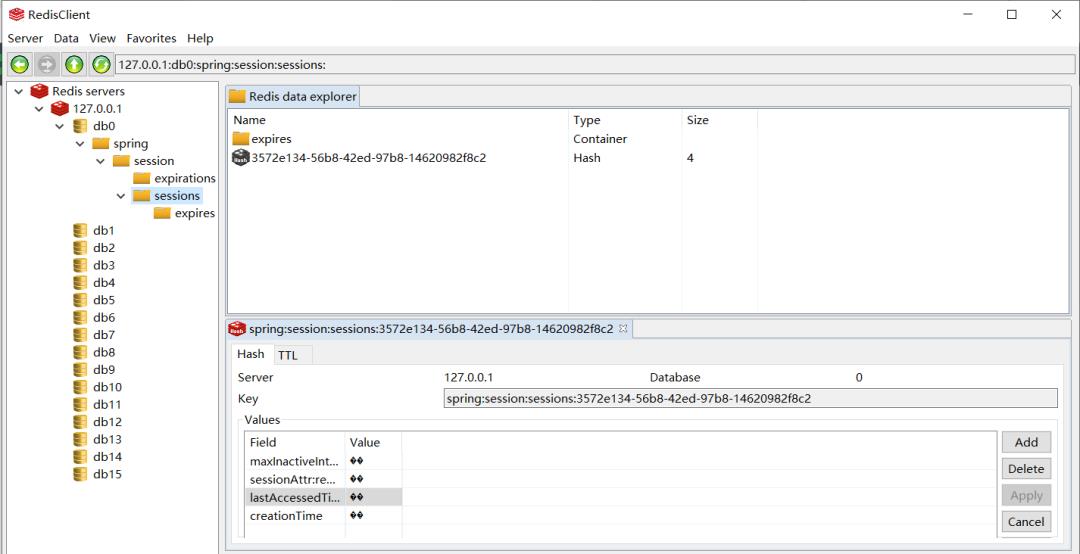
通过redis客户端工具连接redis服务,可以看到redis中已经存在springsession相关数据,此时也可以看到设置的sessions值。
 接着,访问8080端口的sessions地址:http://localhost:8080/myt/sessions返回json结果:
{"sessionId":"3572e134-56b8-42ed-97b8-14620982f8c2","message":"http://localhost:8080/myt/first"}
2、访问9090端口配置application.properties文件,请求9090端口的设置,配置信息如下:
#指定端口号
server.port=9090
项目启动成功之后测试访问,访问9090端口的sessions地址:http://localhost:9090/myt/sessions
{"sessionId":"3572e134-56b8-42ed-97b8-14620982f8c2","message":"http://localhost:8080/myt/first"}
注:通过返回json结果可以发现8080与9090两个服务返回的数据相同,那么恭喜已经实现了session的共享。如果此时访问9090端口的first地址,会发现与8080端口的访问地址端口号不相同:http://localhost:9090/myt/first返回json结果:
{"requestUrl":"http://localhost:9090/myt/first"}
8080和9090端口两个服务的sessions访问地址,都会返回如下json结果:
{"sessionId":"3572e134-56b8-42ed-97b8-14620982f8c2","message":"http://localhost:8080/myt/first"}
结论:两个服务的访问地址不相同,但获取的session数据相同,说明已经实现了session共享,与前面说到的登录用户只需要登录验证一次就可以访问所有相互信任的应用系统呼应了。本文“Spring Boot从入门到精通(七)集成Redis实现Session共享”文章的项目源码(springboot-study-demo04)地址:项目地址:https://github.com/yoodb/springboot
本文转自:https://blog.yoodb.com/yoodb/article/detail/1571
Spring Boot集成Redis缓存实现session的共享就是这么简单。虽说简单,但在实际项目开发中还是比较应用广泛的,尤其是在分布式应用方面,通过Redis session共享与nginx负载均衡配合,实现分布式应用。下面大家不妨试一试,有什么疑问欢迎下方留言,看到后小编立马回复!
单点登录(SSO)是指在多个应用系统中,登录用户只需要登录验证一次就可以访问所有相互信任的应用系统,Redis Session共享是实现单点登录的一种方式。本文是通过Spring Boot框架集成Redis缓存来实现session共享的,分享给大家仅供参考和学习。
有些人可能是初级Java工程师甚至刚刚接触Java编程,因此先普及一下Session的概念:Session是服务器端的一个key-value的数据结构,开发者经常把Session与cookie配合使用,用于保持登录用户的回话。
当客户端在第一次访问服务端时,服务端会响应一个sessionId并且将它存入到本地cookie中,之后每次访问都会将cookie中的sessionId放入到请求头中去请求服务器。如果通过这个sessionid无法找到对应的值,那么服务器会创建一个新的sessionid并且响应给客户端。
本文在前一篇“Spring Boot从入门到精通(六)集成Redis实现缓存机制”文章中的项目源码基础上(关注“Java精选”微信公众号,切换至后台->聚合->开源项目,可以查看Spring Boot系列从入门到精通教程),使用Spring Boot框架集成Redis缓存来实现session共享。
Maven项目pom.xml文件
在Spring Boot项目中pom.xml文件中,增加配置信息如下:
| 1 2 3 4 |
<dependency>??
????????<groupId>org.springframework.session</groupId>??
????????<artifactId>spring-session-data-redis</artifactId>??
</dependency>
|
配置Redis缓存类文件
在前一篇文章源码的基础上(文章末尾有Spring Boot从入门到精通系列文章地址),集成Redis实现缓存机制的源码的基础上增加@EnableRedisHttpSession即可,具体代码如下:
| 1 2 3 4 5 6 7 8 9 10 11 12 13 14 15 16 17 18 19 20 21 22 23 24 25 26 27 28 29 30 31 32 |
package com.yoodb.study.demo04.datasource;
import org.springframework.boot.context.properties.ConfigurationProperties;
import org.springframework.cache.annotation.CachingConfigurerSupport;
import org.springframework.context.annotation.Bean;
import org.springframework.context.annotation.Configuration;
import org.springframework.data.redis.connection.RedisConnectionFactory;
import org.springframework.data.redis.core.RedisTemplate;
import org.springframework.data.redis.serializer.StringRedisSerializer;
import org.springframework.session.data.redis.config.annotation.web.http.EnableRedisHttpSession;
@Configuration
@EnableRedisHttpSession(maxInactiveIntervalInSeconds?=?86400*30)
public class RedisConfig?extends CachingConfigurerSupport?{
????@Bean("redisTemplate")
????@ConfigurationProperties(prefix="spring.redis")
????public RedisTemplate<String,?Object>?redisTemplate(RedisConnectionFactory?factory){
????????RedisTemplate<String,?Object>?redisTemplate?=?new RedisTemplate<>();
????????redisTemplate.setConnectionFactory(factory);
????????//将key的序列化设置成StringRedisSerializer
????????StringRedisSerializer?keySerializer?=?new StringRedisSerializer();
????????redisTemplate.setKeySerializer(keySerializer);
????????redisTemplate.setHashKeySerializer(keySerializer);
????????redisTemplate.afterPropertiesSet();
????????return redisTemplate;
????}
??
}
|
@EnableRedisHttpSession:开启Session共享功能。使用此注解之后Session调用会自动通过Redis存储和获取。另外,想要达到Session共享的目的,在其他的系统上只需要做同样的配置即可。
其中maxInactiveIntervalInSeconds参数是设置Session失效时间,使用Redis
Session之后,原Spring Boot的server.session.timeout属性不再生效。
Spring Session Redis的源码分析
打开@EnableRedisHttpSession注解源码如下:
| 1 2 3 4 5 6 7 8 9 10 11 12 13 14 15 16 17 18 19 20 21 22 23 24 25 26 27 28 29 30 31 32 33 34 35 36 37 38 39 40 41 42 43 44 |
//
//?Source?code?recreated?from?a?.class?file?by?IntelliJ?IDEA
//?(powered?by?Fernflower?decompiler)
//
package org.springframework.session.data.redis.config.annotation.web.http;
import java.lang.annotation.Documented;
import java.lang.annotation.ElementType;
import java.lang.annotation.Retention;
import java.lang.annotation.RetentionPolicy;
import java.lang.annotation.Target;
import org.springframework.context.annotation.Configuration;
import org.springframework.context.annotation.Import;
import org.springframework.session.FlushMode;
import org.springframework.session.SaveMode;
import org.springframework.session.data.redis.RedisFlushMode;
@Retention(RetentionPolicy.RUNTIME)
@Target({ElementType.TYPE})
@Documented
@Import({RedisHttpSessionConfiguration.class})
@Configuration(
????proxyBeanMethods?=?false
)
public @interface EnableRedisHttpSession?{
//Session默认过期时间,秒为单位,默认30分钟
????int maxInactiveIntervalInSeconds()?default 1800;
//配置key的namespace,默认的是spring:session,如果不同的应用共用一个redis,应该为应用配置不同的namespace,这样才能区分这个Session是来自哪个应用。
????String?redisNamespace()?default "spring:session";
//配置刷新Redis中Session的方式,默认是ON_SAVE模式,只有当Response提交后才会将Session提交到Redis
????//此模式也可以配置成IMMEDIATE模式,这样的话所有对Session的更改都会立即更新到Redis。
????/**?@deprecated?*/
????@Deprecated
????RedisFlushMode?redisFlushMode()?default RedisFlushMode.ON_SAVE;
????FlushMode?flushMode()?default FlushMode.ON_SAVE;
//清理过期Session的定时任务默认0,到时间自动清理。
????String?cleanupCron()?default "0?*?*?*?*?*";
????SaveMode?saveMode()?default SaveMode.ON_SET_ATTRIBUTE;
}
|
Controller类文件
前一篇项目源码的基础上,在BootUserController类文件中增加两个方法,具体代码如下:
| 1 2 3 4 5 6 7 8 9 10 11 12 13 14 15 16 17 18 19 20 21 22 23 24 25 26 27 28 29 30 31 32 33 34 35 36 37 38 39 40 41 42 43 44 45 |
package com.yoodb.study.demo04;
import java.util.HashMap;
import java.util.List;
import java.util.Map;
import com.yoodb.study.demo04.bean.BootUser;
import com.yoodb.study.demo04.service.BootUserService;
import org.springframework.beans.factory.annotation.Autowired;
import org.springframework.web.bind.annotation.GetMapping;
import org.springframework.web.bind.annotation.RequestMapping;
import org.springframework.web.bind.annotation.RestController;
import javax.servlet.http.HttpServletRequest;
@RestController
@RequestMapping("/myt")
public class BootUserController?{
????@Autowired
????private BootUserService?service;
????@RequestMapping("/getUsers")
????public List<BootUser>?getUsers()?{
????????List<BootUser>?list?=?service.getUsers();
????????return list;
????}
????@GetMapping(value?=?"/first")
????public Map<String,?Object>?firstResp?(HttpServletRequest?request){
????????Map<String,?Object>?map?=?new HashMap<>();
????????StringBuffer?requestUrl?=?request.getRequestURL();
????????request.getSession().setAttribute("requestUrl",requestUrl?);
????????map.put("requestUrl",?requestUrl);
????????return map;
????}
????@GetMapping(value?=?"/sessions")
????public Object?sessions?(HttpServletRequest?request){
????????Map<String,?Object>?map?=?new HashMap<>();
????????map.put("sessionId",?request.getSession().getId());
????????map.put("message",?request.getSession().getAttribute("requestUrl"));
????????return map;
????}
}
|
Spring Boot项目启动
1、访问8080端口项目启动成功之后测试访问,访问8080端口的first地址:http://localhost:8080/myt/first
返回json结果:
| 1 |
{"requestUrl":"http://localhost:8080/myt/first"}
|
通过redis客户端工具连接redis服务,可以看到redis中已经存在springsession相关数据,此时也可以看到设置的sessions值。
接着,访问8080端口的sessions地址:
http://localhost:8080/myt/sessions
返回json结果:
| 1 |
{"sessionId":"3572e134-56b8-42ed-97b8-14620982f8c2","message":"http://localhost:8080/myt/first"}
|
2、访问9090端口
配置application.properties文件,请求9090端口的设置,配置信息如下:
| 1 2 |
#指定端口号
server.port=9090
|
项目启动成功之后测试访问,访问9090端口的sessions地址:
http://localhost:9090/myt/sessions
| 1 |
{"sessionId":"3572e134-56b8-42ed-97b8-14620982f8c2","message":"http://localhost:8080/myt/first"}
|
注:通过返回json结果可以发现8080与9090两个服务返回的数据相同,那么恭喜已经实现了session的共享。
如果此时访问9090端口的first地址,会发现与8080端口的访问地址端口号不相同:
http://localhost:9090/myt/first
返回json结果:
| 1 |
{"requestUrl":"http://localhost:9090/myt/first"}
|
8080和9090端口两个服务的sessions访问地址,都会返回如下json结果:
| 1 |
{"sessionId":"3572e134-56b8-42ed-97b8-14620982f8c2","message":"http://localhost:8080/myt/first"}
|
结论:两个服务的访问地址不相同,但获取的session数据相同,说明已经实现了session共享,与前面说到的登录用户只需要登录验证一次就可以访问所有相互信任的应用系统呼应了。
本文“Spring Boot从入门到精通(七)集成Redis实现Session共享”文章的项目源码(springboot-study-demo04)地址:
https://github.com/yoodb/springboot
Spring Boot集成Redis缓存实现session的共享就是这么简单。虽说简单,但在实际项目开发中还是比较应用广泛的,尤其是在分布式应用方面,通过Redis session共享与nginx负载均衡配合,实现分布式应用。下面大家不妨试一试,有什么疑问欢迎下方留言,看到后小编立马回复!
内容总结
以上是互联网集市为您收集整理的Spring Boot从入门到精通(七)集成Redis实现Session共享全部内容,希望文章能够帮你解决Spring Boot从入门到精通(七)集成Redis实现Session共享所遇到的程序开发问题。 如果觉得互联网集市技术教程内容还不错,欢迎将互联网集市网站推荐给程序员好友。
内容备注
版权声明:本文内容由互联网用户自发贡献,该文观点与技术仅代表作者本人。本站仅提供信息存储空间服务,不拥有所有权,不承担相关法律责任。如发现本站有涉嫌侵权/违法违规的内容, 请发送邮件至 gblab@vip.qq.com 举报,一经查实,本站将立刻删除。
内容手机端
扫描二维码推送至手机访问。