搭建PXE与DHCP实现无人值守自动化安装CentOS8系统
内容导读
互联网集市收集整理的这篇技术教程文章主要介绍了搭建PXE与DHCP实现无人值守自动化安装CentOS8系统,小编现在分享给大家,供广大互联网技能从业者学习和参考。文章包含5530字,纯文字阅读大概需要8分钟。
内容图文

做别名扫描添加的硬盘
[root@localhost ks]# alias scandisk="echo '- - -' > /sys/class/scsi_host/host0/scan;echo '- - -' > /sys/class/scsi_host/host1/scan;echo '- - -' > /sys/class/scsi_host/host2/scan"
挂载光盘
[root@localhost ks]# mount /dev/sr1 /var/www/html/centos/8
[root@localhost ks]# mount /dev/sr0 /var/www/html/centos/7
安装需要的软件
[root@localhost ks]# yum -y install dhcp-server tftp-server httpd syslinux-nonlinux
启动
[root@localhost ks]# systemctl enable --now httpd tftp dhcpd
拷贝模板文件做配置文件
[root@localhost ks]# cp /usr/share/doc/dhcp-server/dhcpd.conf.example /etc/dhcp/dhcpd.conf

default-lease-time 86400;
max-lease-time 102400;

subnet 172.31.0.0 netmask 255.255.0.0 {
  range 172.31.0.150 172.31.0.170;
  option routers 172.31.0.254;
  next-server 172.31.0.100;
  filename "pxelinux.0";
}
重启
[root@localhost ks]# systemctl enable --now httpd tftp dhcpd
CentOS8的应答文件
[root@localhost ks]# vim centos8.cfg
#version=RHEL8
# Use graphical install
ignoredisk --only-use=sda
zerombr
text
reboot
selinux --disabled
firewall --disabled
url --url="http://172.31.0.100/centos/8/"

%packages
@^minimal-environment
tree
vim
net-tools
%end

# Keyboard layouts
keyboard --xlayouts='us'
# System language
lang en_US.UTF-8

# Network information
bootloader --append="net.ifnames=0" --location=mbr --boot-drive=sda
network  --bootproto=dhcp --device=eth0 --ipv6=auto --activate
network  --hostname=centos8.longxuan.vip

zerombr
# Partition clearing information
clearpart --all --initlabel
ignoredisk --only-use=sda
# Disk partitioning information 50G
part /boot --fstype="ext4" --ondisk=sda --size=1024
part / --fstype="xfs" --ondisk=sda --size=26000
part /data --fstype="xfs" --ondisk=sda --size=15360
part swap --fstype="swap" --ondisk=sda --size=2048

# System timezone
timezone Asia/Shanghai --isUtc --nontp

# Root password
rootpw --plaintext 123456

%addon com_redhat_kdump --disable --reserve-mb='auto'

%end

%anaconda
pwpolicy root --minlen=6 --minquality=1 --notstrict --nochanges --notempty
pwpolicy user --minlen=6 --minquality=1 --notstrict --nochanges --emptyok
pwpolicy luks --minlen=6 --minquality=1 --notstrict --nochanges --notempty
%end
%post

mkdir /etc/yum.repos.d/bak -p
mv /etc/yum.repos.d/*.repo /etc/yum.repos.d/bak
cat > /etc/yum.repos.d/base.repo <<EOF
[BaseOS]
name=BaseOS
baseurl=file:///misc/cd/BaseOS
        https://mirror.tuna.tsinghua.edu.cn/centos/8/BaseOS/x86_64/os/
        https://mirrors.huaweicloud.com/centos/8/BaseOS/x86_64/os/
        https://mirrors.cloud.tencent.com/centos/8/BaseOS/x86_64/os/
        https://mirrors.aliyun.com/centos/8/BaseOS/x86_64/os/
gpgcheck=0

[AppStream]
name=AppStream
baseurl=file:///misc/cd/AppStream
        https://mirror.tuna.tsinghua.edu.cn/centos/8/AppStream/x86_64/os/
        https://mirrors.huaweicloud.com/centos/8/AppStream/x86_64/os/
        https://mirrors.cloud.tencent.com/centos/8/AppStream/x86_64/os/
        https://mirrors.aliyun.com/centos/8/AppStream/x86_64/os/
gpgcheck=0


[epel]
name=EPEL
baseurl=https://mirror.tuna.tsinghua.edu.cn/epel/8/Everything/x86_64
        https://mirrors.cloud.tencent.com/epel/8/Everything/x86_64
        https://mirrors.huaweicloud.com/epel/8/Everything/x86_64
        https://mirrors.aliyun.com/epel/8/Everything/x86_64
gpgcheck=0
enabled=1

[extras]
name=extras
baseurl=https://mirror.tuna.tsinghua.edu.cn/centos/8/extras/x86_64/os/
        https://mirrors.cloud.tencent.com/centos/8/extras/x86_64/os/
        https://mirrors.huaweicloud.com/centos/8/extras/x86_64/os/
        https://mirrors.aliyun.com/centos/8/extras/x86_64/os/
gpgcheck=0
enabled=1

[PowerTools]
name=CentOS- - PowerTools - mirrors.aliyun.com
baseurl=https://mirror.tuna.tsinghua.edu.cn/centos/8/PowerTools/x86_64/os/
        https://mirrors.cloud.tencent.com/centos/8/PowerTools/x86_64/os/
        https://mirrors.huaweicloud.com/centos/8/PowerTools/x86_64/os/
        https://mirrors.aliyun.com/centos/8/PowerTools/x86_64/os/
gpgcheck=0
enabled=1
gpgkey=https://mirrors.aliyun.com/centos/RPM-GPG-KEY-CentOS-Official

EOF

cat >> /etc/profile.d/env.sh <<EOF
PS1='\[\e[1;32m\][\[\e[0m\]\[\e[1;32m\]\t \[\e[1;33m\]\u\[\e[34m\]@\h\[\e[1;31m\] \w\[\e[1;32m\]]\[\e[0m\]# '
EOF
source /etc/profile.d/env.sh
%end
创建目录
[root@localhost ks]# mkdir /var/lib/tftpboot/centos{7,8}
拷贝文件做系统启动
[root@localhost ks]# cp /var/www/html/centos/8/isolinux/{vmlinuz,initrd.img} /var/lib/tftpboot/centos8
[root@localhost ks]# cp /usr/share/syslinux/{pxelinux.0,menu.c32} /var/lib/tftpboot/
[root@localhost ks]# cp /var/www/html/centos/8/isolinux/{ldlinux.c32,libcom32.c32,libutil.c32} /var/lib/tftpboot/
创建挂载目录
[root@localhost ks]# mkdir /var/lib/tftpboot/pxelinux.cfg/
拷贝文件
[root@localhost ks]# cp /var/www/html/centos/8/isolinux/isolinux.cfg /var/lib/tftpboot/pxelinux.cfg/default
修改配置文件
[root@localhost ks]# vim /var/lib/tftpboot/pxelinux.cfg/default
default menu.c32
timeout 600
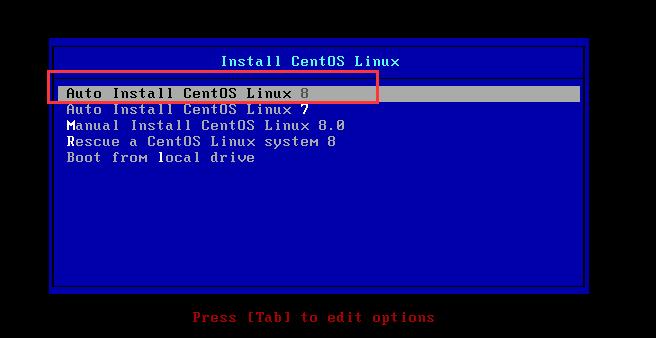
menu title Install CentOS Linux
label linux8
menu label Auto Install CentOS Linux ^8
kernel centos8/vmlinuz
append initrd=centos8/initrd.img ks=http://172.31.0.100/ks/centos8.cfg
?
label linux7
menu label Auto Install CentOS Linux ^7
kernel centos7/vmlinuz
append initrd=centos7/initrd.img ks=http://172.31.0.100/ks/centos7.cfg
?
label manual
menu label ^Manual Install CentOS Linux 8.0
kernel centos8/vmlinuz
append initrd=centos8/initrd.img
inst.repo=http://172.31.0.100/centos/8/
label rescue
menu label ^Rescue a CentOS Linux system 8
kernel centos8/vmlinuz
append initrd=centos8/initrd.img
inst.repo=http://172.31.0.100/centos/8/ rescue
?
label local
menu default
menu label Boot from ^local drive
localboot 0xffff
重启dhcp
[root@localhost ks]# systemctl restart dhcpd
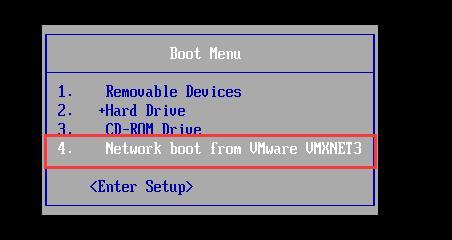
开一台虚拟机验证
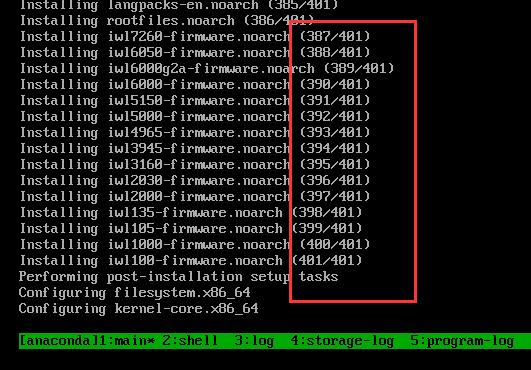
等待安装...401个包...
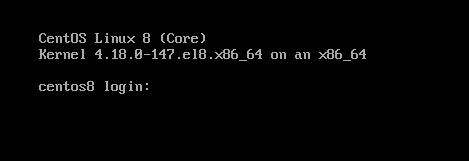
看到如下登陆界面说明安装成功!!!
内容总结
以上是互联网集市为您收集整理的搭建PXE与DHCP实现无人值守自动化安装CentOS8系统全部内容,希望文章能够帮你解决搭建PXE与DHCP实现无人值守自动化安装CentOS8系统所遇到的程序开发问题。 如果觉得互联网集市技术教程内容还不错,欢迎将互联网集市网站推荐给程序员好友。
内容备注
版权声明:本文内容由互联网用户自发贡献,该文观点与技术仅代表作者本人。本站仅提供信息存储空间服务,不拥有所有权,不承担相关法律责任。如发现本站有涉嫌侵权/违法违规的内容, 请发送邮件至 gblab@vip.qq.com 举报,一经查实,本站将立刻删除。
内容手机端
扫描二维码推送至手机访问。
来源:【匿名】