CentOS7下搭建postfix邮箱服务器
内容导读
互联网集市收集整理的这篇技术教程文章主要介绍了CentOS7下搭建postfix邮箱服务器,小编现在分享给大家,供广大互联网技能从业者学习和参考。文章包含30271字,纯文字阅读大概需要44分钟。
内容图文

CentOS7下搭建postfix邮箱服务器
一、基础准备
- 准备工作
所用软件皆在这里
链接:https://pan.baidu.com/s/1b2GZiMekQpm97wgbovpxzg
提取码:6etb
关闭selinux
[root@localhost ~]# setenforce 0
[root@localhost ~]# getenforce
Permissive
[root@localhost ~]#
关闭firewalld防火墙,并清空iptables规则:
[root@localhost ~]# systemctl stop firewalld
[root@localhost ~]# iptables -F
[root@localhost ~]# iptables -X
[root@localhost ~]# iptables -nvL
Chain INPUT (policy ACCEPT 38 packets, 7291 bytes)
pkts bytes target prot opt in out source destination
Chain FORWARD (policy ACCEPT 0 packets, 0 bytes)
pkts bytes target prot opt in out source destination
Chain OUTPUT (policy ACCEPT 12 packets, 1208 bytes)
pkts bytes target prot opt in out source destination
由于CentOS7默认安装的是MariaDB,所以要添加MySQL的yum源,有些编译需要的devel包只有epel扩展源有,所以我们需要把epel源也一并添加。先安装wget这个命令:
yum install -y wget
rpm -ivh mysql-community-release-el7-5.noarch.rpm
rpm -ivh epel-release-latest-7.noarch.rpm
二、LNMP搭建
1. 安装MySQL
① 下载软件包
② 初始化
解压
# tar -zxvf mysql-5.6.43-linux-glibc2.12-x86_64.tar.gz
判断是否有/usr/local/mysql目录,并将目录改为或设为/usr/local/mysql_old
# [ -d /usr/local/mysql ] && mv /usr/local/mysql /usr/local/mysql_old
移动MySQL文件到/usr/local/mysql下
# mv mysql-5.6.43-linux-glibc2.12-x86_64 /usr/local/mysql
建立MySQL用户
# useradd -s /sbin/nologin mysql
# cd /usr/local/mysql
创建datadir,数据库文件会放到这里
# mkdir -p /data/mysql
更改权限
# chown -R mysql:mysql /data/mysql
安装perl-Module-Install
# ./scripts/mysql_install_db --user=mysql --datadir=/data/mysql
此命令执行后你会看到两个OK,并且在/data/mysql目录下生成几个文件和目录然后用echo $?进行验证
③ 配置MySQL
复制配置文件到 /etc/my.cnf下
# cp support-files/my-default.cnf /etc/my.cnf
修改配置文件内容如下

复制启动脚本文件并修改其属性
# cp support-files/mysql.server /etc/init.d/mysqld
# chmod 755 /etc/init.d/mysqld
修改启动脚本
# vim /etc/init.d/mysqld
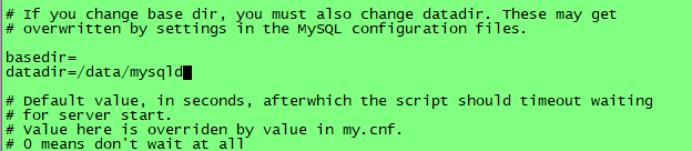
上图中为:datadir=/data/mysql
把mysqld服务加入到系统服务列表中
# chkconfig --add mysqld
使其开机就启动
# chkconfig mysqld on
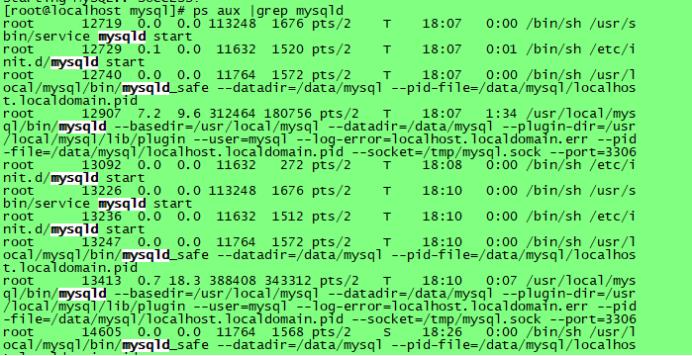
启动服务

检查结果是否大于两行
# ps aux |grep mysqld
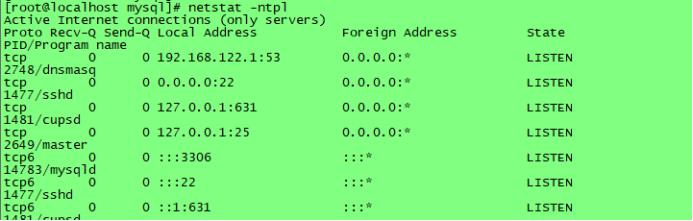
看看有没有监听33306接口
没有netstat就使用命令:
# yum install -y net-tools
# netstat -ntpl
2.安装PHP
1.解压资源包
# cd /usr/local/src
# tar -zxf php-5.6.30.tar.gz
- 安装和配置:
yum install -y gcc
yum install -y libxml2-devel
yum install -y openssl openssl-devel
yum install -y bzip2 bzip2-devel
yum install -y libpng libpng-devel
yum install -y freetype freetype-devel
yum install -y epel-release
yum install -y libmcrypt-devel
yum install -y libjpeg-devel
yum install -y libcurl-devel
//提前安装好库文件,防止安装时出错。
# useradd -s /sbin/nologin php-fpm
编译参数:
#cd php-5.6.30
# ./configure \
--prefix=/usr/local/php-fpm \
--with-config-file-path=/usr/local/php-fpm/etc \
--enable-fpm \
--with-fpm-user=php-fpm \
--with-fpm-group=php-fpm \
--with-mysql=/usr/local/mysql \
--with-mysql-sock=/tmp/mysql.sock \
--with-libxml-dir \
--with-gd \
--with-jpeg-dir \
--with-png-dir \
--with-freetype-dir \
--with-iconv-dir \
--with-zlib-dir \
--with-mcrypt \
--enable-soap \
--with-gd-native-ttf \
--enable-ftp \
--enable-mbstring \
--enable-exif \
--disable-ipv6 \
--with-pear \
--with-curl \
--with-openssl
./configure --prefix=/usr/local/php-fpm --with-config-file-path=/usr/local/php-fpm/etc --enable-fpm --with-fpm-user=php-fpm --with-fpm-group=php-fpm --with-mysql=/usr/local/mysql --with-mysql-sock=/tmp/mysql.sock --with-libxml-dir --with-gd --with-jpeg-dir --with-png-dir --with-freetype-dir --with-iconv-dir --with-zlib-dir --with-mcrypt --enable-soap --with-gd-native-ttf --enable-ftp --enable-mbstring --enable-exif --disable-ipv6 --with-peurl --with-openssl
- 编辑并安装
# make && make install
- 修改配置文件
# cp php.ini-production /usr/local/php-fpm/etc/php.ini
# vim /usr/local/php-fpm/etc/php-fpm.conf
[global]
pid = /usr/local/php-fpm/var/run/php-fpm.pid
error_log = /usr/local/php-fpm/var/log/php-fpm.log
[www]
listen = /tmp/php-fcgi.sock
listen.mode = 666
user = php-fpm
group = php-fpm
pm = dynamic
pm.max_children = 50
pm.start_servers = 20
pm.min_spare_servers = 5
pm.max_spare_servers = 35
pm.max_requests = 500
rlimit_files = 1024
保存配置文件后,,检验是否正确的方法如下:
# /usr/local/php-fpm/sbin/php-fpm -t

如果显示“test is successful”字样,就说明配置没有问题
启动php-fpm,命令如下:
# cp /usr/local/src/php-5.6.30/sapi/fpm/init.d.php-fpm /etc/init.d/php-fpm
# chmod 755 /etc/init.d/php-fpm
# useradd -s /sbin/nologin php-fpm
# service php-fpm start

# chkconfig php-fpm on
# ps aux |grep php-fpm

3. 安装Nginx
- 解压
# cd nginx-1.12.2
# ./configure --prefix=/usr/local/nginx
# make && make install
# vim /etc/init.d/nginx // 写下如下内容:
#!/bin/bash
# chkconfig: - 30 21
# description: http service.
# Source Function Library
. /etc/init.d/functions
# Nginx Settings
NGINX_SBIN="/usr/local/nginx/sbin/nginx"
NGINX_CONF="/usr/local/nginx/conf/nginx.conf"
NGINX_PID="/usr/local/nginx/logs/nginx.pid"
RETVAL=0
prog="Nginx"
start()
{
echo -n $"Starting $prog: "
mkdir -p /dev/shm/nginx_temp
daemon $NGINX_SBIN -c $NGINX_CONF
RETVAL=$?
echo
return $RETVAL
}
stop()
{
echo -n $"Stopping $prog: "
killproc -p $NGINX_PID $NGINX_SBIN -TERM
rm -rf /dev/shm/nginx_temp
RETVAL=$?
echo
return $RETVAL
}
reload()
{
echo -n $"Reloading $prog: "
killproc -p $NGINX_PID $NGINX_SBIN -HUP
RETVAL=$?
echo
return $RETVAL
}
restart()
{
stop
start
}
configtest()
{
$NGINX_SBIN -C $NGINX_CONF -t
return 0
}
case "$1" in
start)
start
;;
stop)
stop
;;
reload)
reload
;;
restart)
restart
;;
configtest)
configtest
;;
*)
echo $"Usage: $o {start|stop|reload|restart|configtest}"
RETVAL=1
esac
exit $RETVAL
保存该脚本后更改权限,命令如下:
# chmod 755 /etc/init.d/nginx
# chkconfig --add nginx
设置开机启动Nginx,命令如下:
# chkconfig nginx on
更改Nginx的配置文件。
首先把原来的配置文件清空,
# > /usr/local/nginx/conf/nginx.conf //“>”可以把一个文本文档快速清空。
# vim /usr/local/nginx/conf/nginx.conf // 写下如下内容:
user nobody nobody;
worker_processes 2;
error_log /usr/local/nginx/logs/nginx_error.log crit;
pid /usr/local/nginx/logs/nginx.pid;
worker_rlimit_nofile 51200;
events
{
use epoll;
worker_connections 6000;
}
http
{
include mime.types;
default_type application/octet-stream;
server_names_hash_bucket_size 3526;
server_names_hash_max_size 4096;
log_format combined_realip '$remote_addr $http_x_forwarded_for [$time_local]'
' $host "$request_uri" $status'
' $http_referer" "$http_user_agent"';
sendfile on;
tcp_nopush on;
keepalive_timeout 30;
client_header_timeout 3m;
client_body_timeout 3m;
send_timeout 3m;
connection_pool_size 256;
client_header_buffer_size 1k;
large_client_header_buffers 8 4k;
request_pool_size 4k;
output_buffers 4 32k;
postpone_output 1460;
client_max_body_size 10m;
client_body_buffer_size 256k;
client_body_temp_path /usr/local/nginx/client_body_temp;
proxy_temp_path /usr/local/nginx/proxy_temp;
fastcgi_temp_path /usr/local/nginx/fastcgi_temp;
fastcgi_intercept_errors on;
tcp_nodelay on;
gzip on;
gzip_min_length 1k;
gzip_buffers 4 8k;
gzip_comp_level 5;
gzip_http_version 1.1;
gzip_types text/plain application/x-javascript text/css text/htm
application/xml;
server
{
listen 80;
server_name localhost;
index index.html index.htm index.php;
root /usr/local/nginx/html;
location ~ \.php$
{
include fastcgi_params;
fastcgi_pass unix:/tmp/php-fcgi.sock;
fastcgi_index index.php;
fastcgi_param SCRIPT_FILENAME /usr/local/nginx/html$fastcgi_script_name;
}
}
}
配置完后,用如下命令检验:
# /usr/local/nginx/sbin/nginx -t
如果显示如下内容,则说明配置文件正确。

然后让服务重新启动:
# systemctl daemon-reload
再启动服务:

测试是否正确解析PHP
首先创建文件,操作如下:
# vim /usr/local/nginx/html/2.php
其内容如下:
<?php
echo “test php scripts.”;
?>
执行下面命令测试文件:
# curl localhost/2.php

三、邮箱系统搭建
1. 安装postfix
首先需要安装编译环境及其他所需要的包,包多所以有点慢。
yum install nginx vim gcc gcc-c++ openssl openssl-devel db4-devel ntpdate mysql mysql-devel mysql-server bzip2 php-mysql cyrus-sasl-md5 perl-GD perl-DBD-MySQL perl-GD perl-CPAN perl-CGI perl-CGI-Session cyrus-sasl-lib cyrus-sasl-plain cyrus-sasl cyrus-sasl-devel libtool-ltdl-devel telnet mail libicu-devel -y
安装完以上所需的包后,开始编译安装postfix:
1、首先卸载系统自带的postfix,并删除postfix用户,重新指定uid、gid创建新用户postfix,postdrop。
yum remove postfix -y
userdel postfix
groupdel postdrop
groupadd -g 3636 postfix
useradd -g postfix -u 3636 -s /sbin/nologin -M postfix
groupadd -g 3637 postdrop
useradd -g postdrop -u 3637 -s /sbin/nologin -M postdrop
2、下载源码包并解压编译(如果下载地址失效就到官网去找下载连接):
cd /usr/local/src/
tar -zxvf postfix-3.0.11.tar.gz
cd postfix-3.0.11
make makefiles 'CCARGS=-DHAS_MYSQL -I/usr/include/mysql -DUSE_SASL_AUTH -DUSE_CYRUS_SASL -I/usr/include/sasl -DUSE_TLS ' 'AUXLIBS=-L/usr/lib64/mysql -lmysqlclient -lz -lrt -lm -L/usr/lib64/sasl2 -lsasl2 -lssl -lcrypto'
make && make install
echo $?
在make install环节的时候会有个交互式的界面,可以自定义一些目录,我这里只更改了第二项临时文件目录,其他的都选择了默认目录:
Please specify the prefix for installed file names. Specify this ONLY
if you are building ready-to-install packages for distribution to OTHER
machines. See PACKAGE_README for instructions.
install_root: [/]
Please specify a directory for scratch files while installing Postfix. You
must have write permission in this directory.
tempdir: [/usr/local/src/postfix-3.0.11] /tmp/extmail // 就只更改这一项为tmp目录,其他的全部默认
Please specify the final destination directory for installed Postfix
configuration files.
config_directory: [/etc/postfix]
Please specify the final destination directory for installed Postfix
administrative commands. This directory should be in the command search
path of adminstrative users.
command_directory: [/usr/sbin]
Please specify the final destination directory for installed Postfix
daemon programs. This directory should not be in the command search path
of any users.
daemon_directory: [/usr/libexec/postfix]
Please specify the final destination directory for Postfix-writable
data files such as caches or random numbers. This directory should not
be shared with non-Postfix software.
data_directory: [/var/lib/postfix]
Please specify the final destination directory for the Postfix HTML
files. Specify "no" if you do not want to install these files.
html_directory: [no]
Please specify the owner of the Postfix queue. Specify an account with
numerical user ID and group ID values that are not used by any other
accounts on the system.
mail_owner: [postfix]
Please specify the final destination pathname for the installed Postfix
mailq command. This is the Sendmail-compatible mail queue listing command.
mailq_path: [/usr/bin/mailq]
Please specify the final destination directory for the Postfix on-line
manual pages. You can no longer specify "no" here.
manpage_directory: [/usr/local/man]
Please specify the final destination pathname for the installed Postfix
newaliases command. This is the Sendmail-compatible command to build
alias databases for the Postfix local delivery agent.
newaliases_path: [/usr/bin/newaliases]
Please specify the final destination directory for Postfix queues.
queue_directory: [/var/spool/postfix]
Please specify the final destination directory for the Postfix README
files. Specify "no" if you do not want to install these files.
readme_directory: [no]
Please specify the final destination pathname for the installed Postfix
sendmail command. This is the Sendmail-compatible mail posting interface.
sendmail_path: [/usr/sbin/sendmail]
Please specify the group for mail submission and for queue management
commands. Specify a group name with a numerical group ID that is
not shared with other accounts, not even with the Postfix mail_owner
account. You can no longer specify "no" here.
setgid_group: [postdrop]
Please specify the final destination directory for Postfix shared-library
files.
shlib_directory: [no]
3、更改目录的属主和属组:
chown -R postfix:postdrop /var/spool/postfix
chown -R postfix:postdrop /var/lib/postfix/
chown root /var/spool/postfix
chown -R root /var/spool/postfix/pid
4、修改postfix的配置文件:
[root@localhost ~]# vim /etc/postfix/main.cf
myhostname = mail.wanghj.com //设置主机名
mydomain = wanghj.com //指定域名
myorigin = $mydomain //指明发件人所在的域名
inet_interfaces = //all指定postfix系统监听的网络接口
mydestination = $myhostname, localhost.$mydomain, localhost,$mydomain //指定postfix接收邮件时收件人的域名 [使用虚拟域需要禁用]
mynetworks_style = host //指定信任网段类型
mynetworks = 192.168.40.1/24, 127.0.0.0/8 //指定信任的客户端
relay_domains = $mydestination //指定允许中转邮件的域名
alias_maps = hash:/etc/aliases //设置邮件的别名
5、然后需要在/etc/init.d/目录下提供一个脚本来管理postfix的启动与停止:
[root@localhost extman]# vim /etc/init.d/postfix
把下面的内容放在/etc/init.d/postfix里面:
#!/bin/bash
#
# postfix Postfix Mail Transfer Agent
#
# chkconfig: 2345 80 30
# description: Postfix is a Mail Transport Agent, which is the program \
# that moves mail from one machine to another.
# processname: master
# pidfile: /var/spool/postfix/pid/master.pid
# config: /etc/postfix/main.cf
# config: /etc/postfix/master.cf
# Source function library.
. /etc/rc.d/init.d/functions
# Source networking configuration.
. /etc/sysconfig/network
# Check that networking is up.
[ $NETWORKING = "no" ] && exit 3
[ -x /usr/sbin/postfix ] || exit 4
[ -d /etc/postfix ] || exit 5
[ -d /var/spool/postfix ] || exit 6
RETVAL=0
prog="postfix"
start() {
# Start daemons.
echo -n $"Starting postfix: "
/usr/bin/newaliases >/dev/null 2>&1
/usr/sbin/postfix start 2>/dev/null 1>&2 && success || failure $"$prog start"
RETVAL=$?
[ $RETVAL -eq 0 ] && touch /var/lock/subsys/postfix
echo
return $RETVAL
}
stop() {
# Stop daemons.
echo -n $"Shutting down postfix: "
/usr/sbin/postfix stop 2>/dev/null 1>&2 && success || failure $"$prog stop"
RETVAL=$?
[ $RETVAL -eq 0 ] && rm -f /var/lock/subsys/postfix
echo
return $RETVAL
}
reload() {
echo -n $"Reloading postfix: "
/usr/sbin/postfix reload 2>/dev/null 1>&2 && success || failure $"$prog reload"
RETVAL=$?
echo
return $RETVAL
}
abort() {
/usr/sbin/postfix abort 2>/dev/null 1>&2 && success || failure $"$prog abort"
return $?
}
flush() {
/usr/sbin/postfix flush 2>/dev/null 1>&2 && success || failure $"$prog flush"
return $?
}
check() {
/usr/sbin/postfix check 2>/dev/null 1>&2 && success || failure $"$prog check"
return $?
}
restart() {
stop
start
}
# See how we were called.
case "$1" in
start)
start
;;
stop)
stop
;;
restart)
stop
start
;;
reload)
reload
;;
abort)
abort
;;
flush)
flush
;;
check)
check
;;
status)
status master
;;
condrestart)
[ -f /var/lock/subsys/postfix ] && restart || :
;;
*)
echo $"Usage: $0 {start|stop|restart|reload|abort|flush|check|status|condrestart}"
exit 1
esac
exit $?
为脚本添加执行权限,并将服务添加到开机启动项中:
[root@localhost ]# chmod +x /etc/init.d/postfix
[root@localhost ]# chkconfig --add postfix
[root@localhost ]# chkconfig postfix on
[root@localhost ]# chown postfix.postfix -R /var/lib/postfix/
[root@localhost ]# chown postfix.postfix /var/spool/ -R
2. 安装dovecot
yum安装:
[root@localhost ~]# yum install -y dovecot dovecot-mysql
配置dovecot:
[root@localhost ~]# cd /etc/dovecot/
[root@localhost dovecot]# vim dovecot.conf //直接在配置文件最后添加即可
protocols = imap pop3
!include conf.d/*.conf
listen = *
base_dir = /var/run/dovecot/
[root@localhost dovecot]# cd conf.d/
[root@localhost conf.d]# vim 10-auth.conf
disable_plaintext_auth = no
[root@localhost conf.d]# vim 10-mail.conf
mail_location = maildir:~/Maildir
mail_location = maildir:/var/mailbox/%d/%n/Maildir
mail_privileged_group = mail
[root@localhost conf.d]# vim 10-ssl.conf
ssl = no
[root@localhost conf.d]# vim 10-logging.conf
log_path = /var/log/dovecot.log
info_log_path = /var/log/dovecot.info
log_timestamp = "%Y-%m-%d %H:%M:%S "
[root@localhost conf.d]# cp auth-sql.conf.ext auth-sql.conf
[root@localhost conf.d]# vim auth-sql.conf
passdb {
driver = sql
# Path for SQL configuration file, see example-config/dovecot-sql.conf.ext
args = /etc/dovecot/dovecot-sql.conf.ext
}
userdb {
driver = sql
args = /etc/dovecot/dovecot-sql.conf.ext
}
编辑dovecot通过mysql认证的配置文件:
[root@localhost conf.d]# vim /etc/dovecot-mysql.conf
driver = mysql
connect = host=localhost dbname=extmail user=extmail password=extmail
default_pass_scheme = CRYPT
password_query = SELECT username AS user,password AS password FROM mailbox WHERE username = '%u'
user_query = SELECT maildir, uidnumber AS uid, gidnumber AS gid FROM mailbox WHERE username = '%u'
3. 安装courier-authlib
下载解压并编译:
[root@localhost ~]# cd /usr/local/src/
[root@localhost src]# tar -jxvf courier-authlib-0.66.2.tar.bz2
[root@localhost src]# cd courier-authlib-0.66.2
[root@localhost courier-authlib-0.66.2]# ./configure --prefix=/usr/local/courier-authlib --sysconfdir=/etc --without-authpam --without-authshadow --without-authvchkpw --without-authpgsql --with-authmysql --with-mysql-libs=/usr/lib64/mysql --with-mysql-includes=/usr/include/mysql --with-redhat --with-authmysqlrc=/etc/authmysqlrc --with-authdaemonrc=/etc/authdaemonrc --with-mailuser=postfix
[root@localhost /usr/local/src/courier-authlib-0.66.2]# make && make install
编译过程中发生了一个错误:
configure: error: The Courier Unicode Library 1.2 appears not to be installed. You may need to install a separate development subpackage, in addition to the main package
这是因为Courier Unicode Library没有安装,我们下载courier-unicode-1.2并编译安装:
[root@localhost ~]# tar jxvf courier-unicode-1.2.tar.bz2
[root@localhost ~]# cd courier-unicode-1.2
[root@localhost courier-unicode-1.2]# ./configure
[root@localhost courier-unicode-1.2]# make && make install
完成Courier Unicode Library的安装后,倒回去再次编译courier-authlib就没问题了
配置courier-authlib:
[root@localhost courier-authlib-0.66.2]# chmod 755 /usr/local/courier-authlib/var/spool/authdaemon
[root@localhost courier-authlib-0.66.2]# cp /etc/authdaemonrc.dist /etc/authdaemonrc
[root@localhost courier-authlib-0.66.2]# cp /etc/authmysqlrc.dist /etc/authmysqlrc
[root@localhost courier-authlib-0.66.2]# vim /etc/authdaemonrc //配置文件里的验证方法比较多,我们这里只使用authmysql
authmodulelist="authmysql"
authmodulelistorig="authmysql"
[root@localhost courier-authlib-0.66.2]# vim /etc/authmysqlrc //直接添加到配置文件尾部,然后去上面将响应系统默认的注视掉,或者删除即可
MYSQL_SERVER localhost
MYSQL_USERNAME extmail
MYSQL_PASSWORD extmail
MYSQL_SOCKET /var/lib/mysql/mysql.sock
MYSQL_PORT 3306
MYSQL_DATABASE extmail
MYSQL_USER_TABLE mailbox
MYSQL_CRYPT_PWFIELD password
DEFAULT_DOMAIN test.com
MYSQL_UID_FIELD '3636'
MYSQL_GID_FIELD '3636'
MYSQL_LOGIN_FIELD username
MYSQL_HOME_FIELD concat('/var/mailbox/',homedir)
MYSQL_NAME_FIELD name
MYSQL_MAILDIR_FIELD concat('/var/mailbox/',maildir)
courier-authlib添加服务启动脚本及其他:
[root@localhost courier-authlib-0.66.2]# cp courier-authlib.sysvinit /etc/init.d/courier-authlib
[root@localhost courier-authlib-0.66.2]# chmod +x /etc/init.d/courier-authlib
[root@localhost courier-authlib-0.66.2]# chkconfig --add courier-authlib
[root@localhost courier-authlib-0.66.2]# chkconfig courier-authlib on
[root@localhost courier-authlib-0.66.2]# echo "/usr/local/courier-authlib/lib/courier-authlib" >> /etc/ld.so.conf.d/courier-authlib.conf
[root@localhost courier-authlib-0.66.1]# ldconfig
[root@localhost courier-authlib-0.66.1]# service courier-authlib start
Starting Courier authentication services: authdaemond
smtp以及虚拟用户相关的设置:
[root@localhost ~]# vim /usr/lib64/sasl2/smtpd.conf //文件不存在,要自己创建
pwcheck_method: authdaemond
log_level: 3
mech_list: PLAIN LOGIN
authdaemond_path:/usr/local/courier-authlib/var/spool/authdaemon/socket
[root@localhost ~]# vim /etc/postfix/main.cf
##postfix支持SMTP##
smtpd_sasl_auth_enable = yes
smtpd_sasl_local_domain = ''
smtpd_recipient_restrictions = permit_mynetworks,permit_sasl_authenticated,reject_unauth_destination
broken_sasl_auth_clients=yes
smtpd_client_restrictions = permit_sasl_authenticated
smtpd_sasl_security_options = noanonymous
##postfix支持虚拟用户##
virtual_mailbox_base = /var/mailbox
virtual_mailbox_maps = mysql:/etc/postfix/mysql_virtual_mailbox_maps.cf //这里的配置文件需在后面extman
里复制过来
virtual_mailbox_domains = mysql:/etc/postfix/mysql_virtual_domains_maps.cf
virtual_alias_domains =
virtual_alias_maps = mysql:/etc/postfix/mysql_virtual_alias_maps.cf
virtual_uid_maps = static:3636
virtual_gid_maps = static:3636
virtual_transport = virtual
4. 安装extmail
下载extmail和extman:
[root@localhost ~]# cd /usr/local/src/
下载地址
链接:https://pan.baidu.com/s/1rAK-g6UdRXNgw4YFGfZGWQ
提取码:klzr
创建站点目录并解压、重命名extmail包:
[root@localhost src]# mkdir -p /var/www/extsuite
[root@localhost src]# tar -zxvf extmail-1.2.tar.gz -C /var/www/extsuite/
[root@localhost src]# mv/var/www/extsuite/extmail-1.2/ /var/www/extsuite/extmail
更改extmail的配置文件:
[root@localhost ~]# cd /var/www/extsuite/extmail
[root@localhost extmail]# cp webmail.cf.default webmail.cf
[root@localhost extmail]# vim webmail.cf
SYS_SESS_DIR = /tmp/extmail
SYS_UPLOAD_TMPDIR = /tmp/extmail/upload
SYS_USER_LANG = zh_CN
SYS_MIN_PASS_LEN = 8
SYS_MAILDIR_BASE = /var/mailbox
SYS_MYSQL_USER = extmail
SYS_MYSQL_PASS = extmail
SYS_MYSQL_DB = extmail
SYS_MYSQL_HOST = localhost
SYS_MYSQL_SOCKET = /var/lib/mysql/mysql.sock
SYS_MYSQL_TABLE = mailbox
SYS_MYSQL_ATTR_USERNAME = username
SYS_MYSQL_ATTR_DOMAIN = domain
SYS_MYSQL_ATTR_PASSWD = password
SYS_AUTHLIB_SOCKET = /usr/local/courier-authlib/var/spool/authdaemon/socket
建立临时文件目录与session目录,并更改权限:
[root@localhost extmail]# mkdir -p /tmp/extmail/upload
[root@localhost extmail]# chown -R postfix.postfix /tmp/extmail/
5. 安装extman
回到extman的下载目录下,解压extman包:
[root@localhost ~]# cd /usr/local/src/
[root@localhost src]# tar -zxvf extman-1.1.tar.gz -C /var/www/extsuite/
[root@localhost src]# cd /var/www/extsuite/
[root@localhost extsuite]# mv extman-1.1/ extman
拷贝extman的配置文件:
[root@localhost extsuite]# cd extman/
[root@localhost extman]# cp webman.cf.default webman.cf
更改cgi目录的属主属组:
[root@localhost extman]# chown -R postfix.postfix /var/www/extsuite/extman/cgi/
[root@localhost extman]# chown -R postfix.postfix /var/www/extsuite/extmail/cgi/
6.导入数据库:
由于数据库不能识别TYPE=MyISAM,所以这里直接导入会出错,需要先编辑extmail.sql数据库文件,将文件中的TYPE=MyISAM更改为ENGINE=MyISAM,共有五处修改:
[root@localhost extman]# vim docs/extmail.sql
:% s/TYPE/ENGINE/g
我这里导入数据的时候发生了一个错误,提示找不到mysql.sock文件:
[root@localhost extman]# mysql -uroot < docs/extmail.sql
ERROR 2002 (HY000): Can't connect to local MySQL server through socket '/var/lib/mysql/mysql.sock' (2)
[root@localhost extman]# ls /var/lib/mysql/mysql.sock
ls: 无法访问/var/lib/mysql/mysql.sock: 没有那个文件或目录
解决:然后我去查看了一下/etc/my.cnf文件,发现没问题,socket参数指向的也是 /var/lib/mysql/mysql.sock 这个路径,于是我就重启了mysql服务,然后再尝试就没有报找不到mysql.sock文件的错误了,但是报了另一个错误:
[root@localhost extman]# mysql -uroot < docs/extmail.sql
ERROR 1364 (HY000) at line 31: Field 'ssl_cipher' doesn't have a default value
[root@localhost extman]#
这错误的意思是:字段 ‘ssl密码’ 没有默认值
于是又得去查看一下/etc/my.cnf文件,然后把sql_mode参数给注释掉:

然后去查看/usr/local/mysql/my.conf文件,将文件最后一行改成如下:

接着重启mysql服务后,继续导入数据,这次就没问题了:
[root@localhost extman]# !service
service mysqld restart
Redirecting to /bin/systemctl restart mysqld.service
[root@localhost extman]# mysql -uroot < docs/extmail.sql
[root@localhost extman]# mysql -uroot < docs/init.sql
导入数据成功后再次修改/etc/my.cnf文件,把刚刚注释的那行给去掉注释,不去掉的话,mysql服务可能会出现不能启动的问题:
数据导入成功后,登录mysql,创建一个mysql数据库用户extmail并授予权限:
[root@localhost extman]# mysql -uroot
mysql> GRANT ALL ON extmail.* to extmail@'%' identified by 'extmail'; //我这里是直接授予全部权限在任意的IP地址上了,实际情况根据需求而定
Query OK, 0 rows affected (0.00 sec)
mysql> FLUSH PRIVILEGES;
Query OK, 0 rows affected (0.00 sec)
mysql>
复制之前提到的配置文件:
[root@localhost ~]# cd /var/www/extsuite/extman/docs/
[root@localhost docs]# cp mysql_virtual_* /etc/postfix/
为extman创建临时目录:
[root@localhost docs]# mkdir /tmp/extman
[root@localhost docs]# chown -R postfix.postfix /tmp/extman/
启动postfix、dovecot、saslauthd服务,并查看进程是否正常:
[root@localhost extman]# service postfix start
Starting postfix (via systemctl): [ 确定 ]
[root@localhost extman]# ps aux |grep postfix
root 2846 0.0 0.2 97880 2512 ? Ss 02:02 0:00 /usr/libexec/postfix/master -w
postfix 2848 0.0 0.4 97984 4792 ? S 02:02 0:00 qmgr -l -t unix -u
postfix 32035 0.0 0.4 97936 4780 ? S 03:43 0:00 pickup -l -t unix -u
root 36298 0.0 0.0 112828 968 pts/0 S+ 04:04 0:00 grep --color=auto postfix
[root@localhost extman]# ss -tnluo | grep :25
tcp LISTEN 0 100 *:25 *:*
[root@localhost extman]# service dovecot start
Redirecting to /bin/systemctl start dovecot.service
[root@localhost extman]# ps aux |grep dovecot
root 38409 0.0 0.1 16092 1168 ? Ss 04:14 0:00 /usr/sbin/dovecot
dovecot 38410 0.0 0.1 9756 1128 ? S 04:14 0:00 dovecot/anvil
root 38411 0.0 0.1 9888 1316 ? S 04:14 0:00 dovecot/log
root 38413 0.0 0.2 13052 2532 ? S 04:14 0:00 dovecot/config
root 38439 0.0 0.0 112828 972 pts/0 S+ 04:14 0:00 grep --color=auto dovecot
[root@localhost extman]# systemctl start saslauthd
[root@localhost extman]# ps aux |grep saslauthd
root 38632 0.0 0.0 69904 916 ? Ss 04:15 0:00 /usr/sbin/saslauthd -m /run/saslauthd -a pam
root 38633 0.0 0.0 69904 692 ? S 04:15 0:00 /usr/sbin/saslauthd -m /run/saslauthd -a pam
root 38634 0.0 0.0 69904 692 ? S 04:15 0:00 /usr/sbin/saslauthd -m /run/saslauthd -a pam
root 38635 0.0 0.0 69904 692 ? S 04:15 0:00 /usr/sbin/saslauthd -m /run/saslauthd -a pam
root 38636 0.0 0.0 69904 692 ? S 04:15 0:00 /usr/sbin/saslauthd -m /run/saslauthd -a pam
root 38665 0.0 0.0 112828 968 pts/0 S+ 04:15 0:00 grep --color=auto saslauthd
[root@localhost extman]# ps aux |grep courier-authlib
root 1627 0.0 0.0 4364 448 ? S 02:02 0:00 /usr/local/courier-authlib/sbin/courierlogger -pid=/usr/local/courier-authlib/var/spool/authdaemon/pid -start /usr/local/courier-authlib/libexec/courier-authlib/authdaemond
root 1712 0.0 0.2 37980 2648 ? S 02:02 0:00 /usr/local/courier-authlib/libexec/courier-authlib/authdaemond
root 2553 0.0 0.0 37980 700 ? S 02:02 0:00 /usr/local/courier-authlib/libexec/courier-authlib/authdaemond
root 2554 0.0 0.0 37980 700 ? S 02:02 0:00 /usr/local/courier-authlib/libexec/courier-authlib/authdaemond
root 2555 0.0 0.0 37980 700 ? S 02:02 0:00 /usr/local/courier-authlib/libexec/courier-authlib/authdaemond
root 2556 0.0 0.0 37980 700 ? S 02:02 0:00 /usr/local/courier-authlib/libexec/courier-authlib/authdaemond
root 2557 0.0 0.0 37980 700 ? S 02:02 0:00 /usr/local/courier-authlib/libexec/courier-authlib/authdaemond
root 39247 0.0 0.0 112832 976 pts/0 S+ 04:19 0:00 grep --color=auto courier-authlib
7. 测试
测试虚拟用户:
[root@localhost courier-authlib-0.66.2]# /usr/local/courier-authlib/sbin/authtest -s login postmaster@extmail.org extmail
Authentication succeede. //显示这个表示成功,测试时使用的是postmaster@extmail.org,因为我们导入的数据库init.sql里面自带了这个。
Authenticated: postmaster@extmail.org (uid 3636, gid 3636)
Home Directory: /var/mailbox/extmail.org/postmaster //这里需要注意/var/mailbox这个目录现在我们还没有创建,后面web访问的时候如果没有会报错,所以提前创建。
Maildir: /var/mailbox/extmail.org/postmaster/Maildir/
Quota: (none)
Encrypted Password: $1$phz1mRrj$3ok6BjeaoJYWDBsEPZb5C0
Cleartext Password: extmail
Options: (none)
[root@localhost courier-authlib-0.66.2]# mkdir /var/mailbox
[root@localhost courier-authlib-0.66.2]# chown -R postfix.postfix /var/mailbox/
测试smtp发信:
[root@localhost ~]# printf "postmaster@extmail.org" | openssl base64
cG9zdG1hc3RlckBleHRtYWlsLm9yZw==
[root@localhost ~]# printf "extmail" | openssl base64
ZXh0bWFpbA==
[root@localhost ~]# telnet localhost 25
Trying ::1...
telnet: connect to address ::1: Connection refused
Trying 127.0.0.1...
Connected to localhost.
Escape character is '^]'.
220 mail.daen.com ESMTP Postfix
auth login
334 VXNlcm5hbWU6
cG9zdG1hc3RlckBleHRtYWlsLm9yZw==
334 UGFzc3dvcmQ6
ZXh0bWFpbA==
235 2.7.0 Authentication successful //成功
quit
221 2.0.0 Bye
Connection closed by foreign host.
内容总结
以上是互联网集市为您收集整理的CentOS7下搭建postfix邮箱服务器全部内容,希望文章能够帮你解决CentOS7下搭建postfix邮箱服务器所遇到的程序开发问题。 如果觉得互联网集市技术教程内容还不错,欢迎将互联网集市网站推荐给程序员好友。
内容备注
版权声明:本文内容由互联网用户自发贡献,该文观点与技术仅代表作者本人。本站仅提供信息存储空间服务,不拥有所有权,不承担相关法律责任。如发现本站有涉嫌侵权/违法违规的内容, 请发送邮件至 gblab@vip.qq.com 举报,一经查实,本站将立刻删除。
内容手机端
扫描二维码推送至手机访问。