linux系统自签发免费ssl证书,为nginx生成自签名ssl证书
内容导读
互联网集市收集整理的这篇技术教程文章主要介绍了linux系统自签发免费ssl证书,为nginx生成自签名ssl证书,小编现在分享给大家,供广大互联网技能从业者学习和参考。文章包含2948字,纯文字阅读大概需要5分钟。
内容图文

安装nginx可参考:
nginx重新编译支持ssl可参考:
接下来手动配置ssl证书:
自己手动颁发证书的话,那么https是不被浏览器认可的,就是https上面会有一个大红叉
下面是手动颁发证书的操作
切换到nginx配置文件
# cd /usr/local/nginx/conf创建配置证书目录
# mkdir ssl
# cd ssl
1.生成私钥
openssl genrsa -des3 -out cert.key 1024   #生成1024的证书私钥
Generating RSA private key, 1024 bit long modulus
............++++++
......................++++++
e is 65537 (0x10001)
Enter pass phrase for cert.key:  #提示输入密码
Verifying - Enter pass phrase for cert.key:  #确认密码
2.创建证书请求
#  openssl req -new -key cert.key -out cert.csr
Enter pass phrase for cert.key:   #输入密码
You are about to be asked to enter information that will be incorporated
into your certificate request.
What you are about to enter is what is called a Distinguished Name or a DN.
There are quite a few fields but you can leave some blank
For some fields there will be a default value,
If you enter '.', the field will be left blank.
-----
Country Name (2 letter code) [AU]:cn   #国家
State or Province Name (full name) [Some-State]:shanghai #省份
Locality Name (eg, city) []:shanghai  #地区名字
Organization Name (eg, company) [Internet Widgits Pty   Ltd]:westos   #公司名
Organizational Unit Name (eg, section) []:linux  #部门
Common Name (e.g. server FQDN or YOUR name) []:server #CA主机名
Email Address []:root@server  #邮箱

Please enter the following 'extra' attributes
to be sent with your certificate request
A challenge password []:123456  #证书请求密钥,CA读取证书的时候需要输入密码
An optional company name []:123456  #公司名称,CA读取证书的时候需要输入名称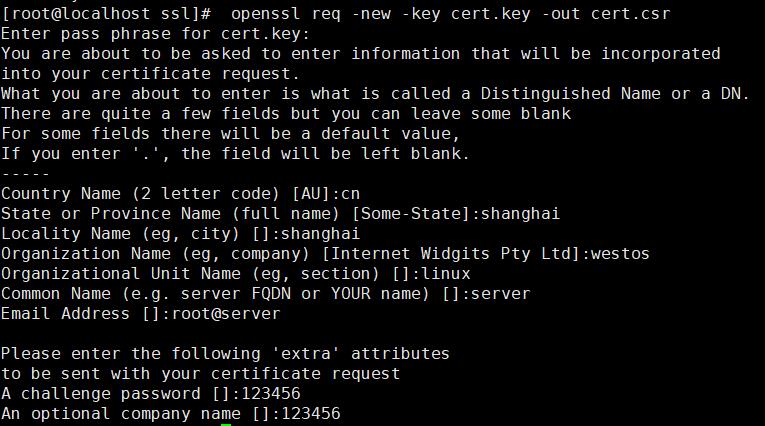
# cp cert.key cert.key.bak# openssl rsa -in cert.key.bak -out cert.key
Enter pass phrase for cert.key.bak: #输入密码
writing RSA key

3.自签署证书
·```
#openssl x509 -req -days 365 -in cert.csr -signkey cert.key -out cert.pem
Signature okbr/>subject=/c=cn/st=shanghai/l=shanghai/o=westos/ou=linux/cn=server/emailaddress=root@server
getting private key
# ll
total 16
-rw-r--r-- 1 root root 749 Oct 25 15:33 cert.csr
-rw-r--r-- 1 root root 891 Oct 25 16:13 cert.key
-rw-r--r-- 1 root root 963 Oct 25 16:12 cert.key.bak
-rw-r--r-- 1 root root 920 Oct 25 16:16 cert.pem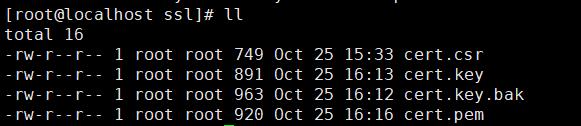
4.将证书导出成浏览器支持的p12
# openssl pkcs12 -export -clcerts -in cert.pem -inkey cert.key -out cert.p12
Enter Export Password:
Verifying - Enter Export Password:
[root@localhost ssl]# ls
cert.csr  cert.key  cert.key.bak  cert.p12  cert.pem
5.p12文件中导出公钥和私钥
生成cert.key文件
openssl pkcs12 -in cert.p12 -nocerts -nodes -out cert.key导出公钥
# openssl rsa -in cert.key -out cert_pri.pem
writing RSA key

导出私钥
# openssl rsa -in cert.key -pubout -out cert_pub.pem内容总结
以上是互联网集市为您收集整理的linux系统自签发免费ssl证书,为nginx生成自签名ssl证书全部内容,希望文章能够帮你解决linux系统自签发免费ssl证书,为nginx生成自签名ssl证书所遇到的程序开发问题。 如果觉得互联网集市技术教程内容还不错,欢迎将互联网集市网站推荐给程序员好友。
内容备注
版权声明:本文内容由互联网用户自发贡献,该文观点与技术仅代表作者本人。本站仅提供信息存储空间服务,不拥有所有权,不承担相关法律责任。如发现本站有涉嫌侵权/违法违规的内容, 请发送邮件至 gblab@vip.qq.com 举报,一经查实,本站将立刻删除。
内容手机端
扫描二维码推送至手机访问。