首页 / VUE / vue路由router
vue路由router
内容导读
互联网集市收集整理的这篇技术教程文章主要介绍了vue路由router,小编现在分享给大家,供广大互联网技能从业者学习和参考。文章包含7908字,纯文字阅读大概需要12分钟。
内容图文

这里写目录标题
- 运行vuecli改变url不刷新
- router
- router-link 补充
- 动态路由
- 路由的懒加载
- 嵌套路由
- 路由传递参数
- $ route和$ router
- 导航守卫( 修改导航栏的标题)
- keep-alive
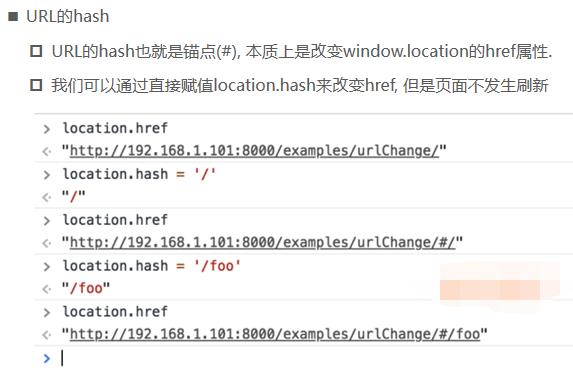
运行vuecli改变url不刷新
1.URL的hash

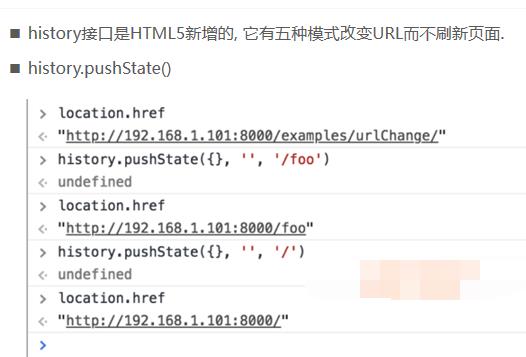
2.HTML5的history模式:pushState 它相当于一个栈


3.HTML5的history模式:replaceState


4.HTML5的history模式:go


router

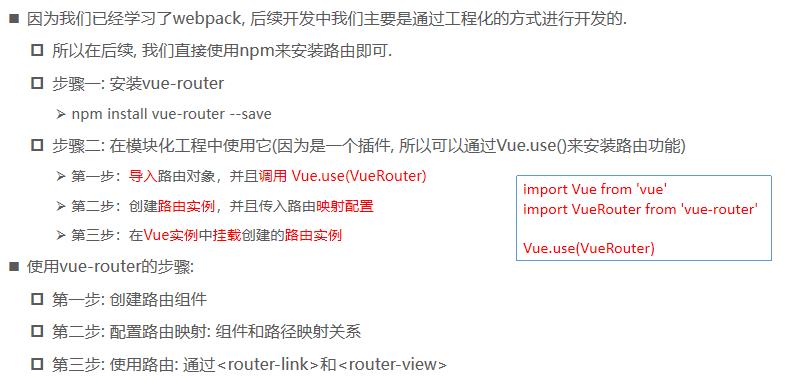
使用路由router
例子:
index.js
// 配置路由相关的信息
import VueRouter from 'vue-router'
import Vue from 'vue'

import Home from '../components/Home'
import About from '../components/About'

// 1.通过Vue.use(插件), 安装插件
Vue.use(VueRouter)

// 2.创建VueRouter对象
//this.$route时routes中的活跃对象
const routes = [
  {
  //路由的默认路径
    path: '',
    // redirect重定向
    redirect: '/home'
  },
  {
    path: '/home',
    component: Home
  },
  {
    path: '/about',
    component: About
  }
]
const router = new VueRouter({//this.$router是该对象
  // 配置路由和组件之间的应用关系
  routes,
  //HTML5的History模式 向url修改成history模式
  mode: 'history',
  linkActiveClass: 'active'//和后面“修改活跃的class文字”active-class等价
})

// 3.将router对象传入到Vue实例
export default router
main.js
import Vue from 'vue'
import App from './App'
import router from './router'

Vue.config.productionTip = false

new Vue({
  el: '#app',
  router,//这是简写形式,基本形式 router:router
  render: h => h(App)
})
LearnVuejs06\learnvuerouter\src\App.vue
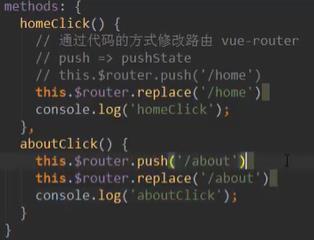
1.

2.通过代码的方式修改

LearnVuejs06\learnvuerouter\src\components\About.vue

LearnVuejs06\learnvuerouter\src\components\Home.vue
router-link 补充
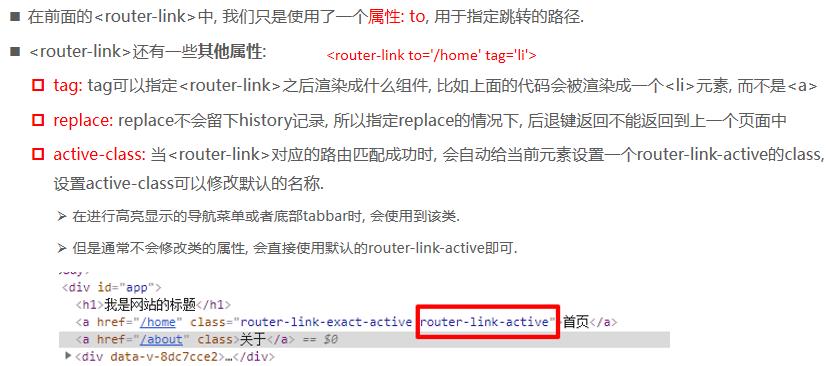
、

修改活跃的class文字

动态路由
01-learnvuerouter/src/components/User.vue

01-learnvuerouter/src/App.vue改成

向/router/index.js加入
// 配置路由相关的信息
import VueRouter from 'vue-router'
import Vue from 'vue'

import Home from '../components/Home'
import About from '../components/About'
import User from '../components/User'
// 1.通过Vue.use(插件), 安装插件
Vue.use(VueRouter)

// 2.创建VueRouter对象
const routes = [
  {
  //路由的默认路径
    path: '',
    // redirect重定向
    redirect: '/home'
  },
  {
    path: '/home',
    component: Home
  },
  {
    path: '/about',
    component: About
  },
   {
    path: '/user/:userId',
    component: user
  }
]
const router = new VueRouter({
  // 配置路由和组件之间的应用关系
  routes,
  //HTML5的History模式 向url修改成history模式
  mode: 'history',
  linkActiveClass: 'active'//和后面“修改活跃的class文字”active-class等价
})

// 3.将router对象传入到Vue实例
export default router

user改成
<template>
  <div>
    <h2>我是用户界面</h2>
    <p>我是用户的相关信息, 嘿嘿嘿</p>
   <!--获取之前路径中的参数-->
    <h2>{{userId}}</h2>userId
    <h2>{{$route.params.userId}}</h2>
  </div>
</template>

<script>
  export default {
    name: "User",
    computed: {
      userId() {
        return this.$route.params.userId
      }
    }
  }
</script>

<style scoped>

</style>

总结

路由的懒加载
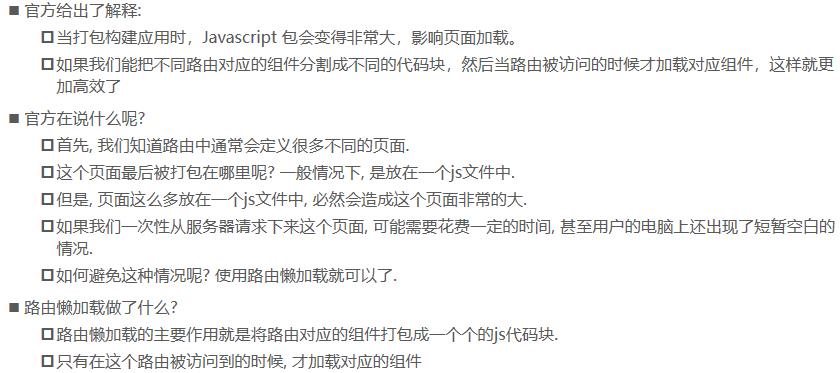
效果

懒加载的方式有

例子:
01-learnvuerouter/src/router/index.js进行一下改善

嵌套路由
实现嵌套路由有两个步骤:
创建对应的子组件, 并且在路由映射中配置对应的子路由.
在组件内部使用标签.
创建01-learnvuerouter/src/components/HomeMessage.vue
<template>
  <div>
    <ul>
      <li>消息1</li>
      <li>消息2</li>
      <li>消息3</li>
      <li>消息4</li>
    </ul>
  </div>
</template>

<script>
  export default {
    name: "HomeMessage"
  }
</script>

<style scoped>

</style>
创建01-learnvuerouter/src/components/HomeNews.vue
<template>
  <div>
    <ul>
      <li>新闻1</li>
      <li>新闻2</li>
      <li>新闻3</li>
      <li>新闻4</li>
    </ul>
  </div>
</template>

<script>
  export default {
    name: "HomeNews"
  }
</script>

<style scoped>

</style>
改变增加01-learnvuerouter/src/router/index.js
const HomeNews = () => import('../components/HomeNews')
const HomeMessage = () => import('../components/HomeMessage')
const Profile = () => import('../components/Profile')
......
const routes = [
  {
    path: '',
    // redirect重定向
    redirect: '/home'
  },
  {
    path: '/home',
    component: Home,
    children: [
     // {
      //   path: '',
      //   redirect: 'news'
      // },
      {
        path: 'news',
        component: HomeNews
      },
      {
        path: 'message',
        component: HomeMessage
      }
    ]
  },
  {
    path: '/about',
    component: About,
  },
  {
    path: '/user/:userId',
    component: User,
  },
  {
    path: '/profile',
    component: Profile,
  }
]
修改01-learnvuerouter/src/components/Home.vue
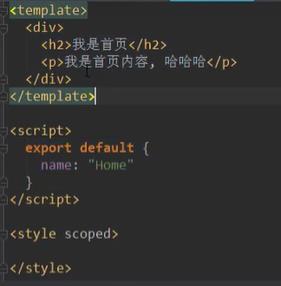
<template>
  <div>
    <h2>我是首页</h2>
    <p>我是首页内容, 哈哈哈</p>

    <router-link to="/home/news">新闻</router-link>
    <router-link to="/home/message">消息</router-link>

    <router-view></router-view>
  </div>
</template>

<script>
  export default {
    name: "Home",
  }
</script>

<style scoped>

</style>
总结

路由传递参数
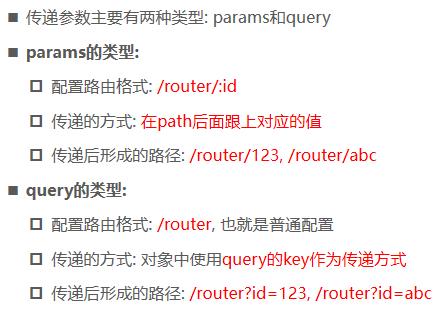
params例子前面有(动态路由)
例子(query):
01-learnvuerouter/src/App.vue增加
   <router-link :to="{path: '/profile', query: {name: 'why', age: 18, height: 1.88}}">
      档案</router-link>
src/components/Profile.vue
<template>
  <div>
    <h2>我是Profile组件</h2>
    <h2>{{$route.query.name}}</h2>
    <h2>{{$route.query.age}}</h2>
    <h2>{{$route.query.height}}</h2>
  </div>
</template>

<script>
  export default {
    name: "Profile",
    created() {
      console.log('Profile created');
    },
    destroyed() {
      console.log('Profile destroyed');
    }
  }
</script>

<style scoped>

</style>
通过button跳转
<!--<router-link :to="'/user/'+userId">用户</router-link>-->
<!--<!–<router-link to="/profile">档案</router-link>–>-->
<!--<router-link :to="{path: '/profile', query: {name: 'why', age: 18, height: 1.88}}">-->
<!--档案</router-link>-->
<button @click="userClick">用户</button>
<button @click="profileClick">档案</button>
......
methods: {
userClick() {
this.$router.push('/user/' + this.userId)
},
profileClick() {
this.$router.push({
path: '/profile',
query: {
name: 'kobe',
age: 19,
height: 1.87
}
})
}
}
$ route和$ router
$ router为VueRouter实例,想要导航到不同URL,则使用$ router.push方法
$route为当前router跳转对象里面可以获取name、path、query、params等
src/main.js
在这里这样做,所有的vue示例都会有该东西
Vue.prototype.test = function () {
  console.log('test');
}
Vue.prototype.name = "二月鸟"
//也可这样做
 const obj = {
   name: 'why' }
 Object.defineProperty(obj, 'age', 18)

导航守卫( 修改导航栏的标题)
1.笨办法,在每个页面中加上以下方法

2.
修改src/router/index.js
// 2.创建VueRouter对象
const routes = [
  {
    path: '',
    // redirect重定向
    redirect: '/home'
  },
  {
    path: '/home',
    component: Home,
    meta: {
      title: '首页'
    },
    children: [
      // {
      //   path: '',
      //   redirect: 'news'
      // },
      {
        path: 'news',
        component: HomeNews
      },
      {
        path: 'message',
        component: HomeMessage
      }
    ]
  },
  {
    path: '/about',
    component: About,
    meta: {
      title: '关于'
    },
    beforeEnter: (to, from, next) => {
      // console.log('about beforeEnter');
      next()
    }
  },
  {
    path: '/user/:id',
    component: User,
    meta: {
      title: '用户'
    },
  },
  {
    path: '/profile',
    component: Profile,
    meta: {
      title: '档案'
    },o
  }
]
......
// 前置守卫(guard)
router.beforeEach((to, from, next) => {
  // 从from跳转到to ,两者的原型都是Route
  document.title = to.matched[0].meta.title
  // console.log(to);
  // console.log('++++');
  next()
})
补充
在index中还可以加
// 后置钩子(hook)
router.afterEach((to, from) => {
  // console.log('----');
})
补充一:如果是后置钩子, 也就是afterEach, 不需要主动调用next()函数.
补充二:
上面我们使用的导航守卫, 被称之为全局守卫.
路由独享的守卫.
const router = new VueRouter({
  routes: [
    {
      path: '/foo',
      component: Foo,
      beforeEnter: (to, from, next) => {
        // ...
      }
    }
  ]
})
组件内的守卫.
const Foo = {
  template: `...`,
  beforeRouteEnter(to, from, next) {
    // 在渲染该组件的对应路由被 confirm 前调用
    // 不!能!获取组件实例 `this`
    // 因为当守卫执行前,组件实例还没被创建
  },
  beforeRouteUpdate(to, from, next) {
    // 在当前路由改变,但是该组件被复用时调用
    // 举例来说,对于一个带有动态参数的路径 /foo/:id,在 /foo/1 和 /foo/2 之间跳转的时候,
    // 由于会渲染同样的 Foo 组件,因此组件实例会被复用。而这个钩子就会在这个情况下被调用。
    // 可以访问组件实例 `this`
  },
  beforeRouteLeave(to, from, next) {
    // 导航离开该组件的对应路由时调用
    // 可以访问组件实例 `this`
  }
}
总结 前置守卫必须使用next(),后置钩子不需要。
keep-alive

src/App.vue
 <keep-alive exclude="Profile,User"><!--组件中name属性-->
      <router-view/>
    </keep-alive>
src/router/index.js
home中的默认路径去掉

src/components/Home.vue加入以下函数
 data() {
      return {
        message: '你好啊',
        path: '/home/news'
      }
    },
......
//menthods
// 这两个函数, 只有该组件被保持了状态使用了keep-alive时, 才是有效的,前两个函数(组件激活和失效时调用),
    activated() {
      this.$router.push(this.path);
      console.log('activated');
    },
    deactivated() {
      console.log('deactivated');
    },
    beforeRouteLeave (to, from, next) {
      console.log(this.$route.path);
      this.path = this.$route.path;
      next()
    }
内容总结
以上是互联网集市为您收集整理的vue路由router全部内容,希望文章能够帮你解决vue路由router所遇到的程序开发问题。 如果觉得互联网集市技术教程内容还不错,欢迎将互联网集市网站推荐给程序员好友。
内容备注
版权声明:本文内容由互联网用户自发贡献,该文观点与技术仅代表作者本人。本站仅提供信息存储空间服务,不拥有所有权,不承担相关法律责任。如发现本站有涉嫌侵权/违法违规的内容, 请发送邮件至 gblab@vip.qq.com 举报,一经查实,本站将立刻删除。
内容手机端
扫描二维码推送至手机访问。