Android studio登陆注册的实现及介绍
内容导读
互联网集市收集整理的这篇技术教程文章主要介绍了Android studio登陆注册的实现及介绍,小编现在分享给大家,供广大互联网技能从业者学习和参考。文章包含10281字,纯文字阅读大概需要15分钟。
内容图文

Android studio登陆注册的实现及介绍
前言
大家好!我是oy,今天给大家带来Android studio登陆注册的实现及介绍,第一次写博客,请见谅。
设计思路
- 创建好activity并进行页面设计;
- 创建用户类和数据库类;
- 完善登陆和注册java代码;
- 去掉头顶的标题栏,end;
效果图
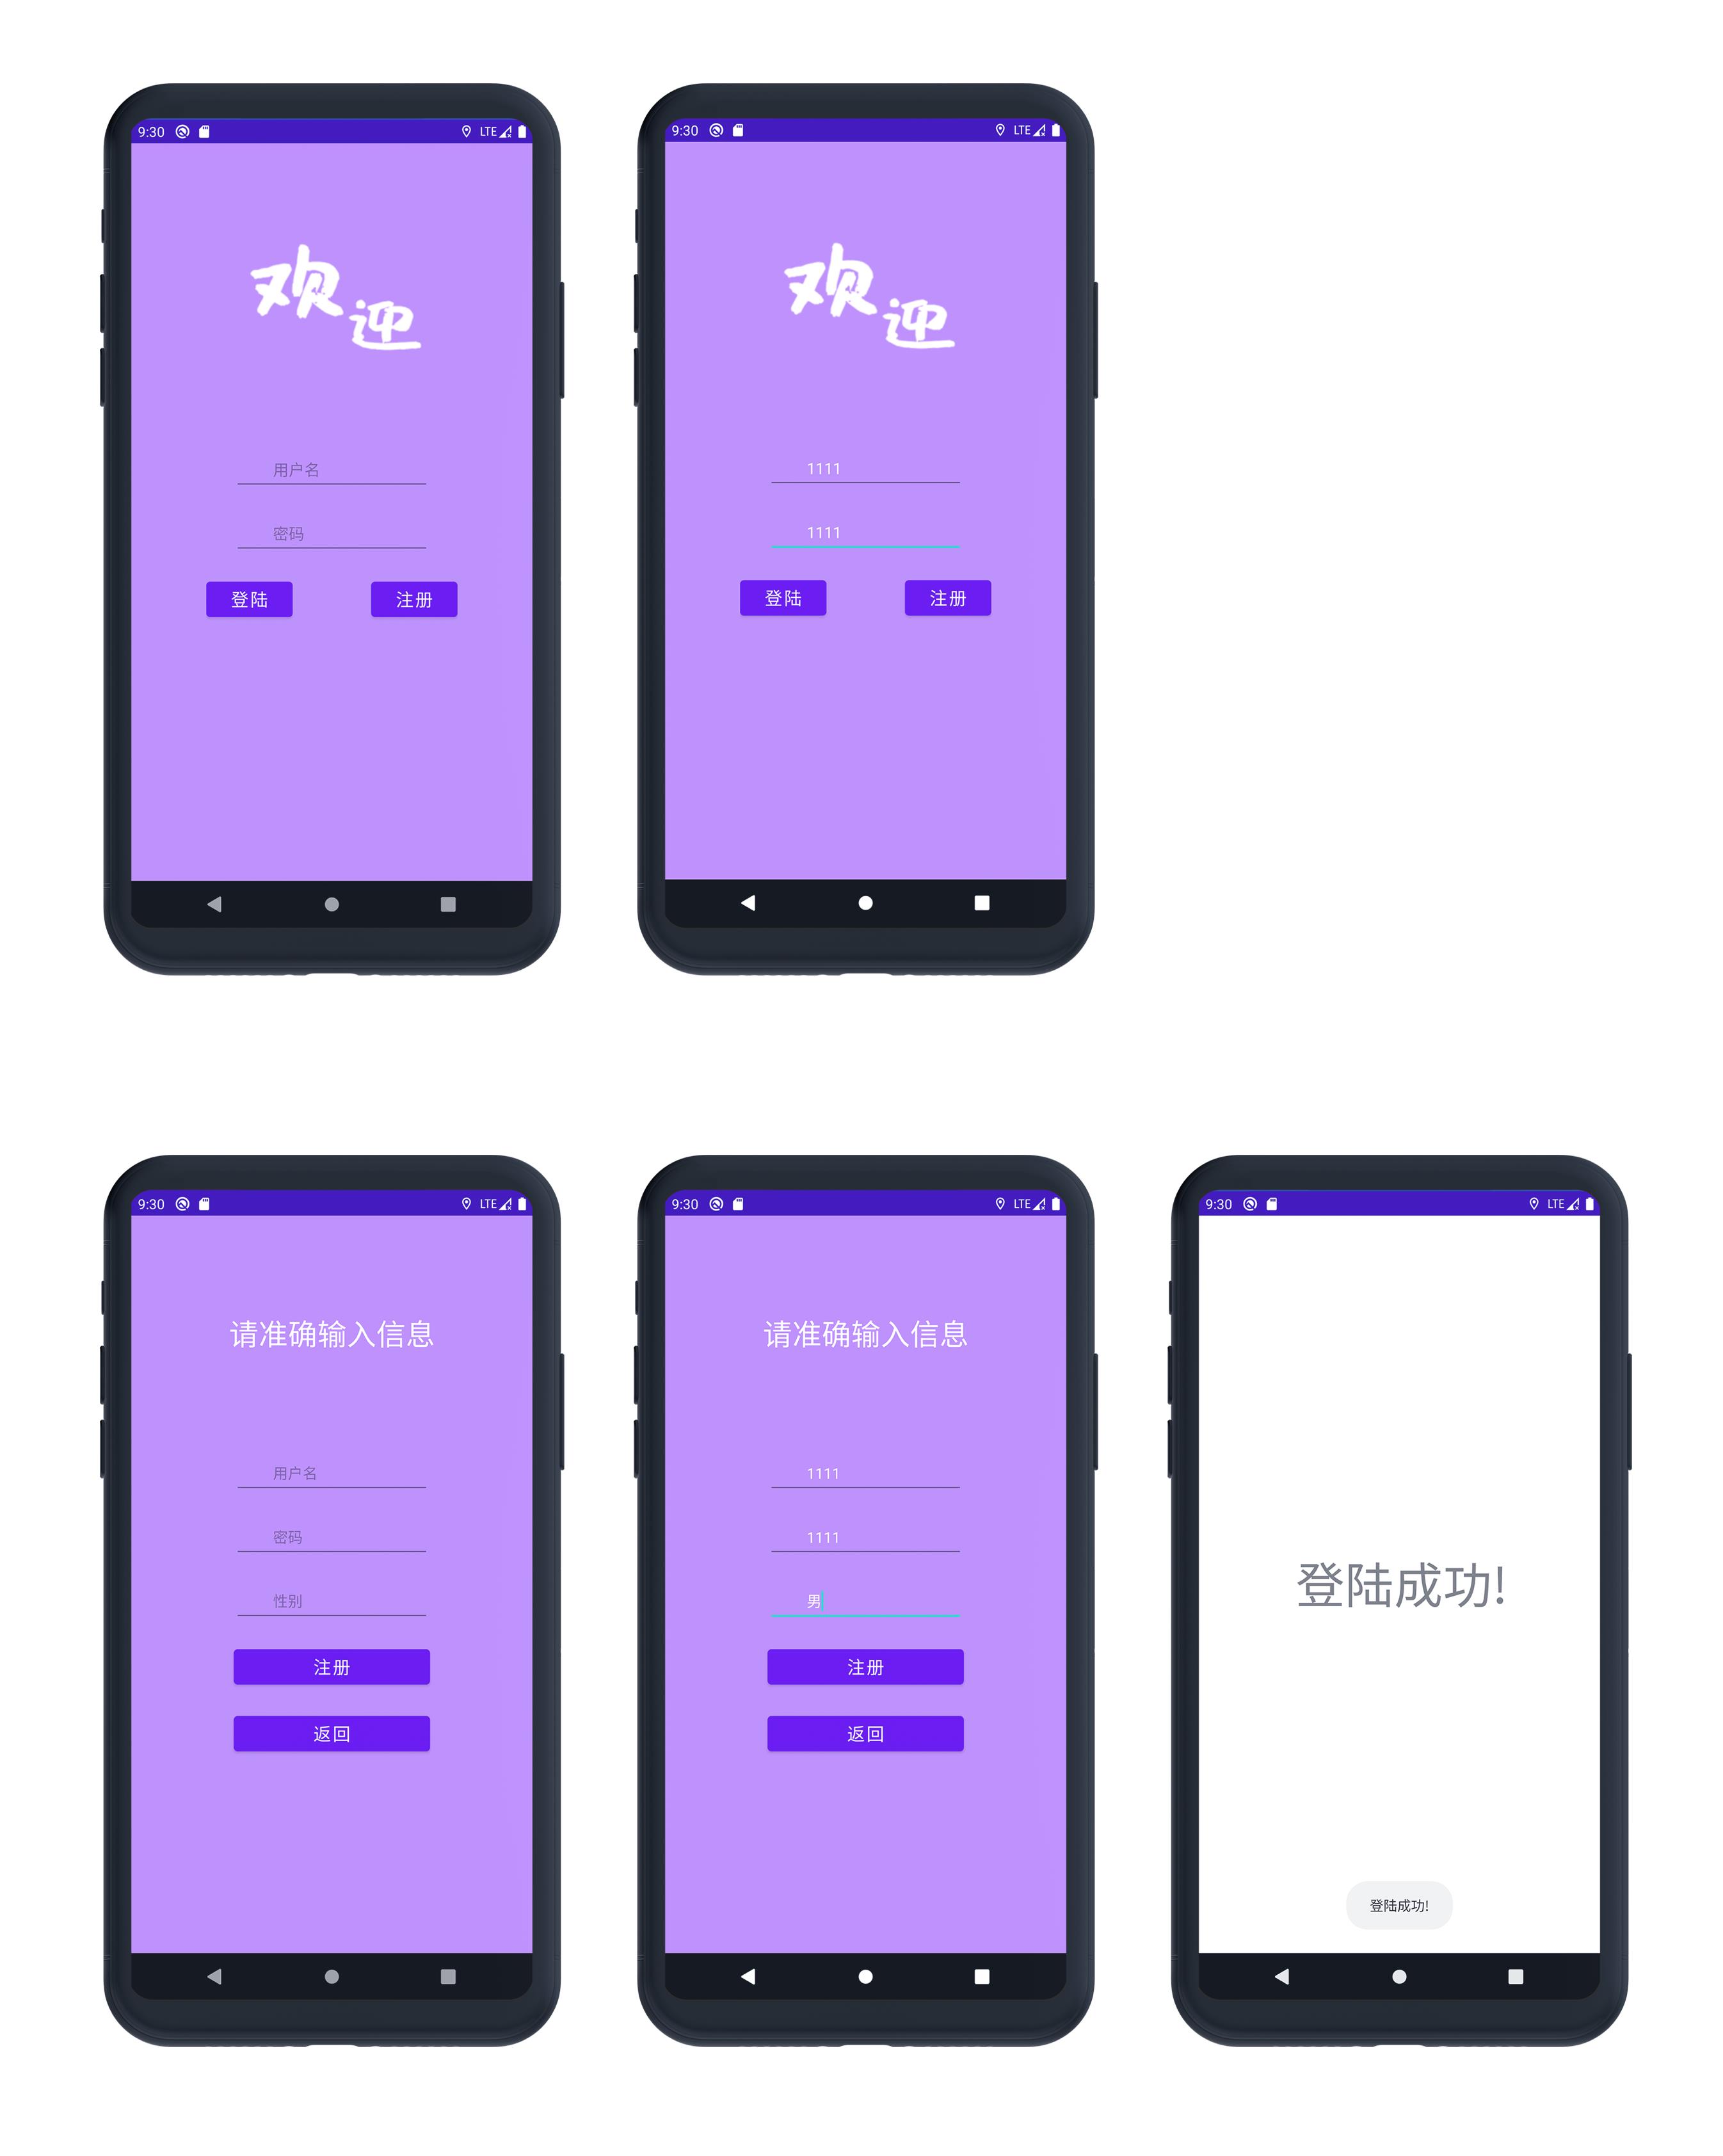
登陆模块
登陆界面代码片.
布局代码很简单的自己看吧
<?xml version="1.0" encoding="utf-8"?>
<LinearLayout xmlns:android="http://schemas.android.com/apk/res/android"
    xmlns:app="http://schemas.android.com/apk/res-auto"
    xmlns:tools="http://schemas.android.com/tools"
    android:layout_width="match_parent"
    android:layout_height="match_parent"
    android:background="@color/purple_200"
    android:orientation="vertical"
    tools:context=".MainActivity">
    <ImageView
        android:layout_marginTop="60dp"
        android:layout_gravity="center_horizontal"
        android:layout_width="200dp"
        android:layout_height="200dp"
        android:background="@drawable/welcome"/>
    <RelativeLayout
        android:layout_marginTop="50dp"
        android:layout_gravity="center_horizontal"
        android:layout_width="wrap_content"
        android:layout_height="wrap_content">
        <EditText
            android:id="@+id/username"
            android:lines="1"
            android:imeOptions="actionNext"
            android:paddingLeft="40dp"
            android:gravity="left|center"
            android:layout_width="200dp"
            android:layout_height="45dp"
            android:hint="用户名"
            android:textSize="16sp"
            android:textColor="@color/white"/>
    </RelativeLayout>
    <RelativeLayout
        android:layout_marginTop="20dp"
        android:layout_gravity="center_horizontal"
        android:layout_width="wrap_content"
        android:layout_height="wrap_content">
        <EditText
            android:id="@+id/password"
            android:lines="1"
            android:imeOptions="actionNext"
            android:paddingLeft="40dp"
            android:gravity="left|center"
            android:layout_width="200dp"
            android:layout_height="45dp"
            android:hint="密码"
            android:textSize="16sp"
            android:textColor="@color/white"/>
    </RelativeLayout>
    <LinearLayout
        android:layout_width="wrap_content"
        android:layout_height="wrap_content"
        android:layout_gravity="center_horizontal"
        android:layout_marginTop="20dp"
        android:orientation="horizontal">
        <Button
            android:id="@+id/login_button"
            android:layout_width="wrap_content"
            android:layout_height="wrap_content"
            android:text="登陆"
            android:textColor="@color/white"
            android:textSize="18sp"
            android:gravity="center" />
        <Button
            android:id="@+id/register_button"
            android:layout_marginLeft="80dp"
            android:text="注册"
            android:layout_width="wrap_content"
            android:layout_height="wrap_content"
            android:textColor="@color/white"
            android:textSize="18sp"
            android:gravity="center" />
    </LinearLayout>

</LinearLayout>
MainActivity.java代码片.
package com.coolweather.login;

import androidx.appcompat.app.AppCompatActivity;

import android.content.Intent;
import android.os.Bundle;
import android.text.TextUtils;
import android.view.View;
import android.widget.Button;
import android.widget.EditText;
import android.widget.Toast;

import org.w3c.dom.Text;

import java.util.ArrayList;

public class MainActivity extends AppCompatActivity {

    private MyDatabaseHelper myDatabaseHelper;
    private Button btnLogin,btnRegister;
    private EditText etAccount,etPassword;

    @Override
    protected void onCreate(Bundle savedInstanceState) {
        super.onCreate(savedInstanceState);
        setContentView(R.layout.activity_main);

        btnLogin = findViewById(R.id.login_button);
        btnRegister = findViewById(R.id.register_button);
        etAccount = findViewById(R.id.username);
        etPassword = findViewById(R.id.password);

        btnRegister.setOnClickListener(new View.OnClickListener() {
            @Override
            public void onClick(View v) {
                Intent intent = new Intent(MainActivity.this,RegisterActivity.class);
                startActivity(intent);
                finish();
            }
        });

        btnLogin.setOnClickListener(new View.OnClickListener() {
            @Override
            public void onClick(View v) {
                String account = etAccount.getText().toString().trim();
                String password = etPassword.getText().toString().trim();

                if (!TextUtils.isEmpty(account) && !TextUtils.isEmpty(password)) {
                    ArrayList<User> data = myDatabaseHelper.getAllDATA();
                    boolean userdata = false;
                    for (int i = 0; i < data.size(); i++) {
                        User user= data.get(i);   //可存储账号数量
                        if (account.equals(user.getName()) && password.equals(user.getPassword())) {
                            userdata = true;
                            break;
                        } else {
                            userdata = false;
                        }
                    }
                    if (userdata){
                        Toast.makeText(MainActivity.this,"登陆成功!",Toast.LENGTH_LONG).show();
                        Intent intent = new Intent(MainActivity.this,HomeActivity.class);
                        startActivity(intent);
                        finish();
                    }
                    else{
                        Toast.makeText(MainActivity.this,"用户名或密码错误!",Toast.LENGTH_LONG).show();
                    }
                }else {
                    Toast.makeText(MainActivity.this,"用户名或密码不能为空!",Toast.LENGTH_LONG).show();
                }
            }
        });
        myDatabaseHelper = new MyDatabaseHelper(MainActivity.this);
    }
}
注册模块
RegisterActivity.java代码片.
package com.coolweather.login;

import androidx.appcompat.app.AppCompatActivity;

import android.content.Intent;
import android.os.Bundle;
import android.text.TextUtils;
import android.view.View;
import android.widget.Button;
import android.widget.EditText;
import android.widget.Toast;

public class RegisterActivity extends AppCompatActivity implements View.OnClickListener {

    private MyDatabaseHelper myDatabaseHelper;
    private Button btnRegister,btnBack;
    private EditText etAccount, etPass, etSex;

    @Override
    protected void onCreate(Bundle savedInstanceState) {
        super.onCreate(savedInstanceState);
        setContentView(R.layout.activity_register);

        etAccount = findViewById(R.id.register_username);
        etPass=findViewById(R.id.register_password);
        etSex=findViewById(R.id.register_sex);
        btnRegister=findViewById(R.id.register2_button);
        btnBack=findViewById(R.id.back_button);
        btnRegister.setOnClickListener(this);
        btnBack.setOnClickListener(new View.OnClickListener() {
            @Override
            public void onClick(View v) {
                Intent intent = new Intent(RegisterActivity.this,MainActivity.class);
                startActivity(intent);
                finish();
            }
        });
        myDatabaseHelper = new MyDatabaseHelper(RegisterActivity.this);
    }

    @Override
    public void onClick(View v) {
        String name = etAccount.getText().toString().trim();
        String pass = etPass.getText().toString().trim();
        String sex = etSex.getText().toString().trim();

        if(!TextUtils.isEmpty(name)&&!TextUtils.isEmpty(pass)&&!TextUtils.isEmpty(sex)){
            myDatabaseHelper.add(name,pass,sex);
            Intent intent1 = new Intent(RegisterActivity.this,MainActivity.class);
            startActivity(intent1);
            finish();
            Toast.makeText(RegisterActivity.this,"注册成功",Toast.LENGTH_SHORT).show();
        }else {Toast.makeText(RegisterActivity.this,"信息不完备,注册失败",Toast.LENGTH_SHORT).show();}
        Toast.makeText(RegisterActivity.this,"注册成功!",Toast.LENGTH_LONG).show();
        myDatabaseHelper.add(name,pass,sex);
        Intent intent = new Intent(RegisterActivity.this,MainActivity.class);
        startActivity(intent);
        finish();
    }

}
注册界面xml代码片.
<?xml version="1.0" encoding="utf-8"?>
<LinearLayout xmlns:android="http://schemas.android.com/apk/res/android"
    xmlns:app="http://schemas.android.com/apk/res-auto"
    xmlns:tools="http://schemas.android.com/tools"
    android:layout_width="match_parent"
    android:layout_height="match_parent"
    tools:context=".RegisterActivity"
    android:orientation="vertical"
    android:background="@color/purple_200">
    <TextView
        android:layout_marginTop="100dp"
        android:layout_width="match_parent"
        android:layout_height="wrap_content"
        android:layout_gravity="center"
        android:text="请准确输入信息"
        android:textColor="@color/white"
        android:textSize="30dp"
        android:gravity="center" />
    <LinearLayout
        android:layout_marginTop="100dp"
        android:layout_width="match_parent"
        android:layout_height="match_parent"
        android:orientation="vertical">

        <EditText
            android:id="@+id/register_username"
            android:layout_gravity="center"
            android:lines="1"
            android:imeOptions="actionNext"
            android:paddingLeft="40dp"
            android:gravity="left|center"
            android:layout_width="200dp"
            android:layout_height="45dp"
            android:hint="用户名"
            android:textSize="15sp"
            android:textColor="@color/white"/>
        <EditText
            android:id="@+id/register_password"
            android:layout_marginTop="20dp"
            android:layout_gravity="center"
            android:lines="1"
            android:imeOptions="actionNext"
            android:paddingLeft="40dp"
            android:gravity="left|center"
            android:layout_width="200dp"
            android:layout_height="45dp"
            android:hint="密码"
            android:textSize="15sp"
            android:textColor="@color/white"/>

        <EditText
            android:id="@+id/register_sex"
            android:layout_marginTop="20dp"
            android:layout_gravity="center"
            android:lines="1"
            android:imeOptions="actionNext"
            android:paddingLeft="40dp"
            android:gravity="left|center"
            android:layout_width="200dp"
            android:layout_height="45dp"
            android:hint="性别"
            android:textSize="15sp"
            android:textColor="@color/white"/>

        <Button
            android:id="@+id/register2_button"
            android:layout_gravity="center"
            android:layout_marginTop="20dp"
            android:text="注册"
            android:layout_width="200dp"
            android:layout_height="wrap_content"
            android:textColor="@color/white"
            android:textSize="18sp"
            android:gravity="center" />
        <Button
            android:id="@+id/back_button"
            android:layout_gravity="center"
            android:layout_marginTop="20dp"
            android:text="返回"
            android:layout_width="200dp"
            android:layout_height="wrap_content"
            android:textColor="@color/white"
            android:textSize="18sp"
            android:gravity="center" />
    </LinearLayout>

</LinearLayout>
数据库模块
创建用户类
User.java代码片.
package com.coolweather.login;

public class User {
    private  int id;
    private  String name;
    private  String password;
    private  String sex;
    public User(String name, String password, String sex){
        super();
        this.name = name;
        this.password = password;
        this.sex = sex;
    }
    public  int getId() {return  id;}
    public void setId(int id) {
        this.id = id;
    }
    public String getName() {
        return name;
    }
    public void setName(String name) {
        this.name = name;
    }
    public String getPassword() {
        return password;
    }
    public void setPassword(String password) {
        this.password = password;
    }
    public String getSex(){return sex;}
    public void setSex(String sex){this.sex = sex;}
    @Override
    public String toString() {
        return "User{id ="+ id + ", name = "+ name +",password ="+password +",sex ="+sex +"}";
    }
}
使用数据库创建MyDatabaseHelper,创建用户表
MyDatabaseHelper.java代码片.
public class MyDatabaseHelper extends SQLiteOpenHelper {
    private SQLiteDatabase db;
    public static final String CREATE_User = "create table user ("
            + "_id INTEGER PRIMARY KEY AUTOINCREMENT, "
            + "name TEXT, "
            + "password TEXT,"
            + "sex TEXT)";
    public MyDatabaseHelper(@Nullable Context context) {
        super(context, "db_test", null, 1);
        db = getReadableDatabase();
    }
去除顶部标题
去theres.xml文件中更改,如下代码片.
<style name="Theme.Login" parent="Theme.MaterialComponents.DayNight.NoActionBar">
总结与补充
主要介绍注册模块,登录模块,数据库模块。使用了本地的sqlite数据库保存用户数据,实现用户注册,可以联系讨论,完整源码有偿。
内容总结
以上是互联网集市为您收集整理的Android studio登陆注册的实现及介绍全部内容,希望文章能够帮你解决Android studio登陆注册的实现及介绍所遇到的程序开发问题。 如果觉得互联网集市技术教程内容还不错,欢迎将互联网集市网站推荐给程序员好友。
内容备注
版权声明:本文内容由互联网用户自发贡献,该文观点与技术仅代表作者本人。本站仅提供信息存储空间服务,不拥有所有权,不承担相关法律责任。如发现本站有涉嫌侵权/违法违规的内容, 请发送邮件至 gblab@vip.qq.com 举报,一经查实,本站将立刻删除。
内容手机端
扫描二维码推送至手机访问。