首页 / 更多教程 / DPCM 压缩系统的实现和分析
DPCM 压缩系统的实现和分析
内容导读
互联网集市收集整理的这篇技术教程文章主要介绍了DPCM 压缩系统的实现和分析,小编现在分享给大家,供广大互联网技能从业者学习和参考。文章包含5153字,纯文字阅读大概需要8分钟。
内容图文

一、实验目的
掌握DPCM编解码系统的基本原理。初步掌握实验用C/C++/Python等语言编程实现DPCM
编码器,并分析其压缩效率。
二、实验原理
DPCM编解码原理
- DPCM是差分预测编码调制的缩写,是比较典型的预测编码系统。
- 在DPCM系统中,预测器的输入是已经解码以后的样本。因为在解码端无法得到原始样本,只能得到存在误差的样本。因此,在DPCM编码器中实际内嵌了一个解码器,如图中所示。
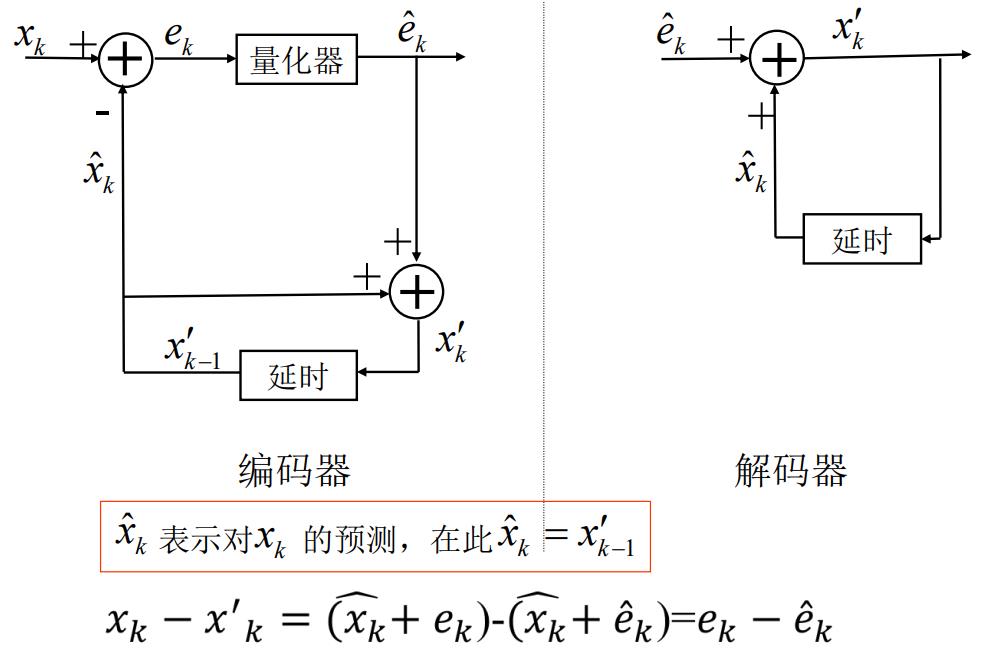

- 在一个DPCM系统中,有两个因素需要设计:预测器和量化器。理想情况下,预测器和量化器应进行联合优化。实际中,采用一种次优的设计方法:分别进行线性预测器和量化器的优化设计。
三、实验内容
- 读取一个256级的灰度图像。
- 采用左侧预测方法计算预测误差并对预测误差进行8比特均匀量化。
- 在DPCM编码器实现的过程中同时输出预测误差图像和重建图像。
- 将预测误差图像写入文件并将该文件输入Huffman编码器,得到输出码流、给出概率分布图并计算压缩比。
- 将原始图像文件输入Huffman编码器,得到输出码流、给出概率分布图并计算压缩比。
- 比较两种系统(1.DPCM+熵编码和2.仅进行熵编码)之间的编码效率(压缩比和图像质量)。压缩质量以PSNR进行计算。
代码实现
- 向左预测函数
void DPCMLeft(int Width,int Height,void *yBuff,void *recBuff,void *errBuff)
{//向左预测
	unsigned char *yB=NULL;
	unsigned char *recB=NULL;
	unsigned char *errB=NULL;
	yB = (unsigned char *)yBuff;
	recB = (unsigned char *)recBuff;
	errB = (unsigned char *)errBuff;
	int P1,P2;//P1为当前值与预测值的误差,P2为量化后的误差
	unsigned char P3;//P3为反量化后的误差

	for(int i=0;i<Height;i++)
	{
		for(int j=0;j<Width;j++)
		{
			if(j == 0)//向左预测时,图像最左边一列的像素值直接输出,无需进行差分预测
			{
				*(recB+j+i*Width)=*(yB+j+i*Width);//当前值为重建值,同时作为下一像素的参考值
				*(errB+j+i*Width)=0;//误差为0
			}
			else//不是最左边一列的像素时DPCM
			{
				P1=*(yB+j+i*Width)-*(recB+(j-1)+i*Width);//当前值与参考值的差值
				if(P1%2==0)//对差值进行8bit均匀量化,并进行+128的偏移以输出
					P2=P1/2+128;
				else
					P2=(P1-1)/2+128;
				*(errB+j+i*Width)=unsigned char(P2);//将误差写入errB缓存区域
				P3=unsigned char(P2*2);//对量化后的误差反量化
				*(recB+j+i*Width)=*(recB+(j-1)+i*Width)+P3;
				//将参考值与反量化得到的误差相加,作为当前像素的重建值,也是下一个像素的参考值
			}
		}
	}
}
- PSNR计算函数
int simplest_yuv420_psnr(void *yBuff1,void *yBuff2, int w, int h, int num)//计算Y分量的PSNR
{
	unsigned char *yB1=NULL;
	yB1 = (unsigned char *)yBuff1;
	unsigned char *yB2=NULL;
	yB2 = (unsigned char *)yBuff2;

	for (int i = 0; i < num; i++)
	{
		double mse_sum = 0, mse = 0, psnr = 0;
		for (int j = 0; j < h ; j++)
		{
			for (int k = 0; k < w; k++)
			{
				mse_sum += pow((double)(*(yB1+k+j*w) - *(yB2+k+j*w)), 2);//取每个差值的平方,并进行累加
			}
		}
		mse = mse_sum / (w * h); //根据公式计算mse
		psnr = 10 * log10(255.0 * 255.0 / mse); //根据公式计算psnr
		printf("%5.3f\n", psnr);
	}
	system("pause");
	return 0;
}
- main函数
int main(int argc, char** argv)
{
	int frameWidth;
	int frameHeight;

	char* yFileName = NULL;//原始灰度文件
	FILE* yFile = NULL;
	unsigned char* y_buff = NULL;
	char* recFileName = NULL;//重建图像文件
	FILE* recFile = NULL;
	unsigned char* rec_buff = NULL;
	char* errFileName = NULL;//量化后的预测误差文件
	FILE* errFile = NULL;
	unsigned char* err_buff = NULL;

	unsigned char* u_buff = NULL;
	unsigned char* v_buff = NULL;

	yFileName = argv[1];
	recFileName = argv[2];
	errFileName = argv[3];
	frameWidth = atoi(argv[4]);
	frameHeight = atoi(argv[5]);

	fopen_s(&yFile,yFileName, "rb");
	if (yFile == NULL)
	{
		printf("cannot find y file\n");
		exit(1);
	}
	recFile = fopen(recFileName, "wb");
	if (recFile == NULL)
	{
		printf("cannot find yuv file\n");
		exit(1);
	}
	errFile = fopen(errFileName, "wb");
	if (errFile == NULL)
	{
		printf("cannot find yuv file\n");
		exit(1);
	}
	//开辟缓存空间
	//4:2:0
	y_buff = (unsigned char*)malloc(frameWidth * frameHeight * sizeof(unsigned char));
	u_buff = (unsigned char*)malloc(frameWidth * frameHeight * sizeof(unsigned char) / 4);
	v_buff = (unsigned char*)malloc(frameWidth * frameHeight * sizeof(unsigned char) / 4);
	rec_buff = (unsigned char*)malloc(frameWidth * frameHeight * sizeof(unsigned char));
	err_buff = (unsigned char*)malloc(frameWidth * frameHeight * sizeof(unsigned char)*1.5);
	if (y_buff == NULL || rec_buff == NULL || err_buff == NULL || u_buff == NULL ||v_buff == NULL)
	{
		printf("wrong malloc\n");
		exit(1);
	}

	fread(y_buff, 1, frameWidth * frameHeight, yFile);//读取灰度文件数据
	if (y_buff == NULL)
	{
		printf("wrong fread\n");
		exit(1);
	}

	DPCMLeft(frameWidth,frameHeight,y_buff,rec_buff,err_buff);//进行向左预测

	for(int i=0;i<frameHeight/2;i++)
	{
		for(int j=0;j<frameWidth/2;j++)
		{
			*(u_buff+j+i*frameWidth/2)=128;
			*(v_buff+j+i*frameWidth/2)=128;
		}
	}
	fwrite(rec_buff, 1, frameWidth * frameHeight, recFile);//将数据写入文件进行输出
	fwrite(err_buff, 1, frameWidth * frameHeight, errFile);
	fwrite(u_buff, 1, frameWidth * frameHeight / 4, errFile);
	fwrite(v_buff, 1, frameWidth * frameHeight / 4, errFile);

	//计算PSNR
	simplest_yuv420_psnr(y_buff,rec_buff,frameWidth,frameHeight,1);

	free(y_buff);
	free(rec_buff);
	free(err_buff);
	free(u_buff);
	free(v_buff);
	fclose(yFile);
	fclose(recFile);
	fclose(errFile);
}
结果及分析
结果:
- 程序运行的输出结果为:51.177。也即PSNR计算的压缩质量为51.177。
- 将压缩前后的图像分别输入Huffman编码器,得到输出码流和概率分布图如下。
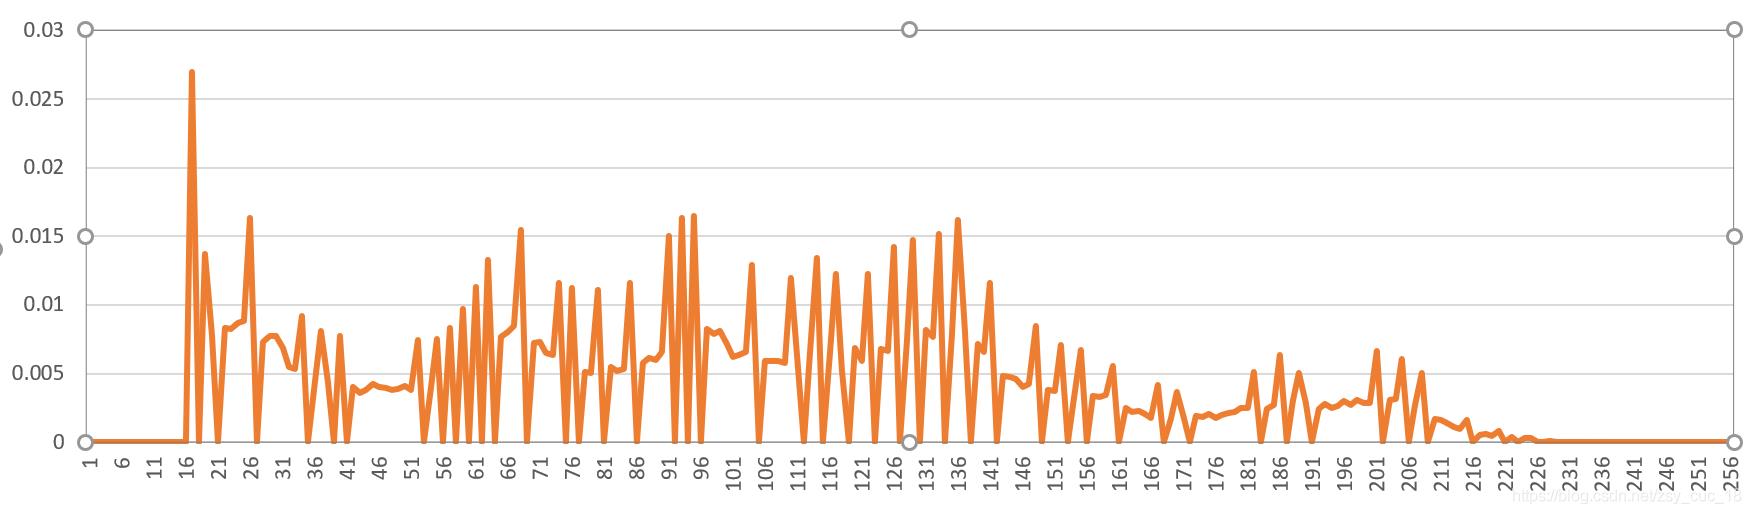
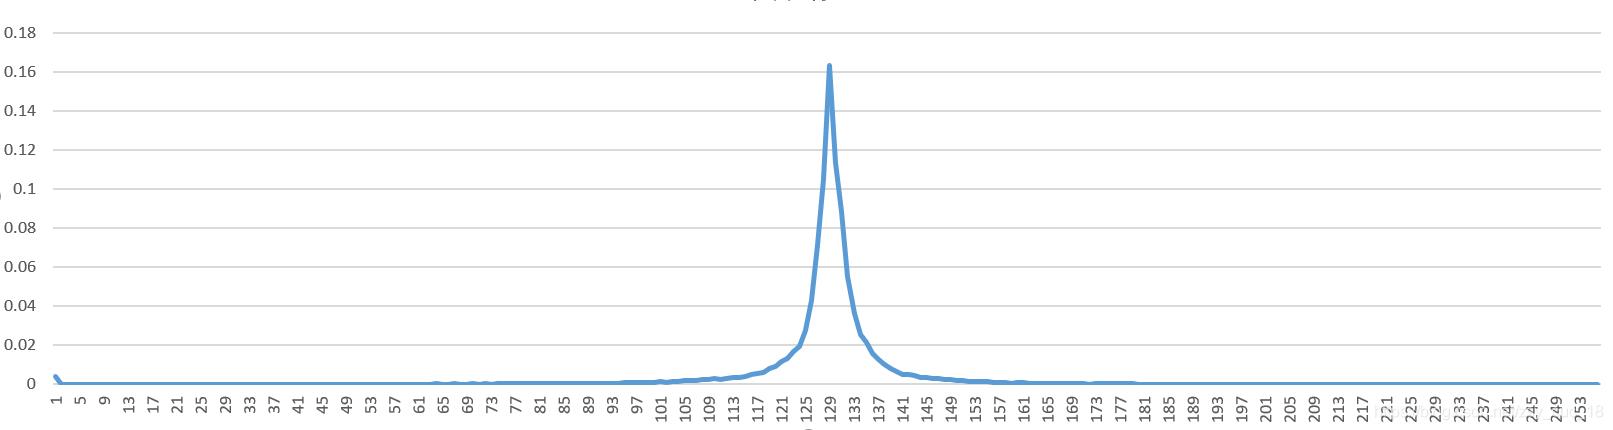
- 计算得到仅进行熵编码的压缩比为71%,DPCM+熵编码达到压缩比为46%。
分析:
- DPCM+熵编码的压缩效率要高于仅进行熵编码,但是PSNR计算出的压缩质量要远差于仅进行熵编码,也即重建出的图像质量要差于仅进行熵编码。
- 随着量化比特数的增大,PSNR的值会增大,但同时压缩效率会降低。
- 要选择合适的量化比特才能达到最理想的压缩状态。
内容总结
以上是互联网集市为您收集整理的DPCM 压缩系统的实现和分析全部内容,希望文章能够帮你解决DPCM 压缩系统的实现和分析所遇到的程序开发问题。 如果觉得互联网集市技术教程内容还不错,欢迎将互联网集市网站推荐给程序员好友。
内容备注
版权声明:本文内容由互联网用户自发贡献,该文观点与技术仅代表作者本人。本站仅提供信息存储空间服务,不拥有所有权,不承担相关法律责任。如发现本站有涉嫌侵权/违法违规的内容, 请发送邮件至 gblab@vip.qq.com 举报,一经查实,本站将立刻删除。
内容手机端
扫描二维码推送至手机访问。
来源:【匿名】