Xamarin.Android MVP模式
内容导读
互联网集市收集整理的这篇技术教程文章主要介绍了Xamarin.Android MVP模式,小编现在分享给大家,供广大互联网技能从业者学习和参考。文章包含4581字,纯文字阅读大概需要7分钟。
内容图文

一、简介
随着UI创建技术的功能日益增强,UI层也履行着越来越多的职责。为了更好地细分视图(View)与模型(Model)的功能,让View专注于处理数 据的可视化以及与用户的交互,同时让Model只关系数据的处理,基于MVC概念的MVP(Model-View-Presenter)模式应运而生。
在MVP模式里通常包含4个要素:
二、实例
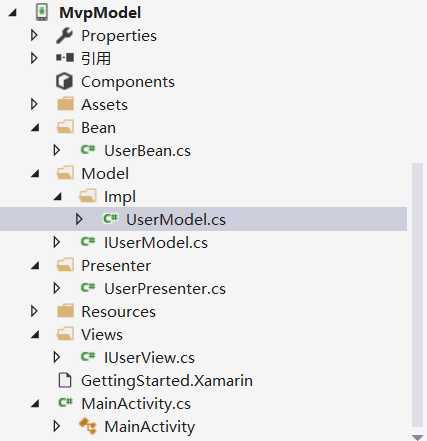
1.新建一个项目,项目结构如下
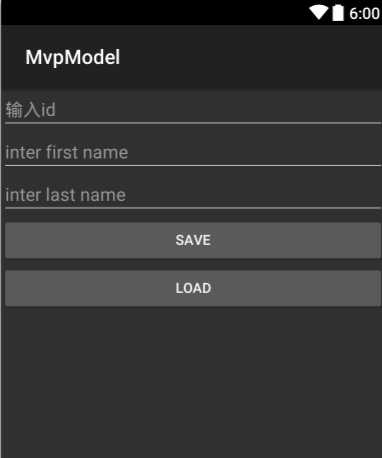
2.做一个根据id读取数据的实例,界面如下


                <?
                xml version="1.0" encoding="utf-8"
                ?>
                <
                LinearLayout
                xmlns:android
                ="http://schemas.android.com/apk/res/android"

    xmlns:tools
                ="http://schemas.android.com/tools"

    android:id
                ="@+id/container"

    android:layout_width
                ="match_parent"

    android:layout_height
                ="match_parent"

    android:orientation
                ="vertical"
                >
                <
                EditText

                android:id
                ="@+id/id"

        android:layout_width
                ="match_parent"

        android:layout_height
                ="wrap_content"

        android:hint
                ="输入id"

        android:inputType
                ="number"
                />
                <
                EditText

                android:id
                ="@+id/first"

        android:layout_width
                ="match_parent"

        android:layout_height
                ="wrap_content"

        android:hint
                ="inter first name"

        android:inputType
                ="text"
                />
                <
                EditText

                android:id
                ="@+id/last"

        android:layout_width
                ="match_parent"

        android:layout_height
                ="wrap_content"

        android:hint
                ="inter last name"

        android:inputType
                ="text"
                />
                <
                Button

                android:id
                ="@+id/save"

        android:layout_width
                ="match_parent"

        android:layout_height
                ="wrap_content"

        android:text
                ="save"
                />
                <
                Button

                android:id
                ="@+id/load"

        android:layout_width
                ="match_parent"

        android:layout_height
                ="wrap_content"

        android:text
                ="load"
                />
                </
                LinearLayout
                >
3.建立bean
            public
            class
             UserBean
    {

            private String mFirstName { get; set; }
        private String mLastName { get; set; }

        public UserBean(String firstName, String lastName)
        {
            this.mFirstName = firstName;
            this.mLastName = lastName;
        }
    }
4.建立model(处理业务逻辑),先写接口,后写实现
            public
            interface
             IUserModel
    {

            void SetID(int id);

        void SetFirstName(String firstName);

        void SetLastName(String lastName);

        int GetID();

        UserBean Load(int id);// 通过id读取user信息,返回一个UserBean
    }
            public
            class
             UserModel : IUserModel
    {

            public
            int
             GetID()
        {

            return
            0
            ;
        }


            public UserBean Load(int id)
        {
            // 查数据库或者联网获取id的userbeanreturnnew UserBean("11", "22");
        }

        publicvoid SetFirstName(string firstName)
        {

        }

        publicvoid SetID(int id)
        {

        }

        publicvoid SetLastName(string lastName)
        {

        }
    }
5.建立view(更新ui中view状态),这里列出需要操作当前view的方法,也就是接口。
            public
            interface
             IUserView
    {

            int
             GetID();

        String GetFristName();

        String GetLastName();


            void
             SetFirstName(String firstName);


            void
             SetLastName(String lastName);
    }
6.建立presenter(主导器,通过ivew和imodel接口操作model和view),activity可以把所有逻辑给presenter处理
            public
            class
             UserPresenter
    {

            private
             IUserView mUserView;

            private
             IUserModel mUserModel;


            public
             UserPresenter(IUserView view)
        {
            mUserView = view;
            mUserModel = new UserModel();
        }

        publicvoid SaveUser(int id, String firstName, String lastName)
        {
            mUserModel.SetID(id);
            mUserModel.SetFirstName(firstName);
            mUserModel.SetLastName(lastName);
        }

        publicvoid LoadUser(int id)
        {
            UserBean user = mUserModel.Load(id);
            mUserView.SetFirstName(user.mFirstName); // 通过调用IUserView的方法来更新显示            mUserView.SetLastName(user.mLastName);
        }
    }
7.activity中实现iview接口,在其中操作view,实例化一个presenter变量。
            public
            class
             MainActivity : Activity, IUserView, View.IOnClickListener
    {
        UserPresenter presenter;
        EditText id, first, last;

            protected
            override
            void
             OnCreate(Bundle bundle)
        {

            base
            .OnCreate(bundle);


            //
             Set our view from the "main" layout resource
                        SetContentView(Resource.Layout.Main);


            //
             Get our button from the layout resource,

            //
             and attach an event to it
             FindViewById<Button>(Resource.Id.save).SetOnClickListener(this);
             FindViewById<Button>(Resource.Id.load).SetOnClickListener(this); ;

            id = FindViewById<EditText>(Resource.Id.id);
            first = FindViewById<EditText>(Resource.Id.first);
            last = FindViewById<EditText>(Resource.Id.last);
            presenter = new UserPresenter(this);
        }

        publicint GetID()
        {
            return Convert.ToInt32(id.Text.ToString());
        }

        publicstring GetFristName()
        {
            return first.Text.ToString();
        }

        publicstring GetLastName()
        {
            return last.Text.ToString();
        }

        publicvoid SetFirstName(string firstName)
        {
            first.Text = firstName;
        }

        publicvoid SetLastName(string lastName)
        {
            last.Text = lastName;
        }

        publicvoid OnClick(View v)
        {
            switch (v.Id)
            {
                case Resource.Id.save:
                    presenter.SaveUser(GetID(), GetFristName(), GetLastName());
                    break;
                case Resource.Id.load:
                    presenter.LoadUser(GetID());
                    break;
            }
        }
    }
7.源码地址
https://github.com/huguodong/XamarinMVP
里面又更详细的实例
原文:http://www.cnblogs.com/huguodong/p/5929224.html
内容总结
以上是互联网集市为您收集整理的Xamarin.Android MVP模式全部内容,希望文章能够帮你解决Xamarin.Android MVP模式所遇到的程序开发问题。 如果觉得互联网集市技术教程内容还不错,欢迎将互联网集市网站推荐给程序员好友。
内容备注
版权声明:本文内容由互联网用户自发贡献,该文观点与技术仅代表作者本人。本站仅提供信息存储空间服务,不拥有所有权,不承担相关法律责任。如发现本站有涉嫌侵权/违法违规的内容, 请发送邮件至 gblab@vip.qq.com 举报,一经查实,本站将立刻删除。
内容手机端
扫描二维码推送至手机访问。