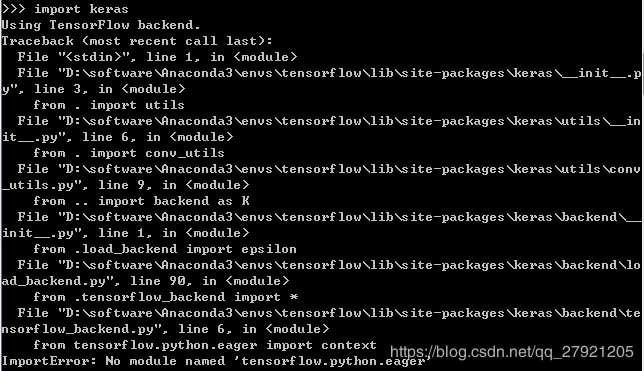
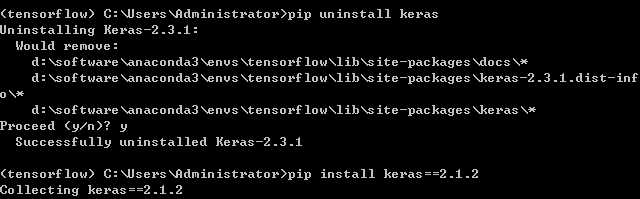
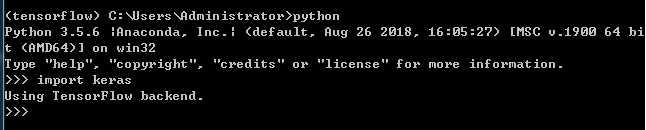
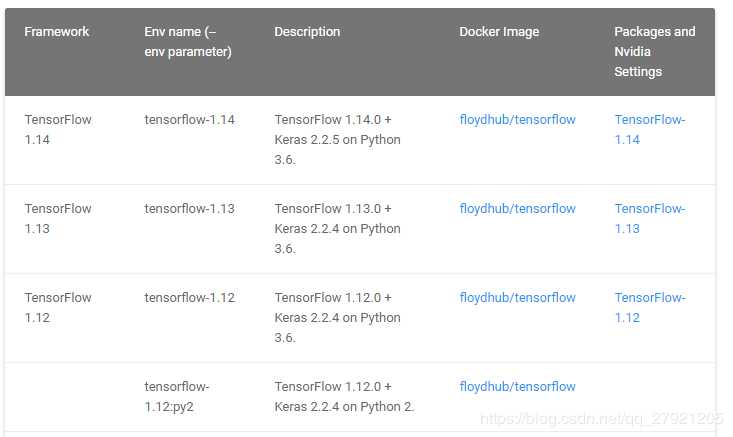
原文https://blog.csdn.net/qq_27921205/article/details/102976824主要是tensorflow和keras的版本不对应的问题import keras的时候,提示:“No module named ‘‘tensorflow.python.eager”."明明昨天用还没问题。 而且网上竟然没有解决方案。就考虑了一下tf和keras的版本,我用的tf1.3,keras2.3.1,就把keras卸载,重装了2.1.2,就没有问题了。 成功: 详细的版本对应参考下面网页:tensorflow和keras对应的版本 "' ref='nofol...
简介
tensorflow的安装分cpu版本和gpu版本,
这里只讨论cpu版本。google提供了很多种安装方式,
主要分三种,
一种是pip安装,非常简单,重要的是它在各个平台都是可以用的,包括windows,但是CentOS6需升级glibc和gcc(CXXABI_)版本第二种是通过docker安装,也差不多是一键安装,内核版本低于3.10不能安装docker,具体的介绍可以看https://github.com/tensorflow/tensorflow/tree/master/tensorflow/tools/docker最后一种,就是源...
记一次超级蠢超级折磨我的bug。报错内容:tensorflow.python.framework.errors_impl.InvalidArgumentError: You must feed a value for placeholder tensor ‘x_1‘ with dtype float and shape [?,227,227,3] [[Node: x_1 = Placeholder[dtype=DT_FLOAT, shape=[?,227,227,3], _device="/job:localhost/replica:0/task:0/device:GPU:0"]()]] [[Node: fc3/_33 = _Recv[client_terminated=false, recv_device="/job...
cpucentosFROM centos:7
MAINTAINER yon
RUN yum -y install make wget && wget -O /etc/yum.repos.d/CentOS-Base.repo http://mirrors.aliyun.com/repo/Centos-7.repo && wget -P /etc/yum.repos.d/ http://mirrors.aliyun.com/repo/epel-7.repo && yum clean all && yum makecacheRUN yum -y install zlib-devel bzip2-devel opens...
import tensorflow as tfwith tf.variable_scope("foo"):v = tf.get_variable("v", [1], initializer=tf.constant_initializer(1.0))#with tf.variable_scope("foo"):# v = tf.get_variable("v", [1])
with tf.variable_scope("foo", reuse=True):v1 = tf.get_variable("v", [1])
print(v == v1)#with tf.variable_scope("bar", reuse=True):# v = tf.get_variable("v", [1])with tf.variable_scope("root"):print(tf.get_vari...
最近在摸deepface代码,一堆环境要配置,过程记录一下吧。安装顺序:Python-> Tensorflow -> Nvidia GPU Driver -> CUDA -> CUDNN一、安装Python3.6Ubuntu16.04系统下默认是python2.7.网上说一般不建议卸载系统自带的python,所以保留。 1. 配置软件仓库sudo add-apt-repository ppa:jonathonf/python-3.6 2. 检查系统软件包,安装Python3.6sudo apt-get update sudo apt-get update sudo apt-get install python3.6 3. 修改pyth...
import numpy as np
import tensorflow as tf
import matplotlib.pyplot as plt#随机调整图片的色彩,定义两种顺序。def distort_color(image, color_ordering=0):if color_ordering == 0:image = tf.image.random_brightness(image, max_delta=32./255.)image = tf.image.random_saturation(image, lower=0.5, upper=1.5)image = tf.image.random_hue(image, max_delta=0.2)image = tf.image.random_contrast(image, lower=0.5, u...
【吴恩达课程使用】anaconda (python 3.7) win10安装 tensorflow 1.8目前tensorflow是只支持到python3.6的,anaconda最新版本已经到python3.7。因为吴恩达课程比较旧一些,这里就配置更加稳定的win10+python3.5+tensorflow1.8版本。一、国内镜像源配置https://mirror.tuna.tsinghua.edu.cn/help/anaconda/各系统都可以通过修改用户目录下的 .condarc 文件:channels:- defaults
show_channel_urls: true
default_channels:- https:/...
#save to fileimport tensorflow as tf
import numpy as np##(1)Save to file 把相关变量存储到文件中
#remember to define the same dtype and shape when restore
W = tf.Variable([[1,2,3],[3,4,5]],dtype=tf.float32,name=‘weights‘)
b = tf.Variable([[1,2,3]],dtype=tf.float32,name=‘biases‘)init = tf.initialize_all_variables()
saver = tf.train.Saver()with tf.Session() as sess:sess.run(init)save_path = sa...
使用清华源快速下载:pip install sklearn -i https://pypi.tuna.tsinghua.edu.cn/simple sklearn包可替换成其他包,例如numpy,TensorFlow等包,一次不行,多重复下载几次(亲测可行)pip install tensorflow -i https://pypi.tuna.tsinghua.edu.cn/simple
原文:https://www.cnblogs.com/zhff/p/13047751.html
一、卷积神经网络(Convolutional Neural Networks, CNN)是一类包含卷积计算且具有深度结构的前馈神经网络(Feedforward Neural Networks),是深度学习(deep learning)的代表算法之一 [1-2] 。卷积神经网络具有表征学习(representation learning)能力,能够按其阶层结构对输入信息进行平移不变分类(shift-invariant classification),因此也被称为“平移不变人工神经网络(Shift-Invariant Artificial Neural Networks, S...
对于有些程序是不支持python3而支持python2的,为了在苹果电脑安装tensorflow,首先sudo su到管理员权限export TF_BINARY_URL=https://storage.googleapis.com/tensorflow/mac/cpu/tensorflow-1.4.0-py2-none-any.whlsudo pip install --upgrade $TF_BINARY_URL安装成功原文:https://www.cnblogs.com/Cucucudeblog/p/10124373.html
安装anaconda:可以下载社区版本的anaconda一路next注:在“Advanced Installation Options”中不要勾选“Add Anaconda to my PATH environment variable.”(“添加Anaconda至我的环境变量。”)。因为如果勾选,则将会影响其他程序的使用。如果使用Anaconda,则通过打开Anaconda Navigator或者在开始菜单中的“Anaconda Prompt”(类似macOS中的“终端”)中进行使用。除非你打算使用多个版本的Anaconda或者多个版本的Python,否...
1、从anaconda官网(https://www.continuum.io/downloads)上下载Linux版本的安装文件(推荐Python 2.7版本),运行sh完成安装。安装完Anaconda,也就安装了python3.5等相关工具2、安装pymysql>>> pip install pymysql3、安装完成后,打开终端,创建TensorFlow虚拟环境 在Prompt中输入:>>> conda create -n tensorflow python=3.54、进入TensorFlow环境,输入>>> source activate tensorflow在命令行前,你就可以看到在输入提示符...
import tensorflow as tf# 输入数据from tensorflow.examples.tutorials.mnist import input_datamnist = input_data.read_data_sets("E:\\MNIST_data", one_hot=True)# 定义网络的超参数
learning_rate = 0.001
training_iters = 200000
batch_size = 128
display_step = 5# 定义网络的参数
# 输入的维度 (img shape: 28*28)
n_input = 784
# 标记的维度 (0-9 digits)
n_classes = 10
# Dropout的概率,输出的可能性
dropout = ...