详解使用uni-app开发微信小程序之登录模块
内容导读
互联网集市收集整理的这篇技术教程文章主要介绍了详解使用uni-app开发微信小程序之登录模块,小编现在分享给大家,供广大互联网技能从业者学习和参考。文章包含3194字,纯文字阅读大概需要5分钟。
内容图文

从微信小程序官方发布的公告中我们可获知:小程序体验版、开发版调用 wx.getUserInfo 接口,将无法弹出授权询问框,默认调用失败,需使用 <button open-type="getUserInfo"></button> 引导用户主动进行授权操作:
1.当用户未授权过,调用该接口将直接报错
2.当用户授权过,可以使用该接口获取用户信息
但在实际开发中我们可能需要弹出授权询问框,因此需要我们自己来写模拟授权弹框(主要是对<buttonopen-type="getUserInfo"></button>的包裹+用户是否是第一次授权判断来显示该页面),代码如下:
1.页面结构
<template>
  <view>
    <!-- #ifdef MP-WEIXIN -->
    <view v-if="isCanUse">
      <view>
        <view class='header'>
          <image src='../../static/img/wx_login.png'></image>
        </view>
        <view class='content'>
          <view>申请获取以下权限</view>
          <text>获得你的公开信息(昵称,头像、地区等)</text>
        </view>

        <button class='bottom' type='primary' open-type="getUserInfo" withCredentials="true" lang="zh_CN" @getuserinfo="wxGetUserInfo">
          授权登录
        </button>
      </view>
    </view>
    <!-- #endif -->
  </view>
</template>
这里的isCanUse是用来记录当前用户是否是第一次授权使用的,wx_login.png图在底部下载获取即可。
2.样式
<style>
  .header {
    margin: 90rpx 0 90rpx 50rpx;
    border-bottom: 1px solid #ccc;
    text-align: center;
    width: 650rpx;
    height: 300rpx;
    line-height: 450rpx;
  }

  .header image {
    width: 200rpx;
    height: 200rpx;
  }

  .content {
    margin-left: 50rpx;
    margin-bottom: 90rpx;
  }

  .content text {
    display: block;
    color: #9d9d9d;
    margin-top: 40rpx;
  }

  .bottom {
    border-radius: 80rpx;
    margin: 70rpx 50rpx;
    font-size: 35rpx;
  }
</style>
3.脚本部分
<script>
  export default {
    data() {
      return {
        SessionKey: '',
        OpenId: '',
        nickName: null,
        avatarUrl: null,
        isCanUse: uni.getStorageSync('isCanUse')||true//默认为true
      };
    },
    methods: {
      //第一授权获取用户信息===》按钮触发
      wxGetUserInfo() {
        let _this = this;
        uni.getUserInfo({
          provider: 'weixin',
          success: function(infoRes) {
            let nickName = infoRes.userInfo.nickName; //昵称
            let avatarUrl = infoRes.userInfo.avatarUrl; //头像
            try {
              uni.setStorageSync('isCanUse', false);//记录是否第一次授权 false:表示不是第一次授权
              _this.updateUserInfo();
            } catch (e) {}
          },
          fail(res) {}
        });
      },

      //登录
        login() {
        let _this = this;
        uni.showLoading({
          title: '登录中...'
        });

        // 1.wx获取登录用户code
        uni.login({
          provider: 'weixin',
          success: function(loginRes) {
            let code = loginRes.code;
            if (!_this.isCanUse) {
              //非第一次授权获取用户信息
              uni.getUserInfo({
                provider: 'weixin',
                success: function(infoRes) {
                       //获取用户信息后向调用信息更新方法
                  let nickName = infoRes.userInfo.nickName; //昵称
                  let avatarUrl = infoRes.userInfo.avatarUrl; //头像
                    _this.updateUserInfo();//调用更新信息方法
                }
              });
            }

            //2.将用户登录code传递到后台置换用户SessionKey、OpenId等信息
            uni.request({
              url: '服务器地址',
              data: {
                code: code,
              },
              method: 'GET',
              header: {
                'content-type': 'application/json'
              },
              success: (res) => {
                //openId、或SessionKdy存储//隐藏loading
                uni.hideLoading();
              }
            });
          },
        });
      },
     //向后台更新信息
      updateUserInfo() {
        let _this = this;
        uni.request({
          url:'url' ,//服务器端地址
          data: {
            appKey: this.$store.state.appKey,
            customerId: _this.customerId,
            nickName: _this.nickName,
            headUrl: _this.avatarUrl
          },
          method: 'POST',
          header: {
            'content-type': 'application/json'
          },
          success: (res) => {
            if (res.data.state == "success") {
              uni.reLaunch({//信息更新成功后跳转到小程序首页
                url: '/pages/index/index'
              });
            }
          }

        });
      }
    },
    onLoad() {//默认加载
      this.login();
    }
  }
</script>
4.最终效果如下:
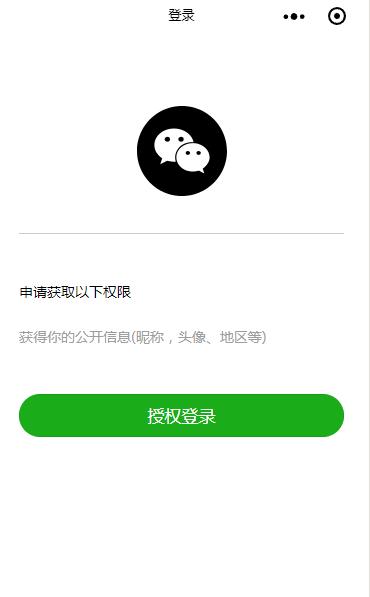
wx_login.png图:

以上就是本文的全部内容,希望对大家的学习有所帮助,也希望大家多多支持脚本之家。
内容总结
以上是互联网集市为您收集整理的详解使用uni-app开发微信小程序之登录模块全部内容,希望文章能够帮你解决详解使用uni-app开发微信小程序之登录模块所遇到的程序开发问题。 如果觉得互联网集市技术教程内容还不错,欢迎将互联网集市网站推荐给程序员好友。
内容备注
版权声明:本文内容由互联网用户自发贡献,该文观点与技术仅代表作者本人。本站仅提供信息存储空间服务,不拥有所有权,不承担相关法律责任。如发现本站有涉嫌侵权/违法违规的内容, 请发送邮件至 gblab@vip.qq.com 举报,一经查实,本站将立刻删除。
内容手机端
扫描二维码推送至手机访问。