ionic使用angularjs表单验证(模板验证)
内容导读
互联网集市收集整理的这篇技术教程文章主要介绍了ionic使用angularjs表单验证(模板验证),小编现在分享给大家,供广大互联网技能从业者学习和参考。文章包含3093字,纯文字阅读大概需要5分钟。
内容图文
")
1什么是模板验证
顾名思义模板验证就是通过一些angularjs的属性来在html标签中验证,为了往模板驱动表单中添加验证机制,你要添加一些验证属性,就像原生的 HTML 表单验证器。 Angular 会用指令来匹配这些具有验证功能的指令。每当表单控件中的值发生变化时,Angular 就会进行验证,并生成一个验证错误的列表(对应着 INVALID 状态)或者 null(对应着 VALID 状态)。
2示例
这是我写的一个小demo,这种验证方式无需写js代码全部在标签 里使用angularjs的属性,其他地方也无需引入angular forms库,因为ionic会自动默认引入。
<header [title]="title"></header>

 <ion-content scroll="false">
 <!--<form>-->
  <ion-item>
  <ion-input type="text" class="form-control"
     name="username" #username="ngModel"
     required maxlength="10" minlength="6"
     placeholder="用户名"
     [(ngModel)]="user.username"
     ></ion-input>

  </ion-item>
  <p>ahdasidhasidashdudi</p>

  <ion-item>
  <ion-input type="password" class="form-control"
     name="password" #password="ngModel"
     required maxlength="16" minlength="6"
     placeholder="密码" [(ngModel)]="user.password"></ion-input>
  </ion-item>

  <ion-item>
  <ion-label>记住密码</ion-label>
  <ion-toggle [(ngModel)]="pepperoni"></ion-toggle>
  </ion-item>

  <button ion-button block (click)="login()">登录</button>
  <ion-item>
  <button ion-button icon-start outline (click)="goRegistered()">
   去注册
  </button>

  <button ion-button icon-end outline>
   忘记密码
  </button>
  </ion-item>
  <h1 class="errorMessage">{{promptMessage}}</h1>
  <span *ngIf="username.invalid && (username.dirty || username.touched)"
   class="errorMessage">用户名必须为6到10位</span>
  <span *ngIf="password.invalid && (password.dirty || password.touched)" class="errorMessage">
  密码必须为6-16位
  </span>
 <!--</form>-->


 </ion-content>
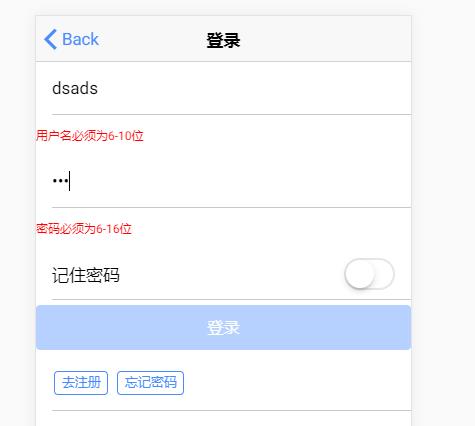
运行效果如下:
3核心属性
可以看到[(ngModel)]="user.username"作用是绑定了我们在ts文件中定义的变量。
#username="ngModel"的作用是把我们绑定的模型值命名成username,变成了一个FormControl对象,这里不必纠结下节会讲。
required 验证是否为空 maxlength="10" 最大长度 minlength="6"最小长度。这些都是我们需要验证的条件。
*ngIf="username.invalid && (username.dirty || username.touched)"
*ngIf标签等于true时将错误信息显示出来username.invalid表示验证不合法返回true,username.dirty 判断是否改变了这个参数的值,username.touched表示是否有碰过表单,作用在于,刚打开表单页面是,里面参数都是空的,但无需显示错误信息。
进入model.d.ts文件看到部分源码如下
/**
  * A control is `valid` when its `status === VALID`.
  *
  * In order to have this status, the control must have passed all its
  * validation checks.
  */
 readonly valid: boolean;
 /**
  * A control is `invalid` when its `status === INVALID`.
  *
  * In order to have this status, the control must have failed
  * at least one of its validation checks.
  */
 readonly invalid: boolean;
valid属性表示参数值校验后结果不通过为false,通过为true。
invalid则表示参数值校验不通过为true,通过为false。
 /**
  * A control is `dirty` if the user has changed the value
  * in the UI.
  *
  * Note that programmatic changes to a control's value will
  * *not* mark it dirty.
  */
 readonly dirty: boolean;
 /**
 * A control is marked `touched` once the user has triggered
 * a `blur` event on it.
  */
 readonly touched: boolean;
dirty表示你是否没有改变过这个参数的值
以上就是本文的全部内容,希望对大家的学习有所帮助,也希望大家多多支持脚本之家。
内容总结
以上是互联网集市为您收集整理的ionic使用angularjs表单验证(模板验证)全部内容,希望文章能够帮你解决ionic使用angularjs表单验证(模板验证)所遇到的程序开发问题。 如果觉得互联网集市技术教程内容还不错,欢迎将互联网集市网站推荐给程序员好友。
内容备注
版权声明:本文内容由互联网用户自发贡献,该文观点与技术仅代表作者本人。本站仅提供信息存储空间服务,不拥有所有权,不承担相关法律责任。如发现本站有涉嫌侵权/违法违规的内容, 请发送邮件至 gblab@vip.qq.com 举报,一经查实,本站将立刻删除。
内容手机端
扫描二维码推送至手机访问。