jenkins + supervisor + ansible 实现netcore程序的多机一键部署
内容导读
互联网集市收集整理的这篇技术教程文章主要介绍了jenkins + supervisor + ansible 实现netcore程序的多机一键部署,小编现在分享给大家,供广大互联网技能从业者学习和参考。文章包含8984字,纯文字阅读大概需要13分钟。
内容图文

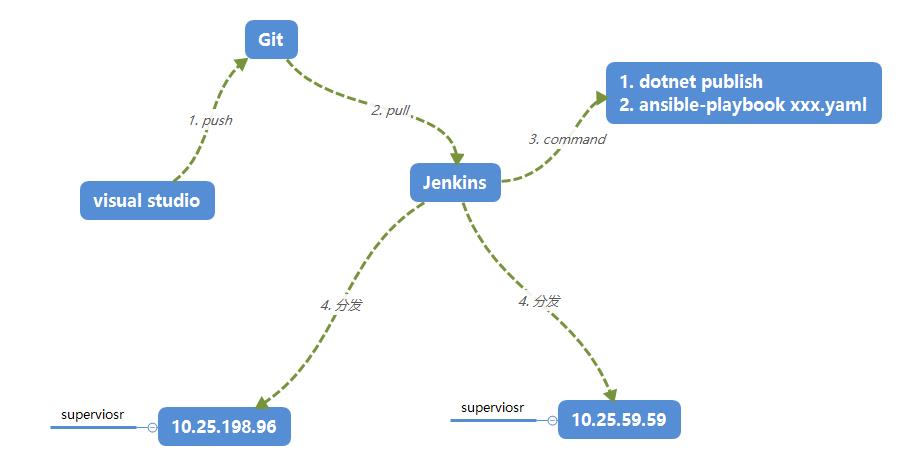
上一篇我们简单的说到了使用jenkins+supervisor实现了一个单机版的多副本部署,但是在更多的场景下还是需要netcore程序的多机一键部署,那么多机器间如何分发呢?肯定不能使用scp这么低级别的命令,所以你的技术栈中要引进ansible,用它来实现这个功能不要太爽。
一:ansible部署
ansible是一个自动化运维工具,实现方法就是在主控机上通过ssh免秘钥的方式自动分发你的程序到多台机器上,所以第一步你要配置主控机到远程机的ssh免秘钥登陆。我这里有两台机器:
- 10.25.198.96 【主控机】
- 10.25.59.59 【远程机】
大概的一个简图就是这样。
1. 免密登陆
[root@localhost?~]#?ssh-keygen?-t?rsa?-P?''
Generating?public/private?rsa?key?pair.
Enter?file?in?which?to?save?the?key?(/root/.ssh/id_rsa):?
Created?directory?'/root/.ssh'.
Your?identification?has?been?saved?in?/root/.ssh/id_rsa.
Your?public?key?has?been?saved?in?/root/.ssh/id_rsa.pub.
The?key?fingerprint?is:
40:72:cc:f4:c3:e7:15:c9:9f:ee:f8:48:ec:22:be:a1?root@localhost.localdomain
The?key's?randomart?image?is:
+--[?RSA?2048]----+
|????.++????...???|
|?????+oo????o.???|
|??????.?+?.?..?.?|
|???????.?+?.??o??|
|????????S?.??.???|
|???????????.??.??|
|????????.???oo???|
|???????....o...??|
|??????E.oo?.o..??|
+-----------------+
[root@localhost?~]#?ls?/root/.ssh/id_rsa
/root/.ssh/id_rsa
[root@localhost?~]#?ls?/root/.ssh
id_rsa??id_rsa.pub
[root@localhost?~]#?scp?/root/.ssh/id_rsa.pub?root@10.25.59.59:/root/.ssh/authorized_keys
root@10.25.59.59's?password:?
id_rsa.pub????????????????????????????????????????????????????????????????100%??408?????0.4KB/s???00:00?
[root@localhost?~]#?cat?/root/.ssh/id_rsa.pub?>>?/root/.ssh/authorized_keys
2. 安装ansible
因为ansible是python写的,通常有两种安装方式:yum 和 pip install 。我这里就采用yum安装,安装完成之后,直接键入ansible命令如下:
[root@localhost?~]#?ansible
ERROR!?Unexpected?Exception,?this?is?probably?a?bug:?(cryptography?0.8.2?(/usr/lib64/python2.7/site-packages),?Requirement.parse('cryptography>=1.1'))
the?full?traceback?was:
可以看到上面报错了,如果你不了解python,还是有点头疼的,上面说的是你的cryptography包版本太低,需要安装>=1.1的,你可以到pipy上down一个新包下来。https://pypi.org/project/cryptography/2.5
对了,如果你的pip也没装的话,那你还是先通过yum install pip吧。
[root@localhost?~]#?pip?install?cryptography==2.5
DEPRECATION:?Python?2.7?will?reach?the?end?of?its?life?on?January?1st,?2020.?Please?upgrade?your?Python?as?Python?2.7?won't?be?maintained?after?that?date.?A?future?version?of?pip?will?drop?support?for?Python?2.7.
Collecting?cryptography==2.5
??Downloading?https://files.pythonhosted.org/packages/17/fd/4c2c8953a9dfe38fbe0c3adafb6355540bd98cef70cc82734acb0a4c0e2f/cryptography-2.5-cp27-cp27mu-manylinux1_x86_64.whl?(2.4MB)
????100%?|████████████████████████████████|?2.4MB?14kB/s?
Collecting?cffi!=1.11.3,>=1.8?(from?cryptography==2.5)
??Downloading?https://files.pythonhosted.org/packages/14/dd/3e7a1e1280e7d767bd3fa15791759c91ec19058ebe31217fe66f3e9a8c49/cffi-1.11.5-cp27-cp27mu-manylinux1_x86_64.whl?(407kB)
????100%?|████████████████████████████████|?409kB?15kB/s?
Requirement?already?satisfied:?six>=1.4.1?in?/usr/lib/python2.7/site-packages?(from?cryptography==2.5)?(1.9.0)
Collecting?ipaddress;?python_version?<?"3"?(from?cryptography==2.5)
??Downloading?https://files.pythonhosted.org/packages/fc/d0/7fc3a811e011d4b388be48a0e381db8d990042df54aa4ef4599a31d39853/ipaddress-1.0.22-py2.py3-none-any.whl
Collecting?asn1crypto>=0.21.0?(from?cryptography==2.5)
??Downloading?https://files.pythonhosted.org/packages/ea/cd/35485615f45f30a510576f1a56d1e0a7ad7bd8ab5ed7cdc600ef7cd06222/asn1crypto-0.24.0-py2.py3-none-any.whl?(101kB)
????100%?|████████████████████████████████|?102kB?34kB/s?
Requirement?already?satisfied:?enum34;?python_version?<?"3"?in?/usr/lib/python2.7/site-packages?(from?cryptography==2.5)?(1.0.4)
Requirement?already?satisfied:?pycparser?in?/usr/lib/python2.7/site-packages?(from?cffi!=1.11.3,>=1.8->cryptography==2.5)?(2.14)
Installing?collected?packages:?cffi,?ipaddress,?asn1crypto,?cryptography
??Found?existing?installation:?cffi?0.8.6
????Uninstalling?cffi-0.8.6:
??????Successfully?uninstalled?cffi-0.8.6
??Found?existing?installation:?cryptography?0.8.2
????Uninstalling?cryptography-0.8.2:
??????Successfully?uninstalled?cryptography-0.8.2
Successfully?installed?asn1crypto-0.24.0?cffi-1.11.5?cryptography-2.5?ipaddress-1.0.22
再输入ansbile如果没有报错那就恭喜你搞定了,否则的话还是迭代循环吧。
[root@localhost?~]#?ansible
Usage:?ansible?<host-pattern>?[options]

Define?and?run?a?single?task?'playbook'?against?a?set?of?hosts
3. ansible简单介绍
安装好了ansible之后,在/etc/ansible目录下会有三个文件,如下:
[root@localhost?~]#?cd?/etc/ansible
[root@localhost?ansible]#?ls
ansible.cfg??hosts??roles
1) ansible.cfg
这个是ansible自身的config文件,默认就这样,我们暂不管。
2) hosts
这里面配置的就是ansible要操控的远程机器,比如我在末尾加上的10.25.59.59 和 10.25.198.96 两台我要分发的机器。
#?This?is?the?default?ansible?'hosts'?file.
#
#?It?should?live?in?/etc/ansible/hosts
#
#???-?Comments?begin?with?the?'#'?character
#???-?Blank?lines?are?ignored
#???-?Groups?of?hosts?are?delimited?by?[header]?elements
#???-?You?can?enter?hostnames?or?ip?addresses
#???-?A?hostname/ip?can?be?a?member?of?multiple?groups

#?Ex?1:?Ungrouped?hosts,?specify?before?any?group?headers.

##?green.example.com
##?blue.example.com
##?192.168.100.1
##?192.168.100.10

#?Ex?2:?A?collection?of?hosts?belonging?to?the?'webservers'?group

##?[webservers]
##?alpha.example.org
##?beta.example.org
##?192.168.1.100
##?192.168.1.110

#?If?you?have?multiple?hosts?following?a?pattern?you?can?specify
#?them?like?this:

##?www[001:006].example.com

#?Ex?3:?A?collection?of?database?servers?in?the?'dbservers'?group

##?[dbservers]
##?
##?db01.intranet.mydomain.net
##?db02.intranet.mydomain.net
##?10.25.1.56
##?10.25.1.57

#?Here's?another?example?of?host?ranges,?this?time?there?are?no
#?leading?0s:

##?db-[99:101]-node.example.com

[memsql-test]
10.25.59.59
10.25.198.96
3) roles
一般来说ansible推荐都是以role模板格式作为playbook来实现非常强大的功能,比如这个地方:https://galaxy.ansible.com/ 都是一些供你学习的role模板。
4. 编写playbook
1) deploy.yaml
---
-?hosts:?all
??
??remote_user:?root

??vars:
????inifile:?"memsql-test"
????program:?"MemSql.Test"
????workspace:?"/var/lib/jenkins/workspace/{{?program?}}/MemSql.NetCore/{{?program?}}/bin/Release/netcoreapp2.1/publish/"?
??tasks:
????-?name:?1.?directory?publish?files
??????copy:
????????src:?"{{?workspace?}}"
????????dest:?"/data/output/{{?program?}}"

????-?name:?2.?copy?*.ini?file?for?supervisor
??????copy:
????????src:?"{{?workspace?}}/doc/{{?inifile?}}.ini"
????????dest:?/data/supervisor/conf/

????-?name:?3.?supervisord?file
??????supervisorctl:
????????name:?memsql-test
????????state:?restarted
????????supervisorctl_path:?/usr/bin/supervisorctl
????????config:?/data/supervisor/supervisord.conf
这个配置文件大概是什么意思呢?
hosts:memsql-test 表示要操作memsql-test组下的所有主机,还记得你在hosts中配置的ip地址吗?
remote_user: root 告诉你远程操控的角色是什么。
vars 定义一些变量,方便后面少些一些重复的代码。
tasks: 定义一些按顺序执行的Action
name:某一个action动作的描述
copy:copy命令,这个算是ansible的模块了,具体参见:https://docs.ansible.com/ansible/latest/modules/copy_module.html
supervisorctl:这个ansible集成了supervisor,挺好的,具体参见:https://docs.ansible.com/ansible/latest/modules/supervisorctl_module.html
三:ansible 和 jenkins 集成
在我的doc文件夹下有三个文件,方便jenkins在脚本执行的时候获取相关文件。
deploy.yaml 这个就是上面介绍的
entrypoint.sh 这个脚本是准备copy到jenkins的command命令框中
cd?./MemSql.NetCore/MemSql.Test?\
&&?dotnet?publish?-c?Release?\
&&?ansible-playbook?./doc/deploy.yaml
- memsql-test.ini 如果看过上一篇,那这个就不介绍了
[program:memsql-test]
command=/usr/bin/dotnet?/data/output/MemSql.Test/MemSql.Test.dll
autostart=false
autorestart=true
stdout_logfile=/data/output/MemSql.Test/1.log???
- 最后就是一个简单的program.cs
class?Program
????{
????????static?void?Main(string[]?args)
????????{
????????????var?cts?=?new?CancellationTokenSource();

????????????var?bgtask?=?Task.Run(()?=>
????????????{
????????????????for?(int?i?=?0;?i?<?int.MaxValue;?i++)
????????????????{
????????????????????Log.Info($"当前index={i},?时间为:{DateTime.Now}");

????????????????????Thread.Sleep(new?Random().Next(1000,?3000));
????????????????}
????????????});

????????????Log.Info($"{DateTime.Now}?Test 后端服务程序正常启动!");
????????????Console.WriteLine($"{DateTime.Now}?Test 后端服务程序正常启动!");

????????????bgtask.Wait();
????????}
????}
- 在jenkins中执行一下, 当然你也可以使用jenkins的ansible插件,简单的话用脚本也可以。
点击jenkins构建之后,就可以看到console界面中 playbook的脚本在跑了。
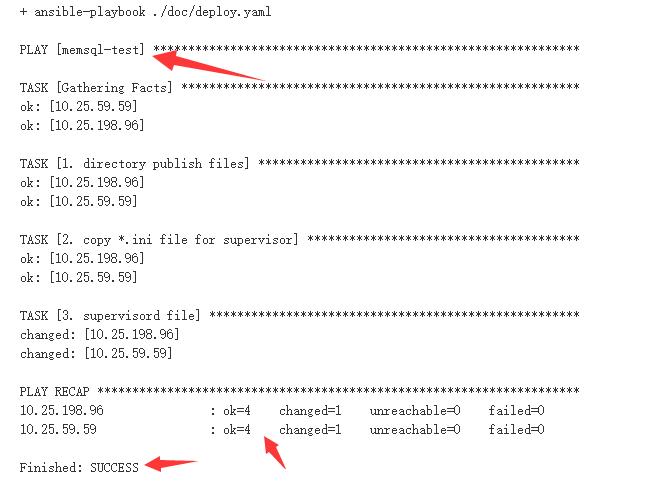
然后你到两台机器都验证一起,process可是起来了。
[root@10-25-59-59?~]#?ps?-ef?|?grep?dotnet
root?????22949??1371??0?11:28??????????00:00:01?/usr/bin/dotnet?/data/output/MemSql.Test/MemSql.Test.dll
root?????26337?18477??0?11:45?pts/0????00:00:00?grep?--color=auto?dotnet
[root@10-25-198-96?~]#?ps?-ef?|?grep?dotnet
root??????4831?21660??6?11:45??????????00:00:00?/usr/bin/dotnet?/data/output/MemSql.Test/MemSql.Test.dll
好了,本篇就说到这里,希望对你有帮助。
内容总结
以上是互联网集市为您收集整理的jenkins + supervisor + ansible 实现netcore程序的多机一键部署全部内容,希望文章能够帮你解决jenkins + supervisor + ansible 实现netcore程序的多机一键部署所遇到的程序开发问题。 如果觉得互联网集市技术教程内容还不错,欢迎将互联网集市网站推荐给程序员好友。
内容备注
版权声明:本文内容由互联网用户自发贡献,该文观点与技术仅代表作者本人。本站仅提供信息存储空间服务,不拥有所有权,不承担相关法律责任。如发现本站有涉嫌侵权/违法违规的内容, 请发送邮件至 gblab@vip.qq.com 举报,一经查实,本站将立刻删除。
内容手机端
扫描二维码推送至手机访问。