springboot整合redis(注解形式)
内容导读
互联网集市收集整理的这篇技术教程文章主要介绍了springboot整合redis(注解形式),小编现在分享给大家,供广大互联网技能从业者学习和参考。文章包含2761字,纯文字阅读大概需要4分钟。
内容图文
")
一.背景
基于的Spring Boot的版本是2.1.3
二.整合
1.添加redis相关的maven依赖
<dependency>
    <groupId>org.springframework.boot</groupId>
    <artifactId>spring-boot-starter-data-redis</artifactId>
</dependency>
2.在application.properties加入redis的相关配置
# Redis数据库索引(默认为0)
spring.redis.database=0

# Redis服务器地址
spring.redis.host=127.0.0.1

# Redis服务器连接端口
spring.redis.port=6379

# Redis服务器连接密码(默认为空),我的是123456
# spring.redis.password=
spring.redis.password=123456

# 连接池最大连接数(使用负值表示没有限制)
spring.redis.pool.max-active=200

# 连接池最大阻塞等待时间(使用负值表示没有限制)
spring.redis.pool.max-wait=-1

# 连接池中的最大空闲连接
spring.redis.pool.max-idle=10

# 连接池中的最小空闲连接
spring.redis.pool.min-idle=0

# 连接超时时间(毫秒)
spring.redis.timeout=5000
3.在启动类上加入@EnableCaching注解
@SpringBootApplication
@EnableCaching
public class App
{

    public static void main( String[] args )
    {
        SpringApplication.run(App.class, args);
    }
}
4.在Service层的方法上加入@Cacheable(cacheNames = "999",key = "1024")
表示第一次查询会从数据库中查询数据,并同时将此方法所查询到的数据存入redis中。之后再调用此方法时,直接从redis缓存中取数据,不用再从数据库中查。
@Service
public interface PersonService {

    @Cacheable(cacheNames = "999",key = "1024")
    List<Person> getAll();

    List<Person> getMan();

    String getTest();

}
5.调用该方法
@Controller
@RequestMapping("list")
public class ListController {

    @Autowired
    PersonService personservice;
    @Autowired
    Person person;
    @Autowired
    PersonDAO persondao;

    @RequestMapping("/html")
    public String getAll(Model model){

        List<Person> list = personservice.getAll();
        model.addAttribute("users",list);

        return "index";
    }
}
6.通过浏览器访问,得到数据库中的数据
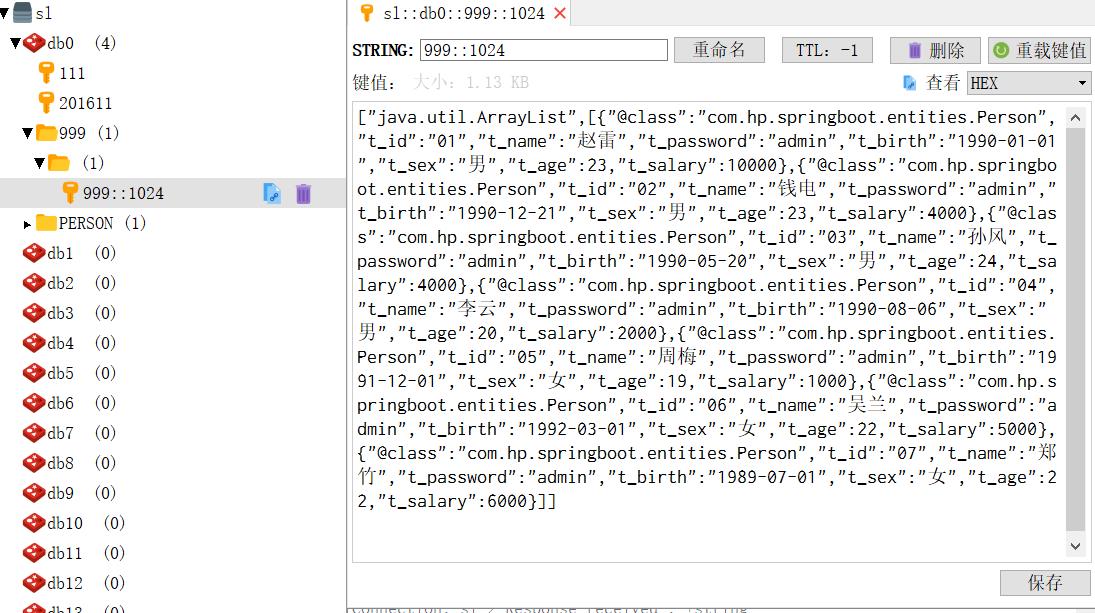
7.通过Redis Desktop Manager查看redis中的数据
8.发现Redis Desktop Manager中的数据不可读,我们做以下处理
新建一个RedisConfiguration类
@Configuration
public class RedisConfiguration{
    /**
     * 缓存管理器       (没有这个在redis中查看到的不是可读的字节数据)
     */
    @Bean("jsonRedisCache")
    public CacheManager cacheManager(RedisConnectionFactory redisConnectionFactory) {
        //初始化一个RedisCacheWriter
        RedisCacheWriter redisCacheWriter = RedisCacheWriter.nonLockingRedisCacheWriter(redisConnectionFactory);
        //设置CacheManager的值序列化方式为json序列化
        RedisSerializer<Object> jsonSerializer = new GenericJackson2JsonRedisSerializer();
        RedisSerializationContext.SerializationPair<Object> pair = RedisSerializationContext.SerializationPair
                                                    .fromSerializer(jsonSerializer);
        RedisCacheConfiguration defaultCacheConfig=RedisCacheConfiguration.defaultCacheConfig()
                                                    .serializeValuesWith(pair);
        //设置默认超过期时间是30秒
        defaultCacheConfig.entryTtl(Duration.ofSeconds(30));
        //初始化RedisCacheManager
        return new RedisCacheManager(redisCacheWriter, defaultCacheConfig);
    }
9.重新启动项目重新访问后
三.总结
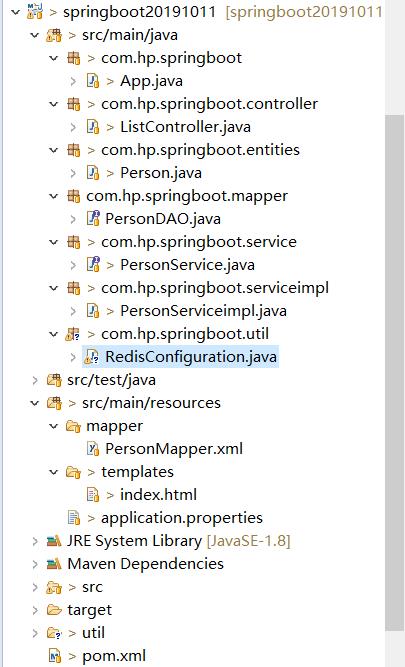
项目总体结构图
内容总结
以上是互联网集市为您收集整理的springboot整合redis(注解形式)全部内容,希望文章能够帮你解决springboot整合redis(注解形式)所遇到的程序开发问题。 如果觉得互联网集市技术教程内容还不错,欢迎将互联网集市网站推荐给程序员好友。
内容备注
版权声明:本文内容由互联网用户自发贡献,该文观点与技术仅代表作者本人。本站仅提供信息存储空间服务,不拥有所有权,不承担相关法律责任。如发现本站有涉嫌侵权/违法违规的内容, 请发送邮件至 gblab@vip.qq.com 举报,一经查实,本站将立刻删除。
内容手机端
扫描二维码推送至手机访问。