Unity3D HTC 完整开发过程详解
内容导读
互联网集市收集整理的这篇技术教程文章主要介绍了Unity3D HTC 完整开发过程详解,小编现在分享给大家,供广大互联网技能从业者学习和参考。文章包含12367字,纯文字阅读大概需要18分钟。
内容图文

HTC Vive 是一个虚拟现实头盔,由 HTC 和 Valve 公司制造。它提供一种在虚拟世界中的浸入式体验,而不是屏幕头像。
如果你是一个 Unity 开发者,在虚拟现实游戏中使用 HTC Vive 非常简单——你可以认为 HTC Vive 和 Unity 是天生一对。
在这篇 HTC Vive 教程中,你会学习如何在 Unity 游戏中集成 HTC Vive。包括:
- 下载和配置 StreamVR
- 处理控制器输入
- 在 VR 中和物理对象交互
- 创建一支激光笔
- 瞬移
在本文最后,你将对未来体验有一个粗略的了解。让我们开始吧!
注:每个人在戴着头戴式显示器都会对运动和旋转产生不同的反应。如果你是第一此穿戴此类设备,当感觉不适时请放松并深呼吸。大部分人很快就会适应 VR。开头几次如果你不适应请不要着急——它很快就会过去。
开始
在正式开始学习之前,你必须拥有下列条件:
- 一台支持 VR 的 Windows PC。
- 在机器上安装有 Unity 5.5 或更高版本。
- 一套完整的 HTC Vive 硬件,并配置和升级好软件。
- 安装 Steam 和 SteamVR。请参考 https://help.steampowered.com/zh-cn/,它将指引你完成硬件安装,并提供 Steam 和 SteamVR 的下载链接。
- 熟悉基本的 Unity 使用:[Introduction to Unity: Getting Started](Introduction to Unity: Getting Started)。
- 熟悉基本的脚本:https://www.raywenderlich.com/980-introduction-to-unity-scripting。
确认 HTC Vive 已经打开并连接!下载:https://koenig-media.raywenderlich.com/uploads/2016/12/Introduction-To-HTC-Vive-Starter.zip
解压缩到任意目录并用 Unity 打开。在项目窗口中看一眼文件夹:
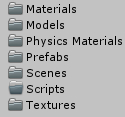
每个文件夹都和对应的资源一一对应:
- Materials: 场景所用到的材质,包括蓝色小球。
Models: 所有的模型。
Physics Materials: 弹性小球的物理材质。
Prefabs: 预制件。
Scenes: 游戏场景。
Scripts: 全部脚本。
Textures: 场景中所有对象共有的单一纹理。
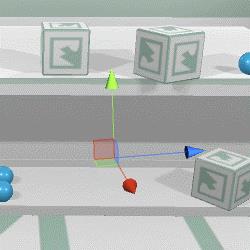
看一看场景视图,按 play 按钮运行游戏:
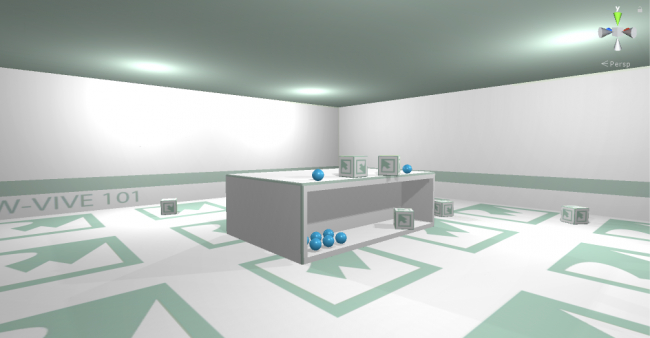
这里不会有太多内容,因为场景中还没有加入 VR 控制。你需要将 SteamVR 添加到项目中,以便将 Vive 连接到 Unity。
设置 StreamVR
SteamVR SDK 是一个由 Valve 提供的官方库,以简化 Vive 开发。当前在 Asset 商店中是免费的,它同时支持 Oculus Rift 和 HTC Vive。
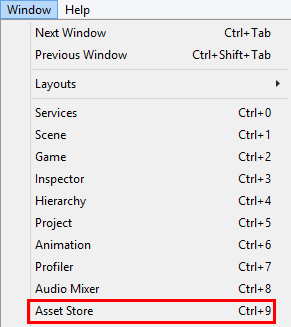
打开 Asset 商店,在顶部工具栏中选择 Window > Asset Store:
等商店页面加载完,在搜索栏中输入 StreamVR 并回车。上下滚动浏览搜索结果,点击 StreamVR Plugin,会打开它的商店页面:

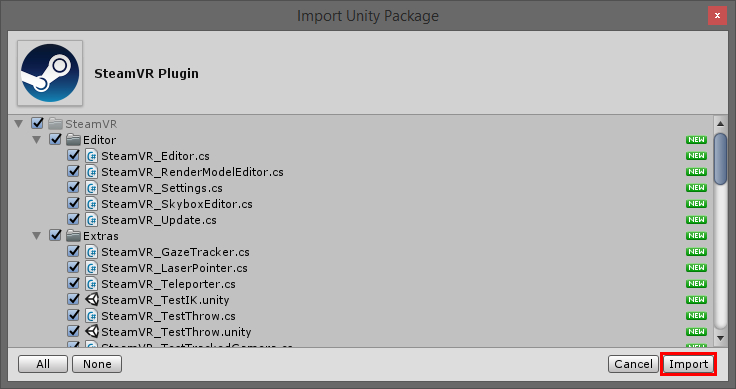
点击 Download 按钮,然后静静等待。等下载完成,你看到导入包对话框。
点击右下角的 Import,导入包:
等导入完成,你会看到下列提示:
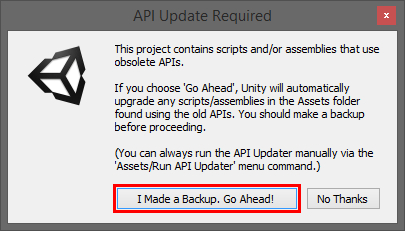
点击 I Made a Backup 按钮,让编辑器对脚本进行预编。几秒后会看到这个窗口:
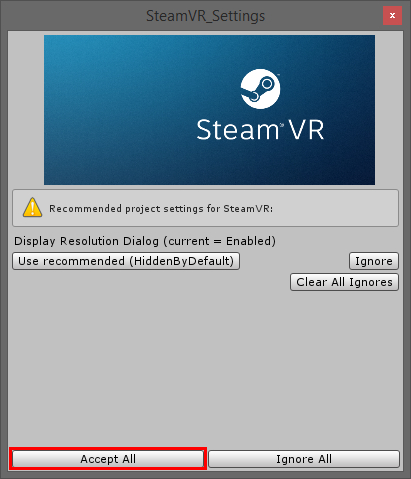
这是 SteamVR 插件的界面。它会列出一些编辑器设置,这些设置能够提升性能和兼容性。
当你打开一个新项目并导入 SteamVR 时,你会在这里看到几个选项。因为开始项目已经优化过,这里我们只需要禁用解析度对话框(resolution dialog)即可。点击 Accept All 按钮,执行所有推荐的修改。关闭 Asset 商店回到场景视图。在项目窗口中,我们现在多了一个新文件夹 SteamVR:
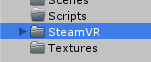
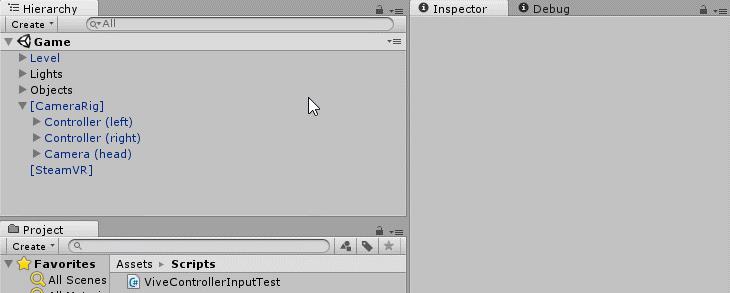
打开这个文件夹,看一眼内容。我们会从 Prefabs 文件中添加一个 VR GameObjects 到场景中。
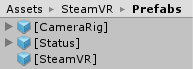
同时选中 [CameraRig] 和 [SteamVR] ,将它们拖到结构窗口:
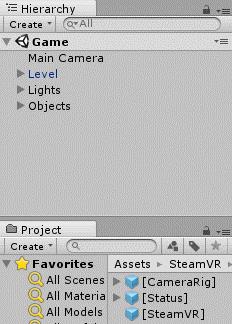
[SteamVR] 负责几件事情。它在玩家打开系统菜单并将物理刷新率和绘图系统进行同步时让游戏自动暂停。它还负责处理“房间规模 VR 动作”的平滑。在检视器面板中查看属性:

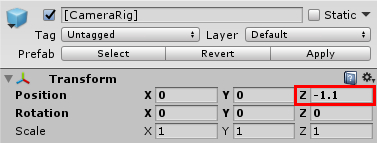
[CameraRig] 更有趣,因为它控制着 Vive 头盔和控制器。选择 [CameraRig] ,在检视器面板中设置它的位置为 (X:0, Y:0, Z:-1.1),将摄像机放到桌子后面。
从结构视图中删除主摄像,因为这会干扰 [CameraRig] 和它的相机。
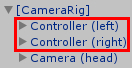
打开手柄,查看屏幕。拿起手柄,四处移动。你会看到在场景视图中看到虚拟手柄也会随之移动:
当 SteamVR 插件检测到手柄,它会创建出虚拟手柄。虚拟手柄被映射为 [CameraRig] 的子节点:
现在——继续在场景视图中——从结构视图中选择 Camera(eye),小心地拿起你的头盔显示器的顶部皮带,移动并微微旋转,同时观察场景视图:
摄像机和头盔显示器是连接在一起的,它会准确地捕获头盔的移动。
现在将头盔显示器戴到头上,拿起手柄,在房间里四处走动感受一下。
如果你想和物体进行交互,那么你会大失所望——什么也不会发生。要添加运动跟踪之外的功能,需要编写一点脚本。
处理输入
拿起一只手柄,仔细观察。每个控制器上有这些按钮:
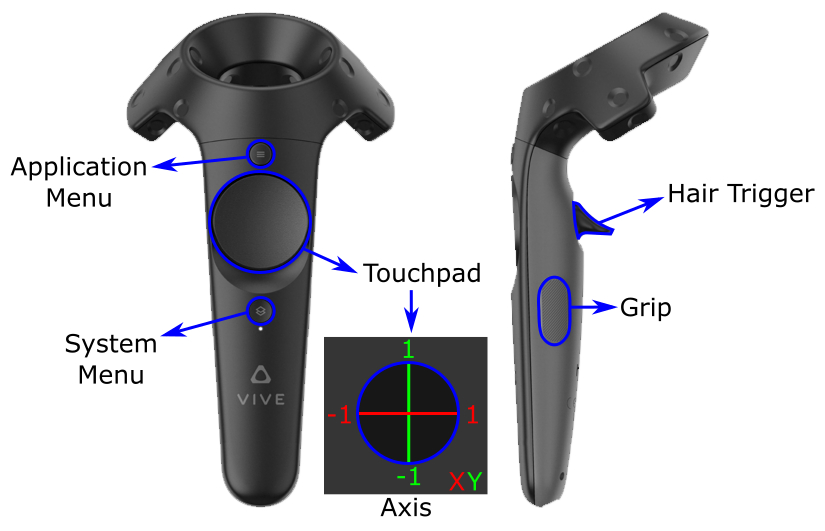
Touchpad 既是可以做模拟摇杆也可以当做按钮。当移动或旋转手柄时,手柄会有速度和旋转速度感应,当和物体交互时这会非常有用。
让我们来编写一些代码!在 Scripts 文件夹中创建一个新的 C# 脚本,取名为 ViveControllerInputTest 然后用任意代码编辑器打开它。
删除 Start() 方法,在 Update() 方法之上添加下列代码:
                                //
                                 1
                                private
                                 SteamVR_TrackedObject trackedObj;

                                //
                                 2
                                private
                                 SteamVR_Controller.Device Controller
{

                                get { return SteamVR_Controller.Input((int)trackedObj.index); }
}
在这里进行了如下操作:
- 对正在被跟踪的对象进行一个引用。在这里,也就是一只手柄。
- Device 属性能够很方便地访问到这个手柄。通过所跟踪的对象的索引来访问控制器的 input,并返回这个 input。
头盔和手柄都是被跟踪的对象——他们在真实事件中的移动和旋转都会被 HTC Vive 跟踪到并传递到虚拟世界。
在 Update() 方法上方添加方法:
                                    void
                                     Awake()
{
    trackedObj = GetComponent<SteamVR_TrackedObject>();
}
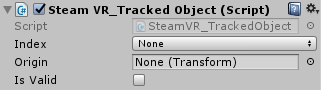
当脚本加载时,trackedObj 会被赋值为 SteamVR_TrackedObject 对象,这个对象和手柄是关联的:
现在你已经能够访问手柄了,你可以读取到它的输入。在 Update() 方法中添加:
                                                //
                                                 1
                                                if (Controller.GetAxis() != Vector2.zero)
{
    Debug.Log(gameObject.name + Controller.GetAxis());
}

// 2if (Controller.GetHairTriggerDown())
{
    Debug.Log(gameObject.name + " Trigger Press");
}

// 3if (Controller.GetHairTriggerUp())
{
    Debug.Log(gameObject.name + " Trigger Release");
}

// 4if (Controller.GetPressDown(SteamVR_Controller.ButtonMask.Grip))
{
    Debug.Log(gameObject.name + " Grip Press");
}

// 5if (Controller.GetPressUp(SteamVR_Controller.ButtonMask.Grip))
{
    Debug.Log(gameObject.name + " Grip Release");
}
上述代码包含了所有当玩家在 VR 中时你够访问到大部分方法。它将 GameObject 的名字输出到控制台,以便区分左右手柄。代码的解释如下:
- 获取手指在 touchpad 上的位置并输出到控制台。
- 当你按下扳机时,这会打印到控制台。扳机有一个专门的方法用于判断它是否被按下:GetHairTrigger(), GetHairTriggerDown() 和 GetHairTriggerUp()。
- 如果松开扳机,这会打印到控制台。
- 如果按下抓取(grip)键,这会打印到控制台。GetPressDown 方法是用于判断某个按钮已经被按下的标准方法。
- 如果释放抓取键,这会打印到控制台。GetPressUp 方法是用于判断某个按钮是否已经被释放的标准方法。
来测试一下脚本。保存脚本,返回 Unity 编辑器。
在结构视图中选中两个手柄,拖动刚才创建的脚本到检视器中,为它们添加 ViveControllerInputTest 组件
再次运行游戏,拿起两只手柄,观察控制台中的输出:
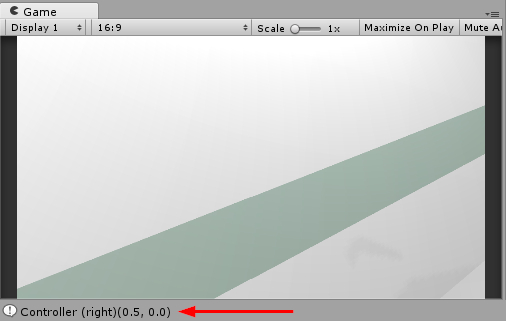
按下按钮,扳机并在 touchpad 上滑动,你会看到控制台会输出每个我们注册的动作:

这仅仅是最基本的输入。现在我们可以将虚拟世界操纵在我的手心了——差不多这个意思啦!
在物理对象上应用手柄
VR 提供了许多我们在真实世界中不可能实现的能力,比如捡起一个物体,查看它们并扔到地上,不需要你负责清理。
通过使用触发器碰撞机和编写少量脚本,HTC Vive 能够创建后顾无忧的虚拟体验。
在结构视图中选中两个手柄,为它们添加刚性体。(Add Component > Physics > Rigidbody)
勾上 Is Kinematic,反选 Use Gravity:
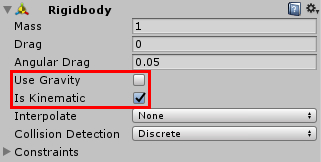
为两个手柄添加一个盒子碰撞体 (Add Component > Physics > Box Collider) 并勾上 Is Trigger。
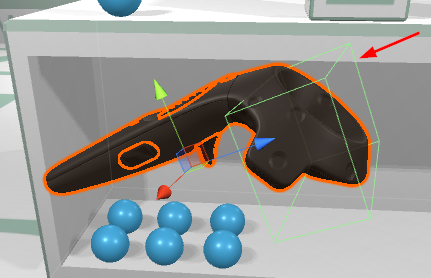
默认的碰撞体有点大,我们需要重新指定大小和位置。设置中心为 (X:0, Y:-0.04, Z:0.02),大小为 (X:0.14, Y:0.07, Z:0.05)。这里需要将值精确到两位数,否则都会影响到手柄的最终效果。

运行游戏,从结构视图中选择一只手柄,并拿起真正的手柄。观察场景视图,然后将焦点置于你正在拿着的那只手柄上(按F)。将碰撞体正好放在手柄的顶端部分,这个部分是你用于抓握物体的地方。
不编写脚本,碰撞体仅仅是一个无用的方块——在 Scripts 文件夹中创建一个新脚本,取名为 ControllerGrabObject 然后打开它。、
删除 Start() 方法并在这里添加这段你已经熟悉的代码:
                                                private
                                                 SteamVR_TrackedObject trackedObj;


                                                private
                                                 SteamVR_Controller.Device Controller
{

                                                get { return SteamVR_Controller.Input((int)trackedObj.index); }
}

void Awake()
{
    trackedObj = GetComponent<SteamVR_TrackedObject>();
}
这段代码和你在输入测试中的代码是一样的。这里获取了手柄,然后保存到一个变量中以备后用。
在 trackedObj 下面添加变量:
                                                    private
                                                     GameObject collidingObject;

                                                    //
                                                     2
                                                    private GameObject objectInHand;
这两个变量的作用分别是:
- 一个 GameObject,用于保存当前与之碰撞的触发器(trigger),这样你才能抓住这个对象。
- 一个 GameObject,用于保存玩家当前抓住的对象。
在 Awake() 方法后添加:
                                                        private
                                                        void
                                                         SetCollidingObject(Collider col)
{

                                                        //
                                                         1
                                                        if (collidingObject || !col.GetComponent<Rigidbody>())
    {
        return;
    }
    // 2
    collidingObject = col.gameObject;
}
这个方法接受一个碰撞体作为参数,并将它的 GameObject 保存到 collidingObject 变量,以便抓住和释放这个对象。同时:
- 如果玩家已经抓着某些东西了,或者这个对象没有一个刚性体,则不要将这个 GameObject 作为可以抓取目标。
- 将这个对象作为可以抓取的目标。
现在,添加触发器方法:
                                                            //
                                                             1
                                                            public
                                                            void
                                                             OnTriggerEnter(Collider other)
{
    SetCollidingObject(other);
}


                                                            //
                                                             2
                                                            public
                                                            void
                                                             OnTriggerStay(Collider other)
{
    SetCollidingObject(other);
}


                                                            //
                                                             3
                                                            public
                                                            void
                                                             OnTriggerExit(Collider other)
{

                                                            if (!collidingObject)
    {
        return;
    }

    collidingObject = null;
}、
当触发器碰撞体进入、退出另一个碰撞体时,这些方法将被触发。
- 当触发器碰撞体进入另一个碰撞体时,将另一个碰撞体作为可以抓取的目标。
- 和第一段类似(第一段注释 //1),但不同的是玩家已经将手柄放在一个对象上并持续一段时间。如果没有这段代码,碰撞会失败或者会导致异常。
- 当碰撞体退出一个对象,放弃目标,这段代码会将 collidingObject 设为 null 以删除目标对象。
下面的代码用于抓住一个对象:
                                                                private
                                                                void
                                                                 GrabObject()
{

                                                                //
                                                                 1
    objectInHand = collidingObject;
    collidingObject = null;
    // 2var joint = AddFixedJoint();
    joint.connectedBody = objectInHand.GetComponent<Rigidbody>();
}

// 3private FixedJoint AddFixedJoint()
{
    FixedJoint fx = gameObject.AddComponent<FixedJoint>();
    fx.breakForce = 20000;
    fx.breakTorque = 20000;
    return fx;
}
在这里,我们:
- 在玩家手中的 GameObject 转移到 objectInHand 中,将 collidingObject 中保存的 GameObject 移除。
- 添加一个连接对象,调用下面的 FixedJoint 方法将手柄和 GameObject 连接起来。
- 创建一个固定连接并加到手柄中,并设置连接属性,使它坚固,不那么容易断裂。最后返回这个连接。
被抓住的东西也要能够被放下。下面的代码放下一个物体:
                                                                    private
                                                                    void
                                                                     ReleaseObject()
{

                                                                    //
                                                                     1
                                                                    if (GetComponent<FixedJoint>())
    {
        // 2
        GetComponent<FixedJoint>().connectedBody = null;
        Destroy(GetComponent<FixedJoint>());
        // 3
        objectInHand.GetComponent<Rigidbody>().velocity = Controller.velocity;
        objectInHand.GetComponent<Rigidbody>().angularVelocity = Controller.angularVelocity;
    }
    // 4
    objectInHand = null;
}
这段代码将被抓对象的固定连接删除,并在玩家扔出去时控制它的速度和角度。这里关键的是手柄的速度。如果没有这个,扔出的东西会直直地往下掉,不管你用多大的力扔它。相信我,这绝对是错误的。
代码解释如下:
- 确定控制器上一定有一个固定连接。
- 删除这个连接上所连的对象,然后销毁这个连接。
- 将玩家放开物体时手柄的速度和角度赋给这个物体,这样会形成了一个完美的抛物线。
- 将 objectInHand 变量置空。
最后,在 Update() 方法中添加代码以处理手柄的输入:
                                                                        //
                                                                         1
                                                                        if
                                                                         (Controller.GetHairTriggerDown())
{

                                                                        if
                                                                         (collidingObject)
    {
        GrabObject();
    }
}


                                                                        //
                                                                         2
                                                                        if
                                                                         (Controller.GetHairTriggerUp())
{

                                                                        if
                                                                         (objectInHand)
    {
        ReleaseObject();
    }
}
- 当玩家按下扳机,同时手上有一个可以抓取的对象,则将对象抓住。
- 当玩家松开扳机,同时手柄上连接着一个物体,则放开这个物体。
相信你已经迫不及待地想试一把了吧?保存脚本,退出编辑器。
在结构视图中选中手柄,将新脚本拖到检视器中将它添加为一个组件。

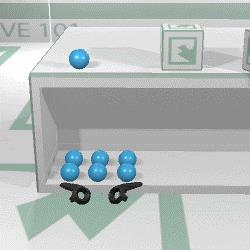
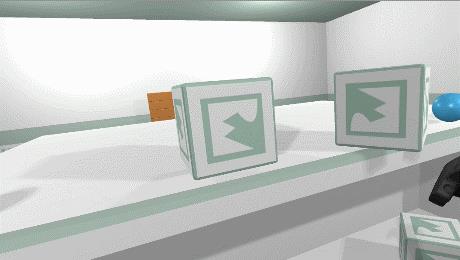
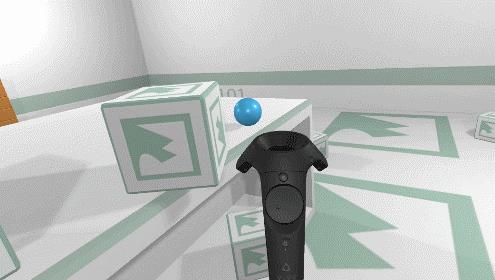
开心的时候来了!打开你的手柄,运行游戏,戴上头盔。按下扳机,抓起几个方块或者圆球,扔出去。你可能需要适应一下。
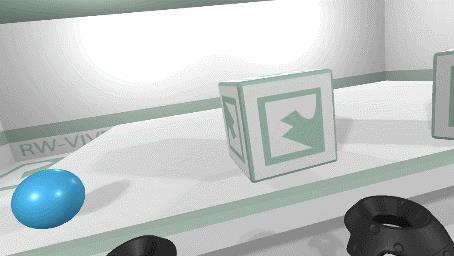
你不得不佩服你自己——你真的很棒!但我觉得你应该让你的 VR 体验变得更好!
制作一只激光笔
因为种种原因,激光笔在 VR 世界中非常有用。你可以用它们去戳破虚拟气球,做瞄准具使用或者调戏虚拟猫咪。
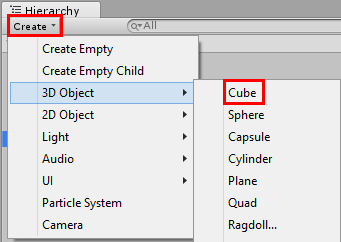
创建激光笔非常简单。只需要一个方块和一个脚本。在结构视图中创建一个方块 (Create > 3D Object > Cube)。
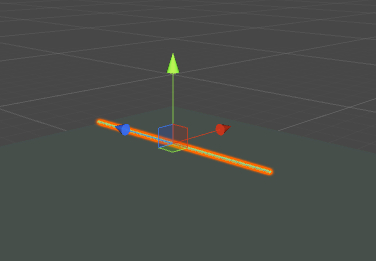
为它取名 Laser,设置它的位置为 (X:0, Y:5, Z:0),缩放为 (X:0.005, Y:0.005, Z:0) ,并去掉 Box Collider 组件。
让它居中,你会看到他漂浮在其他对象之上:
激光不可能有阴影,它们只会有一种颜色,因此我们可以用一个不反光材质实现这个效果。
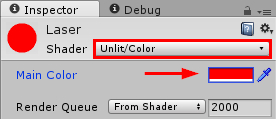
在 Materials 文件夹下创建一个新材质,取名为 Laser,修改它的着色器为 Unlit/Color ,设置它的 Main Color 为大红色:
通过将材质拖到场景视图的 Laser 上即可分配新材质。当然,也可以将材质拖到结构视图的 Laser 上。

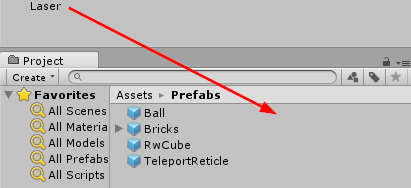
最后,将 Laser 拖到 Prefabs 文件夹,然后从结构视图中删掉 Laser 对象。
现在,在 Scripts 文件夹下创建一个新脚本,名为 LaserPointer,并打开它。添加你早已熟悉的代码:
                                    private
                                     SteamVR_TrackedObject trackedObj;


                                    private
                                     SteamVR_Controller.Device Controller
{

                                    get { return SteamVR_Controller.Input((int)trackedObj.index); }
}

void Awake()
{
    trackedObj = GetComponent<SteamVR_TrackedObject>();
}
在 trackedObj 下面添加变量:
                                        //
                                         1
                                        public
                                         GameObject laserPrefab;

                                        //
                                         2
                                        private
                                         GameObject laser;

                                        //
                                         3
                                        private
                                         Transform laserTransform;

                                        //
                                         4
                                        private Vector3 hitPoint;
- 这个变量用于引用 Laser 预制件。
- 这个变量用于引用一个 Laser 实例。
- 一个 Transform 组件,方便后面适用。
- 激光击中的位置。
用这个方法显示一束激光:
                                            private
                                            void
                                             ShowLaser(RaycastHit hit)
{

                                            //
                                             1
    laser.SetActive(true);
    // 2
    laserTransform.position = Vector3.Lerp(trackedObj.transform.position, hitPoint, .5f);
    // 3    laserTransform.LookAt(hitPoint);
    // 4
    laserTransform.localScale = new Vector3(laserTransform.localScale.x, laserTransform.localScale.y,
        hit.distance);
}
这个方法使用一个 RaycastHit 作为参数,因为它会包含被击中的位置和射击的距离。
代码解释如下:
- 显示激光。
- 激光位于手柄和投射点之间。我们可以用 Lerp 方法,这样我们只需要给它两个端点,以及一个距离百分比即可。如果我们设置这个百分比为 0.5,也就是 50%,这会返回一个中点的位置。
- 将激光照射到 hitPoint 的位置。
在 Update() 方法中添加下列代码,获得玩家的输入:
                                                //
                                                 1
                                                if
                                                 (Controller.GetPress(SteamVR_Controller.ButtonMask.Touchpad))
{
    RaycastHit hit;


                                                //
                                                 2
                                                if (Physics.Raycast(trackedObj.transform.position, transform.forward, out hit, 100))
    {
        hitPoint = hit.point;
        ShowLaser(hit);
    }
}
else// 3{
    laser.SetActive(false);
}
- 如果 touchpad 被按下…
- 从手柄发射激光。如果激光照射到某样物体,保存射到的位置并显示激光。
- 当玩家放开 touchpad,隐藏激光。
在空的 Start() 方法中添加代码:
                                                    //
                                                     1
laser = Instantiate(laserPrefab);
// 2
laserTransform = laser.transform;
- 制造出一束新的激光,然后保存一个它的引用。
- 保存激光的 transform 组件。
保存脚本,返回编辑器。在结构视图中选中两个手柄,将激光的脚本拖进检视器中以添加一个组件。
现在从 Prefabs 文件夹中将 Laser 预制件拖到检视器的 Laser 栏中:
保存项目,重新运行游戏。拿起手柄,戴上头盔,按下 touchpad,激光出现了:
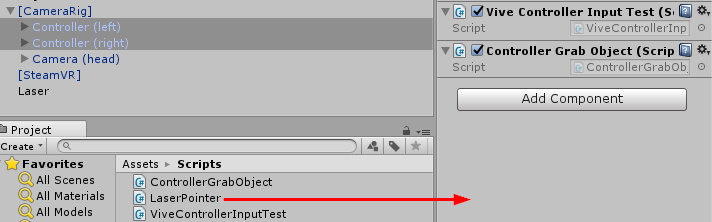
在继续之前,右击输入测试组件,选择 Remove Component,从手柄中删除它们。
之所以要删除输入测试组件,因为会在绘制每一帧时向控制台中输出字符串。这会影响性能,在 VR 中每毫秒都会受影响。为了方便测试我们可以这样做,但在真正的游戏中这是不应该的。
接下来是通过激光在房间中进行瞬移!
移动
在 VR 中移动不像驱使玩家前进那么简单,这样做会极易引起玩家眩晕。更可行的办法是使用瞬移。
从玩家的视觉感知来说,宁可接收位置的突然改变,而不是渐进式的改变。在 VR 设备中轻微的改变都会让你的速度感和平衡感彻底失控,还不如直接让你来到一个新的地方。
要显示你最终位于什么地方,你你可以使用 Prefabs 文件夹中的大头钉或标记。
标记是一个简单的、不反光的圆环:

要使用标记,你需要修改 LaserPointer 脚本,打开这个脚本,在类声明中添加变量:
                                //
                                 1
                                public
                                 Transform cameraRigTransform;

                                //
                                 2
                                public
                                 GameObject teleportReticlePrefab;

                                //
                                 3
                                private
                                 GameObject reticle;

                                //
                                 4
                                private
                                 Transform teleportReticleTransform;

                                //
                                 5
                                public
                                 Transform headTransform;

                                //
                                 6
                                public
                                 Vector3 teleportReticleOffset;

                                //
                                 7
                                public
                                 LayerMask teleportMask;

                                //
                                 8
                                private
                                bool shouldTeleport;
每个变量的用途如下:
- 这是 [CameraRig] 的 transform 组件。
- 一个对传送标记预制件的引用。
- 一个传送标记实例的引用。
- 一个传送标记的 transform 的引用。
- 玩家的头(摄像机)的引用。
- 标记距离地板的偏移,以防止和其他平面发生“z-缓冲冲突”。
- 一个层遮罩,用于过滤这个地方允许什么东西传送。
- 如果为 true,表明找到一个有效的传送点。
在 Update() 方法中,将这一句:
if (Physics.Raycast(trackedObj.transform.position, transform.forward, out hit, 100))
替换为这句,以便将 LayerMask 加入到判断中:
if (Physics.Raycast(trackedObj.transform.position, transform.forward, out hit, 100, teleportMask))
这确保激光只能点到你能够传送过去的 GameObjects 上。
仍然在 Update() 方法中,在 ShowLaser() 一句后添加:
                                    //
                                     1
reticle.SetActive(true);
// 2
teleportReticleTransform.position = hitPoint + teleportReticleOffset;
// 3
shouldTeleport = true;
代码解释如下:
- 显示传送标记。
- 移动传送标记到激光点到的地方,并添加一个偏移以免 z 缓冲冲突。
- 将 shouldTeleport 设为 true,表明找到了一个有效的瞬移位置。
仍然在 Update 方法,找到 laser.SetActive(false); 一句,在后面添加:
reticle.SetActive(false);
如果目标地点无效,隐藏传送标记。
添加下列方法,进行传送:
                                            private
                                            void
                                             Teleport()
{

                                            //
                                             1
    shouldTeleport = false;
    // 2
    reticle.SetActive(false);
    // 3
    Vector3 difference = cameraRigTransform.position - headTransform.position;
    // 4
    difference.y = 0;
    // 5
    cameraRigTransform.position = hitPoint + difference;
}
真正的传送只需要 5 行代码吗?让我们解释一下:
- 将 shouldTeleport 设为 false。表明传送进行中。
- 隐藏传送标记。
- 计算从玩家头盔到摄像机中心的坐标偏移。
- 将这个差中的 y 坐标设置为0,因为我们不考虑玩家头部有多高。
- 移动相机到照射点加上所算出来的坐标偏移。如果不加上这个偏移,玩家会传送到一个错误的地方。看下面的例子:

看到了没有,这个偏移起到了一个关键的作用,让我们精确地定位摄像机的位置并将玩家放到他们想去的地方。
在 Update() 的检查 touchpad 按键的 if else 语句之外添加代码:
                                if (Controller.GetPressUp(SteamVR_Controller.ButtonMask.Touchpad) && shouldTeleport)
{
    Teleport();
}
如果玩家松开 touchpad,同时传送位置有效的话,对玩家进行传送。
最后,在 Start() 方法中添加代码:
                                    //
                                     1
reticle = Instantiate(teleportReticlePrefab);
// 2
teleportReticleTransform = reticle.transform;
- 创建一个标记点,并将它保存到 reticle 变量。
- 保存 reticle 的 transform 组件。
保存脚本,返回 Unity。
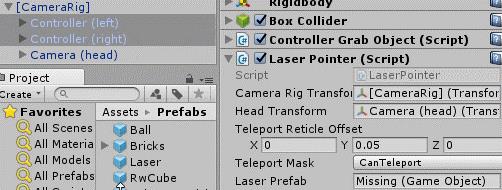
在结构视图中选中两个手柄,会发现多了几个新字段:
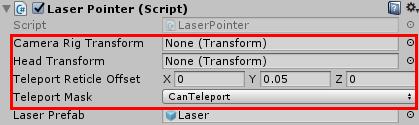
将 [CameraRig] 拖到 Camera Rig Transform 栏,将 TeleportReticle 从 Prefabs 文件夹拖到 Teleport Reticle Transform 栏,将 Camera (head) 拖到 Head Transform 栏。
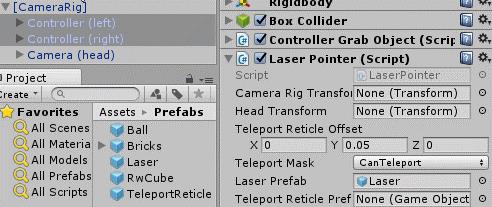
将 Teleport Reticle Offset 设为 (X:0, Y:0.05, Z:0) ,Teleport Mask 设为 CanTeleport。CanTeleport 不是默认层— 它是专门为这个教程创建的。这个层里面只有 Floor 和 Table 对象。
现在运行游戏,用激光照射在地板上进行瞬移。
原文:https://www.cnblogs.com/zpy1993-09/p/14848619.html
内容总结
以上是互联网集市为您收集整理的Unity3D HTC 完整开发过程详解全部内容,希望文章能够帮你解决Unity3D HTC 完整开发过程详解所遇到的程序开发问题。 如果觉得互联网集市技术教程内容还不错,欢迎将互联网集市网站推荐给程序员好友。
内容备注
版权声明:本文内容由互联网用户自发贡献,该文观点与技术仅代表作者本人。本站仅提供信息存储空间服务,不拥有所有权,不承担相关法律责任。如发现本站有涉嫌侵权/违法违规的内容, 请发送邮件至 gblab@vip.qq.com 举报,一经查实,本站将立刻删除。
内容手机端
扫描二维码推送至手机访问。
来源:【匿名】