unity3d 学习笔记_____Native2d 刚体、冲击、联合使用
内容导读
互联网集市收集整理的这篇技术教程文章主要介绍了unity3d 学习笔记_____Native2d 刚体、冲击、联合使用,小编现在分享给大家,供广大互联网技能从业者学习和参考。文章包含2922字,纯文字阅读大概需要5分钟。
内容图文

|
|
|
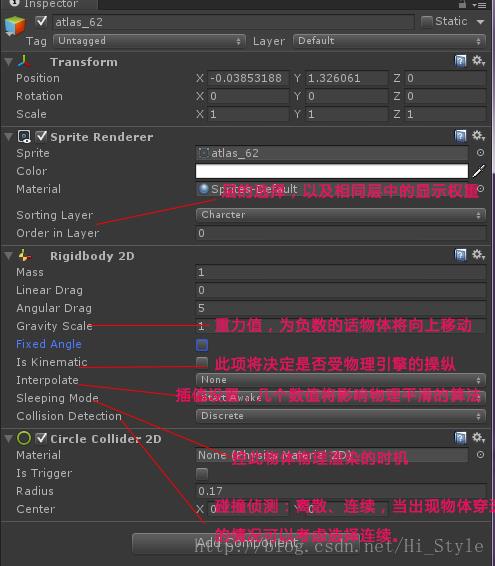
| Mass | Mass of the rigidbody. |
| Linear Drag | Drag coefficient affecting positional movement. |
| Angular Drag | Drag coefficient affecting rotational movement. |
| Gravity Scale | Degree to which the object is affected by gravity. |
| Fixed Angle | Can the rigidbody rotate when forces are applied? |
| Is Kinematic | Is the rigidbody moved by forces and collisions? |
| Interpolate | How the object‘s movement is interpolated between physics updates (useful when motion tends to be jerky). |
| None | No movement smoothing is applied. |
| Interpolate | Movement is smoothed based on the object‘s positions in previous frames. |
| Extrapolate | Movement is smoothed based on an estimate of its position in the next frame. |
| Sleeping Mode | How the object "sleeps" to save processor time when it is at rest. |
| Never Sleep | Sleeping is disabled. |
| Start Awake | Object is initially awake. |
| Start Asleep | Object is initially asleep but can be woken by collisions. |
| Collision Detection | How collisions with other objects are detected. |
| Discrete | A collision is registered only if the object‘s collider is in contact with another during a physics update. |
| Continuous | A collision is registered if the object‘s collider appears to have contacted another between updates. |
碰撞器Collider 分为两种:
(1)刚体碰撞
(2) 触发碰撞、会穿透其它刚体
相应Collider组件中的is Trigger,两种都会产生碰撞事件
	void OnCollisionEnter2D(Collision2D cod)
	{
		print (cod.gameObject.name);
		if(cod.rigidbody)
		cod.rigidbody.AddForce(new Vector2(0,500f));
	}
	void OnTriggerEnter2D(Collider2D other)
	{
		Destroy(other.gameObject);
	}
两个方法都属于MonoBehaviour的Message 回调方法,注意区分它们的參数类型是不同的
另外还有 OnTriggerExit2D、OnTriggerStay2D、 OnCollisionExit2D、OnCollisionStay2D
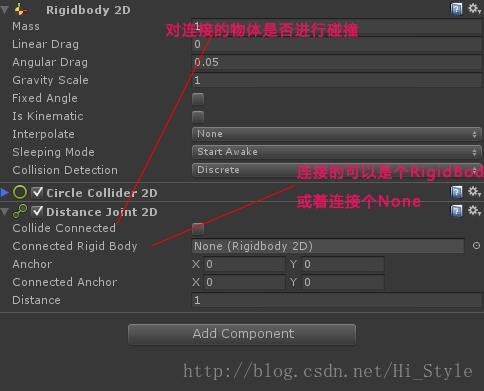
关节的使用:

SpringJoint和DistantanceJoint有点类似多了弹性參数和频率设置(在unity中临时没看出效果)
hingeJoint 能够理解为一个环绕Z轴旋转的关节,能够设置响应moto、以及角度的限制
sliderJoint 滑动关节类似hingeJoint 以一个角度值设置Moto进行滑动,能够对距离(translation)进行限制
以下是一个用HingeJoint做的一个demo:

两仅仅小鸟同一时候加入HingeJoint 连接到盒子。后面的小鸟加下下面脚本控制方向键盘就可以前后运动
using UnityEngine;
using System.Collections;

[RequireComponent(typeof(HingeJoint2D))]
public class MotoControl : MonoBehaviour {

	public float MotoSpeed = 0;
	private JointMotor2D motor;
	HingeJoint2D hj;

	// Use this for initialization
	void Start () {
		hj = GetComponent<HingeJoint2D>();
		motor = hj.motor;
		hj.useMotor = true;
		motor = hj.motor;
		motor.motorSpeed = MotoSpeed;
		motor.maxMotorTorque = 10000;
	}

	// Update is called once per frame
	void Update () {
		motor.motorSpeed = Input.GetAxis("Horizontal") * MotoSpeed;
		hj.motor = motor;
	}
}
做Demo时遇到的问题:
(1)刚開始用hj.motor.motorSpeed一直报错,后来分两步写最终没问题
motor = hj.motor;
motor.motorSpeed = MotoSpeed;
(2)错是没了,但是小车还是不走,最后知道还须要把motor对象又一次赋给HingeJoint
motor.motorSpeed = Input.GetAxis("Horizontal") * MotoSpeed;
hj.motor = motor;
其它一些经常使用的属性:
breakForce、breakTorque分别设定多大力、多大扭矩能给丫的拆了
connectedBody 连接的另外一个刚体的引用 (Joint2D中不存在)
hj.connectedBody = null;连接到一个空对象上
要想断开关节直接去掉关节组件 destroy(hj);
断开将发送 OnJointBreak Message.
版权声明:本文博客原创文章。博客,未经同意,不得转载。
原文:http://www.cnblogs.com/bhlsheji/p/4743235.html
内容总结
以上是互联网集市为您收集整理的unity3d 学习笔记_____Native2d 刚体、冲击、联合使用全部内容,希望文章能够帮你解决unity3d 学习笔记_____Native2d 刚体、冲击、联合使用所遇到的程序开发问题。 如果觉得互联网集市技术教程内容还不错,欢迎将互联网集市网站推荐给程序员好友。
内容备注
版权声明:本文内容由互联网用户自发贡献,该文观点与技术仅代表作者本人。本站仅提供信息存储空间服务,不拥有所有权,不承担相关法律责任。如发现本站有涉嫌侵权/违法违规的内容, 请发送邮件至 gblab@vip.qq.com 举报,一经查实,本站将立刻删除。
内容手机端
扫描二维码推送至手机访问。