[Unity 设计模式]桥接模式(BridgePattern)
内容导读
互联网集市收集整理的这篇技术教程文章主要介绍了[Unity 设计模式]桥接模式(BridgePattern),小编现在分享给大家,供广大互联网技能从业者学习和参考。文章包含7113字,纯文字阅读大概需要11分钟。
内容图文
")
1.前言
继上一讲IOC模式的基础上继续本讲桥接模式,笔者感觉桥接模式是23种设计模式中桥接模式是最好用但也是最难理解的设计模式之一,23中设计模式就好武侠剧中一本武功秘籍,我们在工作过程中想要熟练运用其中的每一种设计模式就好比跟高手过招想要能运用好武侠秘籍中的每一招每一式,并且能随着对手出招的不同我们能随机应变对应的招数,这就要求我们对每一种设计模式都理解的非常深刻才能运用自如,打出组合拳的效果。
2.需求
我们在FPS类游戏中会碰到这样的需求——实现武器和角色,无论是敌人还是我方角色都能通过不同的武器击杀对方,武器有手枪、散弹枪、以及火箭炮,并以”攻击力”和”攻击距离”来区分他们的威力。我们可能会这样实现: 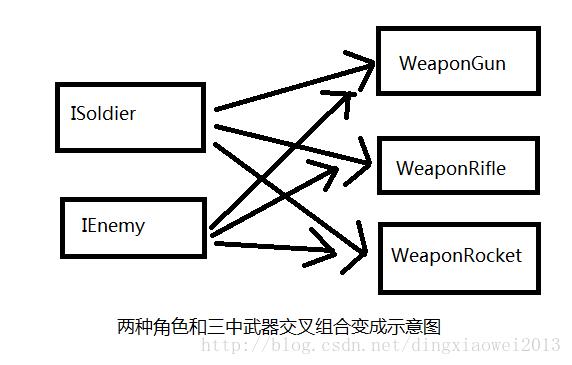
上面是我们的一个UML示例图,这里笔者很惭愧没用过UML专业的绘图工具,就临时用绘图软件简单的画了一下。下面就是我们的初步设计代码。
- 角色基类
            public
            abstract
            class
             ICharacter
{

            //
            拥有一把武器
            protected Weapon m_Weapon = null;
    //攻击目标publicabstractvoid Attack(ICharacter target);
}
- 武器类
            using
             UnityEngine;


            public
            enum
             ENUM_Weapon
{
    Null = 0,
    Gun,
    Rifle,
    Rocket,
}

publicclass Weapon
{
    protected ENUM_Weapon m_EmEwapon = ENUM_Weapon.Null;
    protectedint m_AtkValue = 0;//攻击力protectedint m_AtkRange = 0;//攻击距离protectedint m_AtkPlusValue = 0;//额外加成public Weapon(ENUM_Weapon type, int atkValue, int atkRange)
    {
        m_EmEwapon = type;
        m_AtkValue = atkValue;
        m_AtkRange = atkRange;
    }

    public ENUM_Weapon GetWeaponType()
    {
        return m_EmEwapon;
    }

    publicvoid Fire(ICharacter target)
    {
        //
    }

    publicvoid SetAtkPlusValue(int atkPlusValue)
    {
        m_AtkPlusValue = atkPlusValue;
    }

    publicvoid ShowBulletEffect(Vector3 targetPosition, float lineWidth, float displayTime)
    {

    }

    publicvoid ShowShootEffect()
    {

    }

    publicvoid ShowSoundEffect(string clipName)
    {

    }
}
- 敌人使用武器
            using
             System.Collections;

            using
             System.Collections.Generic;

            using
             UnityEngine;


            public
            class
             IEnemy : ICharacter
{

            public
             IEnemy()
    { }


            public
            override
            void
             Attack(ICharacter target)
    {
        m_Weapon.ShowShootEffect();

            int atkPlusValue = 0;
        switch(m_Weapon.GetWeaponType())
        {
            case ENUM_Weapon.Gun:
                //显示武器特效
                m_Weapon.ShowBulletEffect(target.GetPosition(), 0.3f, 0.2f);
                m_Weapon.ShowSoundEffect("GunShot");
                atkPlusValue = GetAtkPluginValue(5, 20);
                break;
            case ENUM_Weapon.Rifle:
                m_Weapon.ShowBulletEffect(target.GetPosition(), 0.4f, 0.2f);
                m_Weapon.ShowSoundEffect("GunShot");
                atkPlusValue = GetAtkPluginValue(5, 20);
                break;
            case ENUM_Weapon.Rocket:
                m_Weapon.ShowBulletEffect(target.GetPosition(), 0.5f, 0.2f);
                m_Weapon.ShowSoundEffect("GunShot");
                atkPlusValue = GetAtkPluginValue(5, 20);
                break;
        }
        m_Weapon.SetAtkPlusValue(atkPlusValue);
        m_Weapon.Fire(target);
    }
    privateint GetAtkPlusValue(int rate, int atkValue)
    {
        int randValue = UnityEngine.Random.Range(0, 100);
        if (rate > randValue)
            return atkValue;
        return0;
    }
}
- 玩家使用武器
            using
             System.Collections;

            using
             System.Collections.Generic;

            using
             UnityEngine;


            public
            class
             ISoldier : ICharacter
{

            public
             ISoldier()
    {

    }


            public
            override
            void
             Attack(ICharacter target)
    {
        m_Weapon.ShowShootEffect();

            switch
            (m_Weapon.GetWeaponType())
        {

            case
             ENUM_Weapon.Gun:
                m_Weapon.ShowBulletEffect(target.GetPosition(),
            0.03f, 0.2f);
                m_Weapon.ShowSoundEffect("GunShot");
                break;
            case ENUM_Weapon.Rifle:
                m_Weapon.ShowBulletEffect(target.GetPosition(), 0.5f, 0.2f);
                m_Weapon.ShowSoundEffect("RifleShot");
                break;
            case ENUM_Weapon.Rocket:
                m_Weapon.ShowBulletEffect(target.GetPosition(), 0.8f, 0.2f);
                m_Weapon.ShowSoundEffect("RocketShot");
                break;
        }
        m_Weapon.Fire(target);
    }
}
3.初步分析
以上实现存在明显两个缺点:
- 每当添加一个角色时,继承自ICharacter接口的角色重新定义Attack都必须针对不同的武器进行判断,并且要写重复的相同的代码。
- 每当新增武器时,所有角色的Attack都需要重新改造,这样增加维护成本。
为了解决以上问题,下面我们桥接模式隆重登场了!
4.桥接模式
桥接模式(Bridge Pattern):桥接模式的用意是将抽象化(Abstraction)与实现化(Implementation)脱耦,使得二者可以独立地变化。
以上是桥接模式的官方定义,我们还是通过以上例子来理解分析,”桥接”顾名思义就是这一组跟那一组两组对象通过某种中间关系链接在一起。”当两个群组因为功能上的需求,想要进行链接合作,但又希望两组类可以自行发展互相不受对方变化而影响”,上面角色跟武器的实现案例,武器和角色分别是两组群组,其实上面的实现只是考虑了角色通过子类通过基类继承来实现,然后传入武器对象,这中实现思路有点上一讲介绍的控制反转的味道,那既然角色可以这样设计,为何不把武器也这样设计呢,然后两个群组之间就通过两个群组的接口来实现,就好比两家结婚,双方都有一个媒人来传递信息,这是我对桥接模式的理解,哈哈。基于这种想法,我们来改造一下角色和武器的实现。 
说明:
- ICharacter:角色的抽象接口拥有一个IWeapon的对象引用,并在接口中申明了一个武器攻击目标WeaponAttackTarget()方法让子类可以调用,同时要求继承子类必须在Attack()中重新实现攻击目标的功能。
- ISoldier、IEnemy:双方阵容单位实现攻击目标Attack()时,只需要调用父类的WeaponAttackTarget方法就可以使用当前武器攻击对手。
- IWeapon:武器接口,定义游戏中对于武器的操作和使用方法。
- WeaponGun、WeaponRifle、WeaponRocket:游戏中可以使用三中武器对象。
5.桥接模式实现武器和角色功能
- 武器接口
            using
             System.Collections;

            using
             System.Collections.Generic;

            using
             UnityEngine;


            public
            abstract
            class
             IWeapon
{

            //
            属性
            protected
            int m_AtkPlusValue = 0;
    protectedint m_Atk = 0;
    protectedfloat m_Range = 0;

    protected GameObject m_GameObject = null;
    protected ICharacter m_WeaponOwner = null;//武器拥有者

    //发射特效protectedfloat m_EffectDisplayTime = 0;
    protected ParticleSystem m_Particles;
    protected AudioSource m_Audio;

    //显示子弹特效protectedvoid ShowBulletEffect(Vector3 targetPosition, float disPlayTime)
    {
        m_EffectDisplayTime = disPlayTime;
    }

    //显示枪口特效protectedvoid ShowShootEffect()
    {
        if(m_Particles != null)
        {
            m_Particles.Stop();
            m_Particles.Play();
        }
    }

    //显示音效protectedvoid ShowSoundEffect(string clipName)
    {
        if (m_Audio == null)
            return;
        IAssetFactory factory = Factory.GetAssetFactory();
        var clip = factory.LoadAudioClip(clipName);
        if (clip == null)
            return;
        m_Audio.clip = clip;
        m_Audio.Play();
    }

    //攻击目标publicabstractvoid Fire(ICharacter target);
}
- 手枪武器的实现
            public
            class
             WeaponGun:IWeapon
{

            public
             WeaponGun()
    {

    }


            public
            override
            void
             Fire(ICharacter target)
    {
        ShowShootEffect();
        ShowBulletEffect(target.GetPosition(),
            0.3f, 0.2f);
        ShowSoundEffect("GunShot");

        target.UnderAttack(m_WeaponOwner);
    }
}
其他武器同理…
- 角色接口
            using
             System.Collections;

            using
             System.Collections.Generic;

            using
             UnityEngine;


            public
            abstract
            class
             ICharacter
{

            protected Weapon m_Weapon = null;

    publicvoid SetWeapon(IWeapon weapon)
    {
        if (m_Weapon != null)
            m_Weapon.Release();
        m_Weapon = weapon;
        //设置武器拥有者
        m_Weapon.SetOwener(this);
    }

    //获取武器public IWeapon GetWeapon()
    {
        return m_Weapon;
    }

    protectedvoid SetWeaponAtkPlusValue(int value)
    {
        m_Weapon.SetAtkPlusValue(value);
    }

    protectedvoid WeaponAttackTarget(ICharacter target)
    {
        m_Weapon.Fire(target);
    }

    //获取武器攻击力publicvoid GetAtkValue()
    {
        return m_Weapon.GetAtkValue();
    }

    ///<summary>/// 获得攻击距离
    ///</summary>///<returns></returns>publicfloat GetAttackRange()
    {
        return m_Weapon.GetAtkRange();
    }
    ///<summary>/// 攻击目标
    ///</summary>///<param name="target"></param>publicabstractvoid Attack(ICharacter target);
    ///<summary>/// 被其他角色攻击
    ///</summary>///<param name="attacker"></param>publicabstractvoid UnderAttack(ICharacter attacker);
}
- 桥接模式角色实现
            //
            角色接口
            public
            class
             ISolider : ICharacter
{

            public
            override
            void
             Attack(ICharacter target)
    {
        WeaponAttackTarget(target);
    }


            public
            override
            void
             UnderAttack(ICharacter attacker)
    {
        ...
    }
}


            //
            Enemy接口
            public
            class
             IEnemy:ICharacter
{

            public
            override
            void
             Attack(ICharacter target)
    {
        SetWeaponAtkPlusValue(m_Weapon.GetAtkPlusValue);
        WeaponAttackTarget(target);
    }


            public
            override
            void
             UnderAttack(ICharacter attacker)
    {
        ...
    }
}
4.桥接模式改造后分析
以上设计运用桥接模式后的ICharacter就是群组”抽象类”,它定义了”攻击目标”功能,但实现攻击目标功能的却是群组”IWeapon武器类”,对于ICharacter以及其继承都不会理会IWeapon群组的变化,尤其在新增武器类的时候也不会影响角色类。对于ICharacter来说,它面对的指示IWeapon这个接口类,这让两个群组耦合度降到最低。
5.思考
结合以上案例,可以思考另外一个需求:用不同的图形渲染引擎如OpenGL、DirectX来绘制不同的图形。
提示:渲染引擎RenderEngine和图形属于两大群体,这两大群体都要单独有各自的“抽象类”抽象类RenderEngine和抽象类Shape。
- 抽象类RenderEngine肯定要有一个抽象功能方法就是Draw(string shape),这个是被子类具体的渲染引擎重写,因为各自的引擎都有自己独特的渲染方法,所以这个Draw方法就被重写调用各个引擎自己的渲染方法GLRender()和DXRender()。
- 抽象类Shape肯定也要有一个保护对象RenderEngine和设置这个对象的注入方法SetRenderEngine(RenderEngine engine)以及抽象方法Draw()。Draw方法是要被子类重写实现:调用renderEngine的Draw方法来绘制自己。
原文:http://www.cnblogs.com/dingxiaowei/p/7516694.html
内容总结
以上是互联网集市为您收集整理的[Unity 设计模式]桥接模式(BridgePattern)全部内容,希望文章能够帮你解决[Unity 设计模式]桥接模式(BridgePattern)所遇到的程序开发问题。 如果觉得互联网集市技术教程内容还不错,欢迎将互联网集市网站推荐给程序员好友。
内容备注
版权声明:本文内容由互联网用户自发贡献,该文观点与技术仅代表作者本人。本站仅提供信息存储空间服务,不拥有所有权,不承担相关法律责任。如发现本站有涉嫌侵权/违法违规的内容, 请发送邮件至 gblab@vip.qq.com 举报,一经查实,本站将立刻删除。
内容手机端
扫描二维码推送至手机访问。